
Create MicroEJ Platform Build and Run Scripts
This training describes all the steps to create MicroEJ Platform build and run scripts and shows how to use them.
Intended Audience
The audience for this document is Platform engineers who want to
validate their MicroEJ Platform using automated MicroEJ testsuites.
prepare their MicroEJ Platform for automated builds and continuous integration using MicroEJ Module Manager.
ease MicroEJ Standalone Application development by simplifying the Firmware build for Java developers.
configure their MicroEJ Platform with full BSP connection.
Prerequisites
This training is a direct continuation of Create a MicroEJ Firmware From Scratch training. It should have been completed before starting this one.
Introduction
Build and Run scripts are normalized entry points to
build a MicroEJ Firmware linked to the Board Support Package,
deploy and run the Firmware on a device.
External tools only need to run these scripts without additional knowledge about the toolchain or deployment tools.
See Build Script File and Run Script File sections for more information about these scripts. Script examples are provided in Platform Qualification Tools repository.
Overview
In the previous Create a MicroEJ Firmware From Scratch training, the final binary is produced by invoking make in the FreeRTOS BSP. The command to type is dependant of the toolchain used. The Firmware is then executed in QEMU but could have been instead flashed to a device with another specific command. This training explains how to write build and run scripts for these two tasks.
The next sections will
describe step-by-step how to create the build and run scripts both for unix-like systems (Bash scripts) and Windows systems (batch files). These scripts automate Firmware build and execution in QEMU as presented in Create a MicroEJ Firmware From Scratch training.
show a practical usage of these scripts in a MicroEJ development flow. This will allow to configure a MicroEJ Standalone Application to build the Firmware in MicroEJ SDK.
Finally, this training describes how to convert the MicroEJ Platform from partial BSP connection to full BSP connection.
Create Build and Run Scripts
This section describes how to write build and run scripts.
There are two scripts:
build.[sh|bat]which calls the C toolchain to build and link the Firmware file. It also ensures that the output file is calledapplication.outand is located in the directory from where the script was called.run.[sh|bat]which deploys and runsapplication.outon the device. In this training, it will only run the Firmware with QEMU instead of flashing it on real hardware.
Each of these scripts come in two flavors: .sh for unix-like systems, and .bat for Windows systems.
First, create a microej/scripts directory in BSP project:
$ pwd
/mnt/c/Users/user/src/tuto-from-scratch/FreeRTOS/FreeRTOS/Demo/CORTEX_LM3S6965_GCC
$ mkdir microej/scripts
Note
The scripts created in the next sections will be put in this directory.
Create build.sh and run.sh Scripts
Warning
Make sure the build and run scripts have the execution permission.
Create a file called
build.shin themicroej/scriptsdirectory with the following content:
#!/bin/bash

# Save application current directory and jump one level above scripts
CURRENT_DIRECTORY=$(pwd)

# Move to the directory where the Makefile is
cd $(dirname "$0")/../..

# Build the firmware
make

# Copy output the the current directory while renaming it
cp gcc/RTOSDemo.bin  $CURRENT_DIRECTORY/application.out

# Restore application directory
cd $CURRENT_DIRECTORY/
Verify that the script successfully built your Firmware and put it in the current directory with the name
application.out.
$ pwd
/mnt/c/Users/user/src/tuto-from-scratch/FreeRTOS/FreeRTOS/Demo/CORTEX_LM3S6965_GCC
$ make clean
$ microej/scripts/build.sh
  CC    init/startup.c
  CC    main.c
  CC    ../../Source/list.c
  CC    ../../Source/queue.c
  CC    ../../Source/tasks.c
[..]
  130 |  __attribute__( ( always_inline ) ) static inline uint8_t ucPortCountLeadingZeros( uint32_t ulBitmap )
      |                                                           ^~~~~~~~~~~~~~~~~~~~~~~
  LD    gcc/RTOSDemo.axf
$ ls *.out
application.out
Check that
application.outsuccessfully runs with QEMU:
$ qemu-system-arm -M lm3s6965evb -nographic -kernel application.out
Hello, World! printf function is working.
Hello World!
QEMU: Terminated // press Ctrl-a x to end the QEMU session
Create a file called
run.shin themicroej/scriptsdirectory with the following content:
#!/bin/bash

# Add some text to the console before launch
echo -e "\033[0;32m## Start application in QEMU."
echo -e "## Use 'Ctrl-a x' to quit.\e[0m"

# Launch application with QEMU
qemu-system-arm -M lm3s6965evb -nographic -kernel application.out
We can now run the Firmware we just built with the
run.shscript:
$ pwd
/mnt/c/Users/user/src/tuto-from-scratch/FreeRTOS/FreeRTOS/Demo/CORTEX_LM3S6965_GCC
$ microej/scripts/run.sh
## Start application in QEMU.
## Use 'Ctrl-a x' to quit.
Hello, World! printf function is working.
Hello World!
Note
This script is very simple because our Firmware is just run with QEMU instead of real hardware. To deploy the Firmware on a device, the script would have to setup and call a flash tool. See for instance the build and run scripts for Espressif-ESP-WROVER-KIT-V4.1.
Create build.bat and run.bat Scripts
As our toolchain has only been configured for Linux in WSL, we create wrappers that call shell scripts through WSL. We could also decide to directly invoke QEMU for Windows instead. This is just an implementation choice for this Platform.
Create a file called
build.batin themicroej/scriptsdirectory with the following content:
@echo off
SETLOCAL ENABLEEXTENSIONS

REM Reset ERRORLEVEL between multiple run in the same shell
SET ERRORLEVEL=0

REM Save application current directory and jump to scripts directory
SET CURRENT_DIRECTORY=%CD%
CD "%~dp0"

REM Get the script directory in a Unix path format
FOR /F %%i in ('WSL pwd') DO SET SCRIPT_DIRECTORY=%%i

REM Restore application directory
CD %CURRENT_DIRECTORY%

REM Run the bash build script with WSL
WSL %SCRIPT_DIRECTORY%/build.sh

IF %ERRORLEVEL% NEQ 0 (
      EXIT /B %ERRORLEVEL%
)
Calling this script in PowerShell should produce the following result:
PS C:\Users\user\src\tuto-from-scratch\FreeRTOS\FreeRTOS\Demo\CORTEX_LM3S6965_GCC> microej\scripts\build.bat
  CC    init/startup.c
  CC    main.c
  CC    ../../Source/list.c
  CC    ../../Source/queue.c
  CC    ../../Source/tasks.c
 [...]
  CC    microej/src/LLMJVM_stub.c
  LD    gcc/RTOSDemo.axf
Current DIR /mnt/c/Users/user/src/tuto-from-scratch/FreeRTOS/FreeRTOS/Demo/CORTEX_LM3S6965_GCC/microej/scripts
        1 file(s) moved.
Note
This prints the full build output if it is the first build (or after a make clean) otherwise it prints make: Nothing to be done for 'all'.
Create a file called
run.batin themicroej/scriptsdirectory with the following content:
@echo off
SETLOCAL ENABLEEXTENSIONS

REM Reset ERRORLEVEL between multiple run in the same shell
SET ERRORLEVEL=0

REM Save application current directory and jump to scripts directory
SET CURRENT_DIRECTORY=%CD%
CD "%~dp0"

REM Get the script directory in a Unix path format
FOR /F %%i in ('WSL pwd') DO SET SCRIPT_DIRECTORY=%%i

REM Restore application directory
CD %CURRENT_DIRECTORY%

REM Run the bash run script with WSL
WSL %SCRIPT_DIRECTORY%/run.sh

IF %ERRORLEVEL% NEQ 0 (
    EXIT /B %ERRORLEVEL%
)
Calling this script in PowerShell should produce the following result:
C:\Users\user\src\tuto-from-scratch\FreeRTOS\FreeRTOS\Demo\CORTEX_LM3S6965_GCC\application.out
1 file(s) copied.
## Start application in QEMU.
## Use 'Ctrl-a x' to quit.
Hello, World! printf function is working.
Hello World!
Use Build Script in MicroEJ SDK
In this section, we illustrate how build script is used in practice to ease the Firmware build for Java developers in MicroEJ SDK.
We will configure a MicroEJ Standalone Application to enable full Firmware build (application + BSP + link) when building the HelloWorld application.
We will then configure a full BSP connection. This will remove the need to configure the path of the BSP root directory as a MicroEJ Standalone Application option. Please refer to BSP connection cases section and BSP connection options for more details.
Note
Build and run scripts do not require to configure a full BSP connection. This last part has only been added to allow a MicroEJ Standalone Application project to be built independently from the BSP.
Build Firmware from MicroEJ SDK
Right click on the
HelloWorldapplication projectIn the menu, select Run As > Run Configurations…
Select the Configuration tab
Select Device > Deploy entry in the configurations menu
Check Execute the MicroEJ script (build.bat) at the location known by the 3rd-party BSP project checkbox
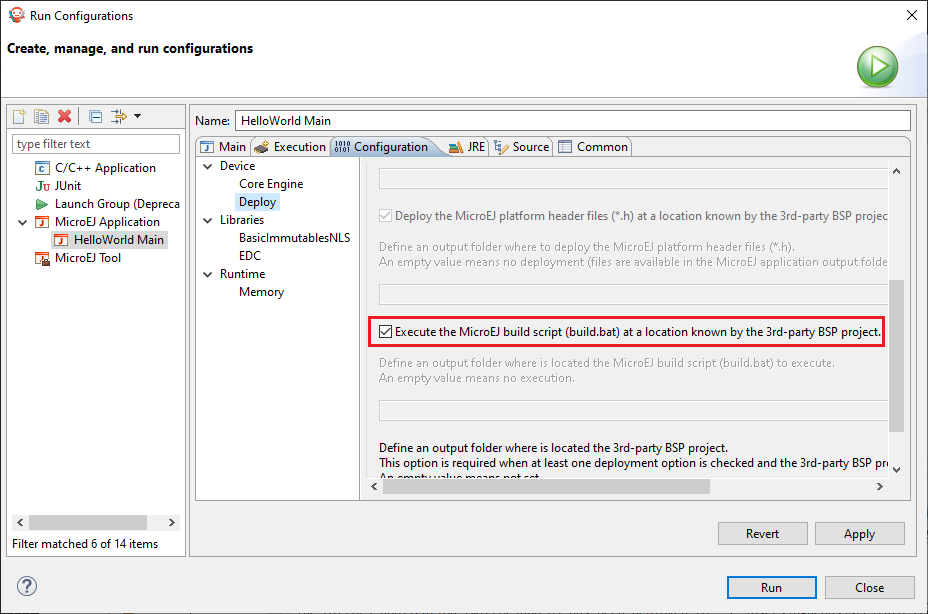
Click on the Run button. It should print the following:
=============== [ Initialization Stage ] ===============
Platform connected to BSP location 'C:\Users\user\src\tuto-from-scratch\FreeRTOS\FreeRTOS\Demo\CORTEX_LM3S6965_GCC' using application option 'deploy.bsp.root.dir'.
[INFO ] Launching in Evaluation mode. Your UID is 0120202834374C4A.
=============== [ Launching SOAR ] ===============
=============== [ Launching Link ] ===============
=============== [ Deployment ] ===============
MicroEJ files for the 3rd-party BSP project are generated to 'C:\Users\user\src\tuto-from-scratch\workspace\HelloWorld\com.mycompany.Main\platform'.

FAIL
The following error occurred while executing this line:
C:\Users\user\src\tuto-from-scratch\workspace\lm3s811evb-Platform-CM0_GCC48-0.0.1\source\scripts\deploy.xml:30: The following error occurred while executing this line:
C:\Users\user\src\tuto-from-scratch\workspace\lm3s811evb-Platform-CM0_GCC48-0.0.1\source\scripts\deployInBSP.xml:97: The following error occurred while executing this line:
C:\Users\user\src\tuto-from-scratch\workspace\lm3s811evb-Platform-CM0_GCC48-0.0.1\source\scripts\deployInBSP.xml:260: Option 'deploy.bsp.microejscript' is enabled but this Platform does no define a well-known location. Either update the Platform configuration (option 'deploy.bsp.microejscript.relative.dir' in 'bsp/bsp.properties') or disable this option.
Edit the file
bsp/bsp.propertiesas follow:
# Specify BSP external scripts files ('build.bat' and 'run.bat') parent directory.
# This is a '/' separated directory relative to 'bsp.root.dir'.
microejscript.relative.dir=microej/scripts
Rebuild your Platform (right-click on the platform configuration project and click on Build Module)
Run the HelloWorld launcher once again. This should print the following result:
=============== [ Initialization Stage ] ===============
Platform connected to BSP location 'C:\Users\user\src\tuto-from-scratch\FreeRTOS\FreeRTOS\Demo\CORTEX_LM3S6965_GCC' using platform option 'deploy.bsp.root.dir'.
[INFO ] Launching in Evaluation mode. Your UID is 0120202834374C4A.=============== [ Launching SOAR ] ===============
=============== [ Launching Link ] ===============
=============== [ Deployment ] ===============
MicroEJ files for the 3rd-party BSP project are generated to 'C:\Users\user\Workspaces\_test_fw_tuto\HelloWorld\com.mycompany.Main\platform'.
The MicroEJ application (microejapp.o) has been deployed to: 'C:\Users\user\src\tuto-from-scratch\FreeRTOS\FreeRTOS\Demo\CORTEX_LM3S6965_GCC\microej\lib'.
The MicroEJ platform library (microejruntime.a) has been deployed to: 'C:\Users\user\src\tuto-from-scratch\FreeRTOS\FreeRTOS\Demo\CORTEX_LM3S6965_GCC\microej\lib'.
The MicroEJ platform header files (*.h) have been deployed to: 'C:\Users\user\src\tuto-from-scratch\FreeRTOS\FreeRTOS\Demo\CORTEX_LM3S6965_GCC\microej\inc'.
Execution of script 'C:\Users\user\src\tuto-from-scratch\FreeRTOS\FreeRTOS\Demo\CORTEX_LM3S6965_GCC\microej\scripts\build.bat' started...
LD    gcc/RTOSDemo.axf
Current DIR /mnt/c/Users/user/Workspaces/_test_fw_tuto/HelloWorld/com.mycompany.Main
Execution of script 'C:\Users\user\src\tuto-from-scratch\FreeRTOS\FreeRTOS\Demo\CORTEX_LM3S6965_GCC\microej\scripts\build.bat' done.
=============== [ Completed Successfully ] ===============

SUCCESS
Reading the traces, we see that the HelloWorld application (microejapp.o) and the MicroEJ Platform library (microejruntime.a) have been deployed to the suitable BSP location.
Then the build.bat script has been executed to rebuild the BSP and link the Firmware. The output is the application.out binary that can be flashed on the device (or run on QEMU).
Convert from partial BSP connection to full BSP connection (optional)
In this section, we configure the BSP root directory in the Platform. Such configuration is called full BSP connection: the MicroEJ Platform includes the BSP, and any MicroEJ Standalone Application can be built against this MicroEJ Platform without extra configuration.
When launching the HelloWorld application from MicroEJ SDK, the launcher knows how to find the BSP because we have configured its path in HelloWorld/build/emb.properties file which is imported in the launcher
(this file has been configured in Create a MicroEJ Firmware From Scratch training).
Cut
deploy.bsp.root.dirproperty value fromHelloWorld/build/emb.propertiesfilePaste the value in
bsp/bsp.propertiesas follow:
# Specify the BSP root directory. Can use ${project.parent.dir} which target the parent of platform configuration project
# For example, '${workspace}/${project.prefix}-bsp' specifies a BSP project beside the '-configuration' project
root.dir=[absolute_path] to FreeRTOS\\FreeRTOS\\Demo\\CORTEX_LM3S811_GCC
Rebuild your MicroEJ Platform (right-click on the platform configuration project and click on Build Module)
The MicroEJ Platform is now fully connected to the BSP.
Launch
HelloWorldproject from Eclipse launcher, it should print the following result:
=============== [ Initialization Stage ] ===============
Platform connected to BSP location 'C:\Users\user\src\tuto-from-scratch\FreeRTOS\FreeRTOS\Demo\CORTEX_LM3S6965_GCC' using platform option 'root.dir' in 'bsp/bsp.properties'.
[INFO ] Launching in Evaluation mode. Your UID is 0120202834374C4A.
=============== [ Launching SOAR ] ===============
=============== [ Launching Link ] ===============
=============== [ Deployment ] ===============
MicroEJ files for the 3rd-party BSP project are generated to 'C:\Users\user\src\tuto-from-scratch\workspace\HelloWorld\com.mycompany.Main\platform'.
The MicroEJ application (microejapp.o) has been deployed to: 'C:\Users\user\src\tuto-from-scratch\FreeRTOS\FreeRTOS\Demo\CORTEX_LM3S6965_GCC\microej\lib'.
The MicroEJ platform library (microejruntime.a) has been deployed to: 'C:\Users\user\src\tuto-from-scratch\FreeRTOS\FreeRTOS\Demo\CORTEX_LM3S6965_GCC\microej\lib'.
The MicroEJ platform header files (*.h) have been deployed to: 'C:\Users\user\src\tuto-from-scratch\FreeRTOS\FreeRTOS\Demo\CORTEX_LM3S6965_GCC\microej\inc'.
Execution of script 'C:\Users\user\src\tuto-from-scratch\FreeRTOS\FreeRTOS\Demo\CORTEX_LM3S6965_GCC\microej\scripts\build.bat' started...
  LD    gcc/RTOSDemo.axf
Current DIR /mnt/c/Users/user/src/tuto-from-scratch/FreeRTOS/FreeRTOS/Demo/CORTEX_LM3S6965_GCC/microej/scripts
Execution of script 'C:\Users\user\src\tuto-from-scratch\FreeRTOS\FreeRTOS\Demo\CORTEX_LM3S6965_GC  C\microej\scripts\build.bat' done.
=============== [ Completed Successfully ] ===============

SUCCESS
Note
You can notice the difference in the second line of the trace that now says that the connection is
using platform option root.dir' in 'bsp/bsp.properties'instead ofusing platform option 'deploy.bsp.root.dir'in the previous launch.The application launcher does not know anymore where the BSP is located. Nevertheless it still builds a Firmware ready to be flashed. The link to the BSP is now configured in the MicroEJ Platform. Any MicroEJ Standalone Application can be built against this MicroEJ Platform with no BSP specific option.
Going Further
More about build and run scripts in Build Script File and Run Script File sections
Some build scripts examples from Platform Qualification Tools
Follow the Configure and Run the Testsuite documentation to learn how to run an automated testsuite
Perform the Setup an Automated Build using Jenkins and Artifactory training to learn how to automate the build of a MicroEJ Platform module