
Create a MicroEJ Firmware From Scratch
This training explains how to create a MicroEJ Firmware from scratch. It goes through the typical steps followed by a Firmware developer integrating MicroEJ with a C Board Support Package (BSP) for a target device.
In this training, the target device is a Luminary Micro Stellaris. Though this device is no longer available on the market, it has two advantages:
The QEMU PC System emulator can emulate the device.
FreeRTOS provides an official Demo BSP.
Consequently, no board is required to follow this training. Everything is emulated on the developer’s PC.
The training should take 1 hour to complete (excluding the installation time of MicroEJ SDK and Windows Subsystem Linux (WSL)).
Intended Audience
The audience for this document is Firmware engineers who want to understand how MicroEJ is integrated to a C Board Support Package.
In addition, this training should be of interest to all developers wishing to familiarize themselves with the low level components of a MicroEJ Firmware such as: MicroEJ Architecture, MicroEJ Platform, Low Level API and BSP connection.
Introduction
The following steps are usually followed when starting a new project:
Pick a target device (that meets the requirements of the project).
Setup a RTOS and a toolchain that support the target device.
Adapt the RTOS port if needed.
Install a MicroEJ Architecture that matches the target device/RTOS/toolchain.
Setup a new MicroEJ Platform connected to the Board Support Package (BSP).
Implement Low Level API.
Validate the resulting MicroEJ Platform with the Platform Qualification Tools (PQT).
Develop the MicroEJ Application.
This training describes step by step how to go from the FreeRTOS BSP
to a MicroEJ Application that runs on the MicroEJ Platform and prints
the classic "Hello, World!".
In this training:
The target device is a Luminary Micro Stellaris which is emulated by QEMU (QEMU Stellaris boards).
The RTOS is FreeRTOS and the toolchain is GNU CC for ARM.
All modifications to FreeRTOS BSP made for this training are available at https://github.com/MicroEJ/FreeRTOS/tree/tuto-microej-firmware-from-scratch.
Note
The implementation of the Low Level API and their validation with the Platform Qualification Tools (PQT) will be the topic of another training.
Prerequisites
MicroEJ SDK 5 from version 5.3.0 to latest (distribution 20.10). Can be downloaded from https://repository.microej.com/packages/SDK (tested on MicroEJ SDK distribution 20.10)
Windows 10 or higher with Windows Subsystem for Linux (WSL). See the installation guide.
A Linux distribution installed on WSL (Tested on Ubuntu 19.10 eoan and Ubuntu 20.04 focal).
Note
In WSL, use the command
lsb_release -ato print the current Ubuntu version.
A code editor such as Visual Studio Code is also recommended to edit BSP files.
Overview
The next sections describe step by step how to build a MicroEJ Firmware that runs a HelloWorld MicroEJ Application on the emulated device.
The steps to follow are:
Setup the development environment (assuming the prerequisites are satisfied).
Get a running BSP
Build the MicroEJ Platform
Create the HelloWorld MicroEJ Application
Implement the minimum Low Level API to run the application
This training goes through trials and errors every Firmware developers may encounter. It provides a solution after each error rather than providing the full solution in one go.
Setup the Development Environment
This section assumes the prerequisites have been properly installed.
In WSL:
Update apt’s cache:
sudo apt-get updateInstall qemu-system-arm and GNU CC toolchain for ARM:
sudo
apt-get install -y qemu-system-arm gcc-arm-none-eabi
build-essential subversion
The rest of this training will use the folder
src/tuto-from-scratch/in the Windows home folder.Create the folder:
mkdir -p /mnt/c/Users/${USER}/src/tuto-from-scratch(the-poption ensures all the directories are created).Go into the folder:
cd
/mnt/c/Users/${USER}/src/tuto-from-scratch/
Clone FreeRTOS and its submodules:
git clone -b
V10.3.1 --recursive https://github.com/FreeRTOS/FreeRTOS.git
(this may takes some time)
Note
Use the right-click to paste from the Windows clipboard into WSL console. The right-click is also used to copy from the WSL console into the Windows clipboard.
Get Running BSP
This section presents how to get running BSP based on FreeRTOS that boots on the target device.
Go into the target device sub-project:
cd
FreeRTOS/FreeRTOS/Demo/CORTEX_LM3S811_GCC
Build the project:
makeIgnoring the warnings, the following error appears during the link:
CC    hw_include/osram96x16.c
LD    gcc/RTOSDemo.axf
arm-none-eabi-ld: section .text.startup LMA [0000000000002b24,0000000000002c8f] overlaps section .data LMA [0000000000002b24,0000000000002b27]
make: *** [makedefs:191: gcc/RTOSDemo.axf] Error 1
Insert the following fixes in the linker script file named
standalone.ld(thanks to http://roboticravings.blogspot.com/2018/07/freertos-on-cortex-m3-with-qemu.html).Note
WSL can start the editor Visual Studio Code. type
code .in WSL..represents the current directory in Unix.diff --git a/FreeRTOS/Demo/CORTEX_LM3S811_GCC/standalone.ld b/FreeRTOS/Demo/CORTEX_LM3S811_GCC/standalone.ld --- a/FreeRTOS/Demo/CORTEX_LM3S811_GCC/standalone.ld +++ b/FreeRTOS/Demo/CORTEX_LM3S811_GCC/standalone.ld @@ -42,7 +42,15 @@ SECTIONS _etext = .; } > FLASH - .data : AT (ADDR(.text) + SIZEOF(.text)) + .ARM.exidx : + { + *(.ARM.exidx*) + *(.gnu.linkonce.armexidx.*) + } > FLASH + + _begin_data = .; + + .data : AT ( _begin_data ) { _data = .; *(vtable)
This is the output of the
git diffcommand. Lines starting with a-should be removed. Lines starting with a+should be added.Note
The
patch(1)can be used to apply the patch. Assuming WSL shell is inFreeRTOS/Demo/CORTEX_LM3S811_GCCdirectory:Install dos2unix utility:
sudo apt install dos2unixConvert all files to unix line-ending:
find -type f -exec
dos2unix {} \;
Copy the content of the code block in a file named
linker.patch(every lines of the code block must be copied in the file).Apply the patch:
patch -l -p4 < linker.patch.
It is also possible to paste the diff directly into the console:
In WSL, invoke
patch -l -p4. The command starts, waiting for input on stdin (the standard input).Copy the diff and paste it in WSL
Press enter
Press
Ctrl-d Ctrl-d(press theControlkey + the letterdtwice).
Run the build again:
makeRun the emulator with the generated kernel:
qemu-system-arm -M
lm3s811evb -nographic -kernel gcc/RTOSDemo.bin
The following error appears and then nothing:
ssd0303: error: Unknown command: 0x80
ssd0303: error: Unexpected byte 0xe3
ssd0303: error: Unknown command: 0x80
ssd0303: error: Unexpected byte 0xe3
ssd0303: error: Unknown command: 0x80
ssd0303: error: Unexpected byte 0xe3
ssd0303: error: Unknown command: 0x80
ssd0303: error: Unexpected byte 0xe3
ssd0303: error: Unknown command: 0x80
ssd0303: error: Unexpected byte 0xe3
ssd0303: error: Unknown command: 0x80
ssd0303: error: Unexpected byte 0xe3
ssd0303: error: Unknown command: 0x80
ssd0303: error: Unexpected byte 0xe3
ssd0303: error: Unknown command: 0x80
ssd0303: error: Unexpected byte 0xe3
ssd0303: error: Unknown command: 0x80
ssd0303: error: Unexpected byte 0xe3
Press
Ctrl-a x(pressControl+ the lettera, release, pressx) to the end the QEMU session. The session ends withQEMU: Terminated.Note
The errors can be safely ignored. They occur because the OLED controller emulated receive incorrect commands.
At this point, the target device is successfully booted with the FreeRTOS kernel.
FreeRTOS Hello World
This section describes how to configure the BSP to print text on the QEMU console.
The datasheet of the target device (LM3S811 datasheet) describes how to use the UART device and an example implementation for QEMU is available here).
Here is the patch that implements putchar(3) and puts(3) and prints
Hello World.
diff --git a/FreeRTOS/Demo/CORTEX_LM3S811_GCC/main.c b/FreeRTOS/Demo/CORTEX_LM3S811_GCC/main.c
--- a/FreeRTOS/Demo/CORTEX_LM3S811_GCC/main.c
+++ b/FreeRTOS/Demo/CORTEX_LM3S811_GCC/main.c
@@ -134,9 +134,25 @@ SemaphoreHandle_t xButtonSemaphore;
 QueueHandle_t xPrintQueue;

 /*-----------------------------------------------------------*/
+#define UART0BASE ((volatile int*) 0x4000C000)
+
+int putchar (int c){
+    (*UART0BASE) = c;
+    return c;
+}
+
+int puts(const char *s) {
+    while (*s) {
+        putchar(*s);
+        s++;
+    }
+    return putchar('\n');
+}

 int main( void )
 {
+    puts("Hello, World! puts function is working.");
+
    /* Configure the clocks, UART and GPIO. */
    prvSetupHardware();
Rebuild and run the newly generated kernel: make &&
qemu-system-arm -M lm3s811evb -nographic -kernel gcc/RTOSDemo.bin
(press Ctrl-a x to interrupt the emulator).
make: Nothing to be done for 'all'.
Hello, World! puts function is working.
ssd0303: error: Unknown command: 0x80
ssd0303: error: Unexpected byte 0xe3
ssd0303: error: Unknown command: 0x80
ssd0303: error: Unexpected byte 0xe3
ssd0303: error: Unknown command: 0x80
ssd0303: error: Unexpected byte 0xe3
ssd0303: error: Unknown command: 0x80
ssd0303: error: Unexpected byte 0xe3
ssd0303: error: Unknown command: 0x80
ssd0303: error: Unexpected byte 0xe3
ssd0303: error: Unknown command: 0x80
ssd0303: error: Unexpected byte 0xe3
ssd0303: error: Unknown command: 0x80
ssd0303: error: Unexpected byte 0xe3
ssd0303: error: Unknown command: 0x80
ssd0303: error: Unexpected byte 0xe3
ssd0303: error: Unknown command: 0x80
ssd0303: error: Unexpected byte 0xe3
QEMU: Terminated
With this two functions implemented, printf(3) is also available.
diff --git a/FreeRTOS/Demo/CORTEX_LM3S811_GCC/main.c b/FreeRTOS/Demo/CORTEX_LM3S811_GCC/main.c
--- a/FreeRTOS/Demo/CORTEX_LM3S811_GCC/main.c
+++ b/FreeRTOS/Demo/CORTEX_LM3S811_GCC/main.c
@@ -149,9 +149,11 @@ int puts(const char *s) {
        return putchar('\n');
 }

+#include <stdio.h>
+
 int main( void )
 {
-       puts("Hello, World! puts function is working.");
+       printf("Hello, World! printf function is working.\n");

        /* Configure the clocks, UART and GPIO. */
        prvSetupHardware();
At this point, the character output on the UART is implemented in the FreeRTOS BSP. The next step is to create the MicroEJ Platform and MicroEJ Application.
Create a MicroEJ Platform
This section describes how to create and configure a MicroEJ Platform compatible with the FreeRTOS BSP and GCC toolchain.
A MicroEJ Architecture is a software package that includes the MicroEJ Runtime port to a specific target Instruction Set Architecture (ISA) and C compiler. It contains a set of libraries, tools and C header files. The MicroEJ Architectures are provided by MicroEJ SDK.
A MicroEJ Platform is a port of a MicroEJ Architecture for a custom device. It contains the MicroEJ configuration and the BSP (C source files).
When selecting a MicroEJ Architecture, special care must be taken to ensure the compatibility between the toolchain used in the BSP and the toolchain used to build the Core Engine included in the MicroEJ Architecture.
The list of MicroEJ Architectures supported is listed here. MicroEJ Evaluation Architectures provided by MicroEJ Corp. can be downloaded from MicroEJ Architectures Repository.
There is no CM3 in MicroEJ Architectures Repository and the Arm®
Cortex®-M3 MCU is not mentioned in the capabilities
matrix. This means that the MicroEJ
Architectures for Arm® Cortex®-M3 MCUs are no longer distributed for
evaluation. Download the latest MicroEJ Architecture for Arm®
Cortex®-M0 instead (the Arm® architectures are binary upward
compatible from Arm®v6-M (Cortex®-M0) to Arm®v7-M (Cortex®-M3)).
Import the MicroEJ Architecture
This step describes how to import a MicroEJ Architecture.
Start MicroEJ SDK on an empty workspace. For example, create an empty folder
workspacenext to theFreeRTOSgit folder and select it.Keep the default MicroEJ Repository
Download the latest MicroEJ Architecture for Arm® Cortex®-M0 instead: https://repository.microej.com/modules/com/microej/architecture/CM0/CM0_GCC48/flopi0G22/maintenance/7.20.3/flopi0G22-7.20.3-eval.xpf
Import the MicroEJ Architecture in MicroEJ SDK
File > Import > MicroEJ > Architectures
select the MicroEJ Architecture file downloaded
Accept the license and click on Finish

Install an Evaluation License
This step describes how to create and activate an Evaluation License for the MicroEJ Architecture previously imported.
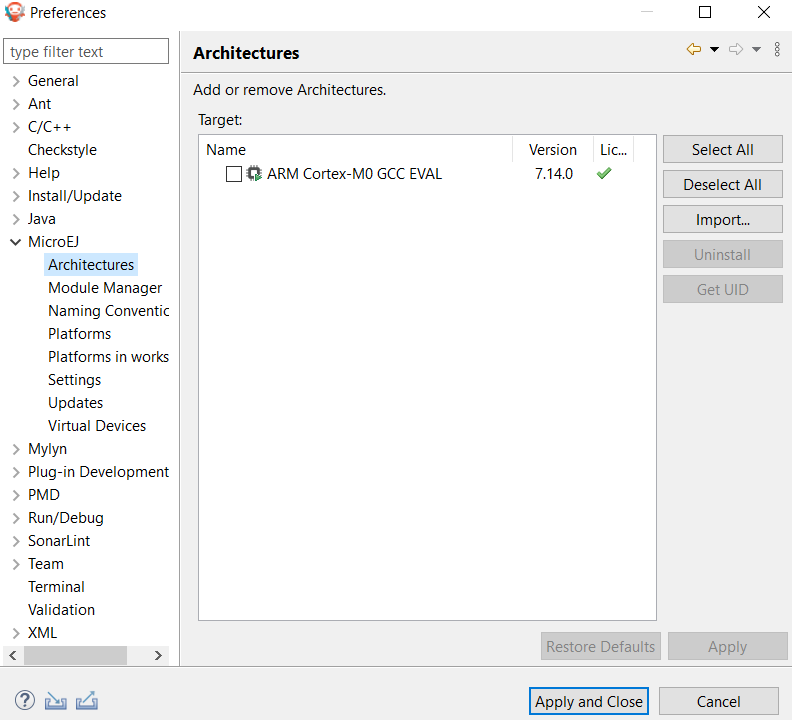
Select the Window > Preferences > MicroEJ > Architectures menu.
Click on the architectures and press Get UID.
Copy the UID. It will be needed when requesting a license.
Go to https://license.microej.com.
Click on Create a new account link.
Create an account with a valid email address. A confirmation email will be sent a few minutes after. Click on the confirmation link in the email and login with the account.
Click on Activate a License.
Set Product
P/N:to9PEVNLDBU6IJ.Set
UID:to the UID generated before.Click on Activate.
The license is being activated. An activation mail should be received in less than 5 minutes. If not, please contact contact our support team.
Once received by email, save the attached zip file that contains the activation key.
Go back to Microej SDK.
Select the Window > Preferences > MicroEJ menu.
Press Add….
Browse the previously downloaded activation key archive file.
Press OK. A new license is successfully installed.
Go to Architectures sub-menu and check that all architectures are now activated (green check).
Microej SDK is successfully activated.
Create the MicroEJ Platform
This step describes how to create a new MicroEJ Platform using the MicroEJ Architecture previously imported.
Select File > New > Platform Project.
Ensure the Architecture selected is the MicroEJ Architecture previously imported.
Ensure the Create from a platform reference implementation box is unchecked.
Click on Next button.
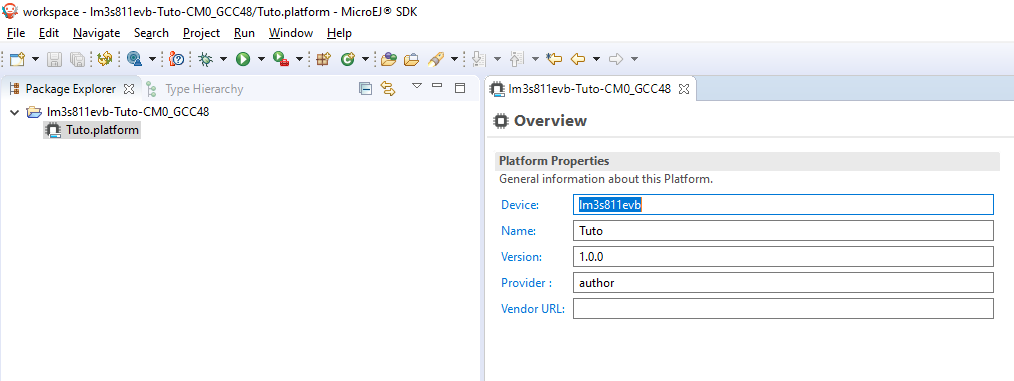
Fill the fields:
Set
Device:tolm3s811evbSet
Name:toTuto
Setup the MicroEJ Platform
This step describes how to configure the MicroEJ Platform previously created. For more information on this topic, please refer to VEE Port Project Creation.
The Platform Configuration Additions
provide a flexible way to configure the BSP connection between the MicroEJ Platform and MicroEJ Application
to the BSP. In this training, the Partial BSP connection is used. That
is, the MicroEJ SDK will output all MicroEJ files (C headers, MicroEJ
Application microejapp.o, MicroEJ Runtime microejruntime.a,
…) in a location known by the BSP. The BSP is configured to compile
and link with those files.
For this training, that means that the final binary is produced by
invoking make in the FreeRTOS BSP.
Install the Platform Configuration Additions by copying all the files within the
contentfolder in the MicroEJ Platform folder.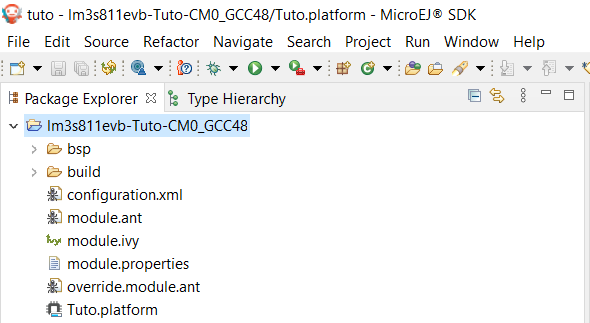
Note
The
contentdirectory contains files that must be installed in a MicroEJ Platform configuration directory (the directory that contains the.platformfile). It can be automatically downloaded using the following command line:svn export --force https://github.com/MicroEJ/VEEPortQualificationTools/tags/2.6.0/framework/platform/content [path_to_platform_configuration_directory]Edit the file
bsp/bsp.propertiesas follow:# Specify the MicroEJ Application file ('microejapp.o') parent directory. # This is a '/' separated directory relative to 'bsp.root.dir'. microejapp.relative.dir=microej/lib # Specify the MicroEJ Platform runtime file ('microejruntime.a') parent directory. # This is a '/' separated directory relative to 'bsp.root.dir'. microejlib.relative.dir=microej/lib # Specify MicroEJ Platform header files ('*.h') parent directory. # This is a '/' separated directory relative to 'bsp.root.dir'. microejinc.relative.dir=microej/inc
Edit the file
module.ivyand add the MicroEJ Architecture as a dependency:<dependencies> <dependency org="com.microej.architecture.CM0.CM0_GCC48" branch="maintenance" name="flopi0G22" rev="7.20.3"> <artifact name="flopi0G22" m:classifier="${com.microej.platformbuilder.architecture.usage}" ext="xpf"/> </dependency> </dependencies>
Edit the file
module.propertiesand set the MicroEJ platform filename:# Platform configuration file (relative to this project). com.microej.platformbuilder.platform.filename=Tuto.platform
Right-click on the platform project and click on
Build Module.The following message appears in the console:
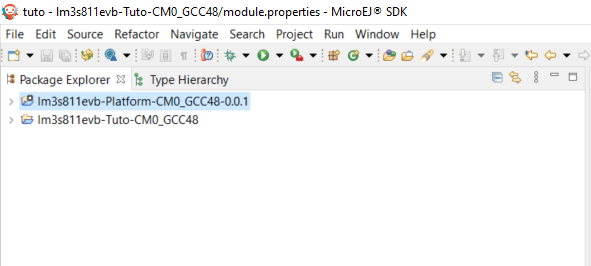
module-platform:report:
        [echo]     ============================================================================================================
        [echo]     Platform has been built in this directory 'C:\Users\user\src\tuto-from-scratch\workspace/lm3s811evb-Platform-CM0_GCC48-0.0.1'.
        [echo]     To import this project in your MicroEJ SDK workspace (if not already available):
        [echo]      - Select 'File' > 'Import...' > 'General' > 'Existing Projects into Workspace' > 'Next'
        [echo]      - Check 'Select root directory' and browse 'C:\Users\user\src\tuto-from-scratch\workspace/lm3s811evb-Platform-CM0_GCC48-0.0.1' > 'Finish'
        [echo]     ============================================================================================================

BUILD SUCCESSFUL
Follow the instructions to import the generated platform in the workspace:
At this point, the MicroEJ Platform is ready to be used to build MicroEJ Applications.
Create MicroEJ Application HelloWorld
Select File > New > Standalone Application Project.
Set the name to
HelloWorldand click on Finish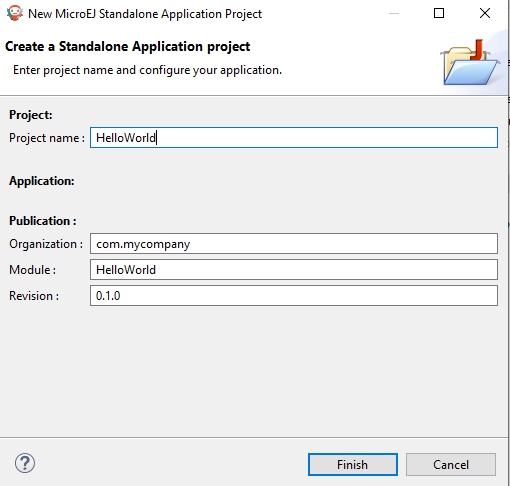
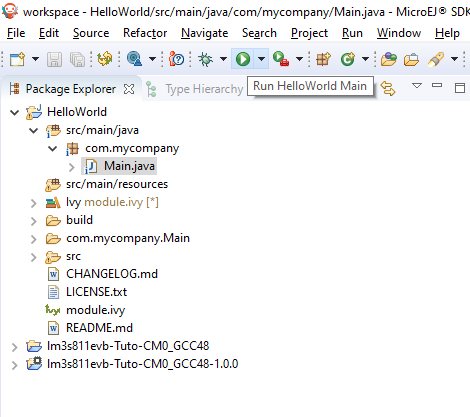
Run the application in Simulator to ensure it is working properly. Right-click on HelloWorld project > Run As > MicroEJ Application
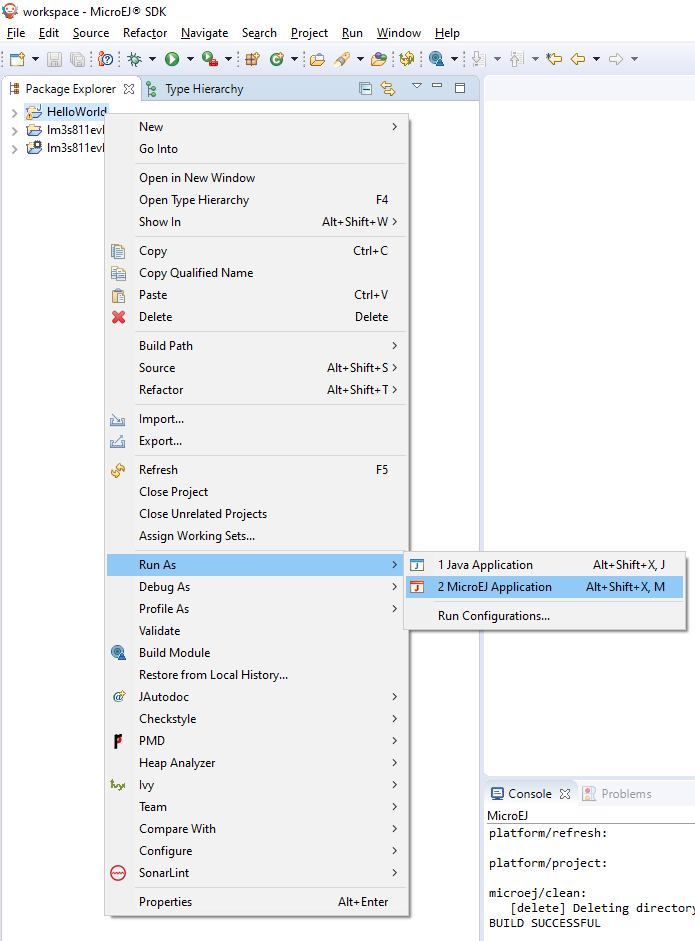
The following message appears in the console:
=============== [ Initialization Stage ] ===============
=============== [ Launching on Simulator ] ===============
Hello World!
=============== [ Completed Successfully ] ===============

SUCCESS
Configure BSP Connection in MicroEJ Application
This step describes how to configure the BSP connection for the HelloWorld MicroEJ Application and how to build the MicroEJ Application that will run on the target device.
For a MicroEJ Application, the BSP connection is configured in the
PROJECT-NAME/build/emb.properties file.
Create a file
HelloWorld/build/emb.propertieswith the following content:core.memory.immortal.size=0 core.memory.javaheap.size=1024 core.memory.threads.pool.size=4 core.memory.threads.size=1 core.memory.thread.max.size=4 deploy.bsp.microejapp=true deploy.bsp.microejlib=true deploy.bsp.microejinc=true deploy.bsp.root.dir=[absolute_path] to FreeRTOS\\FreeRTOS\\Demo\\CORTEX_LM3S811_GCC
Note
Assuming the WSL current directory is
FreeRTOS/FreeRTOS/Demo/CORTEX_LM3S811_GCC, use the following command to find thedeploy.bsp.root.dirpath with proper escaping:pwd | sed -e 's|/mnt/c/|C:\\\\|' -e 's|/|\\\\|g'
Open Run > Run configurations…
Select the HelloWorld launcher configuration
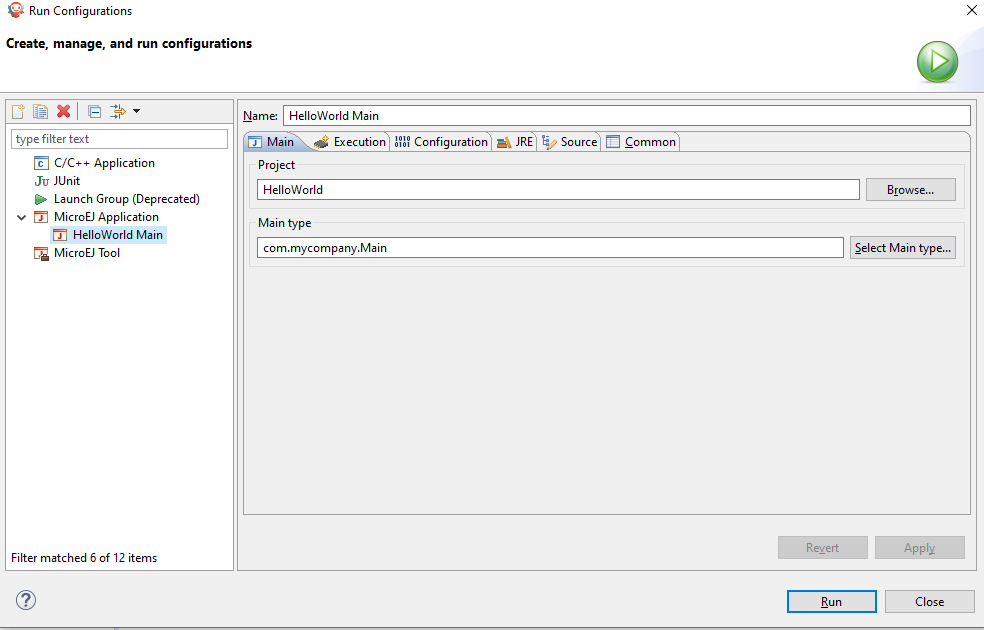
Select Execution tab.
Change the execution mode from Execute on Simulator to Execute on Device.
Add the file
build/emb.propertiesto the options files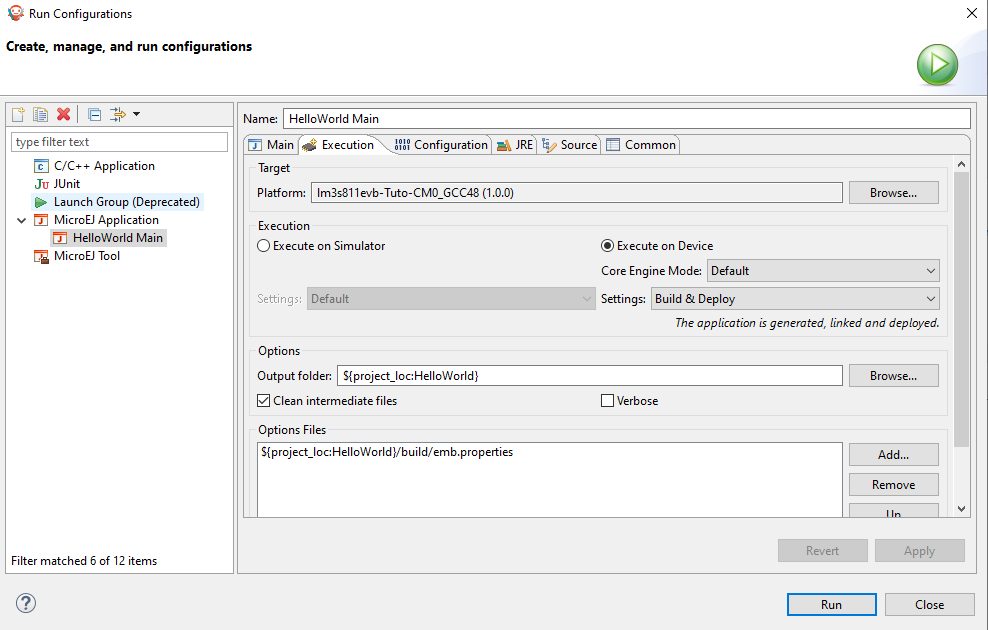
Click on Run
=============== [ Initialization Stage ] ===============
Platform connected to BSP location 'C:\Users\user\src\tuto-from-scratch\FreeRTOS\FreeRTOS\Demo\CORTEX_LM3S811_GCC' using application option 'deploy.bsp.root.dir'.
=============== [ Launching SOAR ] ===============
=============== [ Launching Link ] ===============
=============== [ Deployment ] ===============
MicroEJ files for the 3rd-party BSP project are generated to 'C:\Users\user\src\tuto-from-scratch\workspace\HelloWorld\com.mycompany.Main\platform'.
The MicroEJ application (microejapp.o) has been deployed to: 'C:\Users\user\src\tuto-from-scratch\FreeRTOS\FreeRTOS\Demo\CORTEX_LM3S811_GCC\microej\lib'.
The MicroEJ platform library (microejruntime.a) has been deployed to: 'C:\Users\user\src\tuto-from-scratch\FreeRTOS\FreeRTOS\Demo\CORTEX_LM3S811_GCC\microej\lib'.
The MicroEJ platform header files (*.h) have been deployed to: 'C:\Users\user\src\tuto-from-scratch\FreeRTOS\FreeRTOS\Demo\CORTEX_LM3S811_GCC\microej\inc'.
=============== [ Completed Successfully ] ===============

SUCCESS
At this point, the HelloWorld MicroEJ Application is built and deployed in the FreeRTOS BSP.
MicroEJ and FreeRTOS Integration
This section describes how to finalize the integration between MicroEJ and FreeRTOS to get a working firmware that runs the HelloWorld MicroEJ Application built previously.
In the previous section, when the MicroEJ Application was built,
several files were added to a new folder named microej/.
$ pwd
/mnt/c/Users/user/src/tuto-from-scratch/FreeRTOS/FreeRTOS/Demo/CORTEX_LM3S811_GCC
$ tree microej/
microej/
├── inc
│   ├── BESTFIT_ALLOCATOR.h
│   ├── BESTFIT_ALLOCATOR_impl.h
│   ├── LLBSP_impl.h
│   ├── LLMJVM.h
│   ├── LLMJVM_MONITOR_impl.h
│   ├── LLMJVM_impl.h
│   ├── LLTRACE_impl.h
│   ├── MJVM_MONITOR.h
│   ├── MJVM_MONITOR_types.h
│   ├── intern
│   │   ├── BESTFIT_ALLOCATOR.h
│   │   ├── BESTFIT_ALLOCATOR_impl.h
│   │   ├── LLBSP_impl.h
│   │   ├── LLMJVM.h
│   │   ├── LLMJVM_impl.h
│   │   └── trace_intern.h
│   ├── sni.h
│   └── trace.h
└── lib
    ├── microejapp.o
    └── microejruntime.a

3 directories, 19 files
The
microej/libfolder contains the HelloWorld MicroEJ Application object file (microejapp.o) and the MicroEJ Runtime. The final binary must be linked with these two files.The
microej/incfolder contains several C header files used to expose MicroEJ Low Level APIs. The functions defined in files ending with the_impl.hsuffix should be implemented by the BSP.
To summarize, the following steps remain to complete the integration between MicroEJ and the FreeRTOS BSP:
Implement minimal Low Level APIs
Invoke the Core Engine
Build and link the firmware with the MicroEJ Runtime and MicroEJ Application
Minimal Low Level APIs
The purpose of this training is to demonstrate how to develop a minimal MicroEJ Architecture, it is not to develop a complete MicroEJ Architecture. Therefore this training implements only the required functions and provides stub implementation for unused features. For example, the following implementation does not support scheduling.
The two headers that must be implemented are LLBSP_impl.h and
LLMJVM_impl.h.
In the BSP, create a folder named
microej/src(next to themicroej/libandmicroej/incfolders).Implement
LLBSP_impl.hinLLBSP.c:microej/src/LLBSP.c#include "LLBSP_impl.h" extern void _etext(void); uint8_t LLBSP_IMPL_isInReadOnlyMemory(void* ptr) { return ptr < &_etext; } /** * Writes the character <code>c</code>, cast to an unsigned char, to stdout stream. * This function is used by the default implementation of the Java <code>System.out</code>. */ void LLBSP_IMPL_putchar(int32_t c) { putchar(c); }
The implementation of
LLBSP_IMPL_putcharreuses theputcharimplemented previously.The
rodatasection is defined in the linker scriptstandalone.ld. The flash memory starts at 0 and the end of the section is stored in the_etexsymbol.
Implement
LLMJVM_impl.hinLLMJVM_stub.c(all functions are stubbed with a dummy implementation):microej/src/LLMJVM_stub.c#include "LLMJVM_impl.h" int32_t LLMJVM_IMPL_initialize() { return LLMJVM_OK; } int32_t LLMJVM_IMPL_vmTaskStarted() { return LLMJVM_OK; } int32_t LLMJVM_IMPL_scheduleRequest(int64_t absoluteTime) { return LLMJVM_OK; } int32_t LLMJVM_IMPL_idleVM() { return LLMJVM_OK; } int32_t LLMJVM_IMPL_wakeupVM() { return LLMJVM_OK; } int32_t LLMJVM_IMPL_ackWakeup() { return LLMJVM_OK; } int32_t LLMJVM_IMPL_getCurrentTaskID() { return (int32_t) 123456; } void LLMJVM_IMPL_setApplicationTime(int64_t t) { } int64_t LLMJVM_IMPL_getCurrentTime(uint8_t system) { return 0; } int64_t LLMJVM_IMPL_getTimeNanos() { return 0; } int32_t LLMJVM_IMPL_shutdown(void) { return LLMJVM_OK; }
The microej folder in the BSP has the following structure:
$ pwd
/mnt/c/Users/user/src/tuto-from-scratch/FreeRTOS/FreeRTOS/Demo/CORTEX_LM3S811_GCC
$ tree microej/
microej/
├── inc
│   ├── BESTFIT_ALLOCATOR.h
│   ├── BESTFIT_ALLOCATOR_impl.h
│   ├── LLBSP_impl.h
│   ├── LLMJVM.h
│   ├── LLMJVM_MONITOR_impl.h
│   ├── LLMJVM_impl.h
│   ├── LLTRACE_impl.h
│   ├── MJVM_MONITOR.h
│   ├── MJVM_MONITOR_types.h
│   ├── intern
│   │   ├── BESTFIT_ALLOCATOR.h
│   │   ├── BESTFIT_ALLOCATOR_impl.h
│   │   ├── LLBSP_impl.h
│   │   ├── LLMJVM.h
│   │   ├── LLMJVM_impl.h
│   │   └── trace_intern.h
│   ├── sni.h
│   └── trace.h
├── lib
│   ├── microejapp.o
│   └── microejruntime.a
└── src
    ├── LLBSP.c
    └── LLMJVM_stub.c

4 directories, 21 files
Invoke the Core Engine
The Core Engine is created and initialized with the C function
SNI_createVM. Then it is started and executed in the current RTOS
task by calling SNI_startVM. The function SNI_startVM returns
when the MicroEJ Application exits. Both functions are declared in the
C header sni.h.
diff --git a/FreeRTOS/Demo/CORTEX_LM3S811_GCC/main.c b/FreeRTOS/Demo/CORTEX_LM3S811_GCC/main.c
--- a/FreeRTOS/Demo/CORTEX_LM3S811_GCC/main.c
+++ b/FreeRTOS/Demo/CORTEX_LM3S811_GCC/main.c
@@ -150,11 +150,14 @@ int puts(const char *s) {
 }

 #include <stdio.h>
+#include "sni.h"

 int main( void )
 {
        printf("Hello, World! printf function is working.\n");

+       SNI_startVM(SNI_createVM(), 0, NULL);
+
    /* Configure the clocks, UART and GPIO. */
    prvSetupHardware();
Build and Link the Firmware with the MicroEJ Runtime and MicroEJ Application
To build and link the firmware with the MicroEJ Runtime and MicroEJ Application, the BSP port must be modified to:
Use the MicroEJ header files in folder
microej/incUse the source files folder
microej/srcthat contains the Low Level API implementationLLBSP.candLLMJVM_stub.cCompile and link
LLBSP.oandLLMJVM_stub.oLink with MicroEJ Application (
microej/lib/microejapp.o) and MicroEJ Runtime (microej/lib/microejruntime.a)
The following patch updates the BSP port Makefile to do it:
--- a/FreeRTOS/Demo/CORTEX_LM3S811_GCC/Makefile
+++ b/FreeRTOS/Demo/CORTEX_LM3S811_GCC/Makefile
@@ -29,8 +29,10 @@ RTOS_SOURCE_DIR=../../Source
 DEMO_SOURCE_DIR=../Common/Minimal

 CFLAGS+=-I hw_include -I . -I ${RTOS_SOURCE_DIR}/include -I ${RTOS_SOURCE_DIR}/portable/GCC/ARM_CM3 -I ../Common/include -D GCC_ARMCM3_LM3S102 -D inline=
+CFLAGS+= -I microej/inc

 VPATH=${RTOS_SOURCE_DIR}:${RTOS_SOURCE_DIR}/portable/MemMang:${RTOS_SOURCE_DIR}/portable/GCC/ARM_CM3:${DEMO_SOURCE_DIR}:init:hw_include
+VPATH+= microej/src

 OBJS=${COMPILER}/main.o        \
          ${COMPILER}/list.o    \
@@ -44,9 +46,12 @@ OBJS=${COMPILER}/main.o      \
          ${COMPILER}/semtest.o \
          ${COMPILER}/osram96x16.o

+OBJS+= ${COMPILER}/LLBSP.o ${COMPILER}/LLMJVM_stub.o
+
 INIT_OBJS= ${COMPILER}/startup.o

 LIBS= hw_include/libdriver.a
+LIBS+= microej/lib/microejruntime.a microej/lib/microejapp.o
Then build the firmware with make. The following error occurs at
link time.
  CC    microej/src/LLMJVM_stub.c
  LD    gcc/RTOSDemo.axf                                                                                                                                                                                                                     arm-none-eabi-ld: error: microej/lib/microejruntime.a(sni_vm_startup_greenthread.o) uses VFP register arguments, gcc/RTOSDemo.axf does not
arm-none-eabi-ld: failed to merge target specific data of file microej/lib/microejruntime.a(sni_vm_startup_greenthread.o)
arm-none-eabi-ld: gcc/RTOSDemo.axf section `ICETEA_HEAP' will not fit in region `SRAM'
arm-none-eabi-ld: region `SRAM' overflowed by 4016 bytes
microej/lib/microejapp.o: In function `_java_internStrings_end':
The RAM requirements of the BSP (with printf), FreeRTOS, the MicroEJ Application and MicroEJ Runtime do not fit in the 8k of SRAM. It is possible to link within 8k of RAM by customizing a MicroEJ Tiny-Sandbox on a baremetal device (without a RTOS) but this is not the purpose of this training.
Instead, this training will switch to another device, the Luminary
Micro Stellaris LM3S6965EVB. This device is almost identical as the
LM3S811EVB but it has 256k of flash memory and 64k of SRAM. Updating
the values in the linker script standalone.ld is sufficient to
create a valid BSP port for this device.
Instead of continuing to work with the LM3S811 port, create a copy, named CORTEX_LM3S6965_GCC:
$ cd ..
$ pwd
/mnt/c/Users/user/src/tuto-from-scratch/FreeRTOS/FreeRTOS/Demo
$ cp -r CORTEX_LM3S811_GCC/ CORTEX_LM3S6965_GCC
$ cd CORTEX_LM3S6965_GCC
The BSP path defined by the property deploy.bsp.root.dir in the
MicroEJ Application must be updated as well.
The rest of the training assumes that everything is done in the
CORTEX_LM3S6965_GCC folder.
Then update the linker script standlone.ld:
diff --git a/FreeRTOS/Demo/CORTEX_LM3S6965_GCC/standalone.ld b/FreeRTOS/Demo/CORTEX_LM3S6965_GCC/standalone.ld
--- a/FreeRTOS/Demo/CORTEX_LM3S6965_GCC/standalone.ld
+++ b/FreeRTOS/Demo/CORTEX_LM3S6965_GCC/standalone.ld
@@ -28,8 +28,8 @@

 MEMORY
 {
-    FLASH (rx) : ORIGIN = 0x00000000, LENGTH = 64K
-    SRAM (rwx) : ORIGIN = 0x20000000, LENGTH = 8K
+    FLASH (rx) : ORIGIN = 0x00000000, LENGTH = 256K
+    SRAM (rwx) : ORIGIN = 0x20000000, LENGTH = 64K
 }

 SECTIONS
The new command to run the firmware with QEMU is: qemu-system-arm -M
lm3s6965evb -nographic -kernel gcc/RTOSDemo.bin.
Rebuild the firmware with make. The following error occurs:
CC microej/src/LLMJVM_stub.c
LD gcc/RTOSDemo.axf microej/lib/microejapp.o: In function `_java_internStrings_end':
C:\Users\user\src\tuto-from-scratch\workspace\HelloWorld\com.mycompany.Main\SOAR.o:(.text.soar+0x1b3e): undefined reference to `ist_mowana_vm_GenericNativesPool___com_1is2t_1vm_1support_1lang_1SupportNumber_1parseLong'
C:\Users\user\src\tuto-from-scratch\workspace\HelloWorld\com.mycompany.Main\SOAR.o:(.text.soar+0x1cea): undefined reference to `ist_mowana_vm_GenericNativesPool___com_1is2t_1vm_1support_1lang_1SupportNumber_1toStringLongNative' C:\Users\user\src\tuto-from-scratch\workspace\HelloWorld\com.mycompany.Main\SOAR.o:(.text.soar+0x1e3e): undefined reference to `ist_mowana_vm_GenericNativesPool___com_1is2t_1vm_1support_1lang_1Systools_1appendInteger'
C:\Users\user\src\tuto-from-scratch\workspace\HelloWorld\com.mycompany.Main\SOAR.o:(.text.soar+0x1f2a): undefined reference to `ist_mowana_vm_GenericNativesPool___java_1lang_1System_1getMethodClass'
C:\Users\user\src\tuto-from-scratch\workspace\HelloWorld\com.mycompany.Main\SOAR.o:(.text.soar+0x1e3e): undefined reference to `ist_mowana_vm_GenericNativesPool___com_1is2t_1vm_1support_1lang_1Systools_1appen
... skip ...
C:\Users\user\src\tuto-from-scratch\workspace\HelloWorld\com.mycompany.Main\SOAR.o:(.text.soar+0x31d6): undefined reference to `ist_mowana_vm_GenericNativesPool___java_1lang_1System_1initializeProperties'
C:\Users\user\src\tuto-from-scratch\workspace\HelloWorld\com.mycompany.Main\SOAR.o:(.text.soar+0x37b6): undefined reference to `ist_mowana_vm_GenericNativesPool___java_1lang_1Thread_1storeException'
C:\Users\user\src\tuto-from-scratch\workspace\HelloWorld\com.mycompany.Main\SOAR.o:(.text.soar+0x37c8): undefined reference to `ist_microjvm_NativesPool___java_1lang_1Thread_1execClinit'
microej/lib/microejapp.o: In function `__icetea__getSingleton__com_is2t_microjvm_mowana_VMTask':
C:\Users\user\src\tuto-from-scratch\workspace\HelloWorld\com.mycompany.Main\SOAR.o:(.text.__icetea__getSingleton__com_is2t_microjvm_mowana_VMTask+0xc): undefined reference to `com_is2t_microjvm_mowana_VMTask___getSingleton'
microej/lib/microejapp.o: In function `__icetea__getSingleton__com_is2t_microjvm_IGreenThreadMicroJvm':
... skip ...
microej/lib/microejapp.o: In function `TRACE_record_event_u32x3_ptr':
C:\Users\user\src\tuto-from-scratch\workspace\HelloWorld\com.mycompany.Main\SOAR.o:(.rodata.TRACE_record_event_u32x3_ptr+0x0): undefined reference to `TRACE_default_stub'
microej/lib/microejapp.o: In function `TRACE_record_event_u32x4_ptr':
C:\Users\user\src\tuto-from-scratch\workspace\HelloWorld\com.mycompany.Main\SOAR.o:(.rodata.TRACE_record_event_u32x4_ptr+0x0): undefined reference to `TRACE_default_stub'
microej/lib/microejapp.o:C:\Users\user\src\tuto-from-scratch\workspace\HelloWorld\com.mycompany.Main\SOAR.o:(.rodata.TRACE_record_event_u32x5_ptr+0x0): more undefined references to `TRACE_default_stub' follow
make: *** [makedefs:196: gcc/RTOSDemo.axf] Error 1
This error occurs because microejruntime.a refers to symbols in
microejapp.o but is declared after in the linker command line. By
default, the GNU LD linker does not search unresolved symbols into
archive files loaded previously (see man ld for a description of
the start-group option). To solve this issue, either invert the
declaration of LIBS (put microejapp.o first) or guard the
libraries declaration with --start-group and --end-group in
makedefs. This training uses the later.
diff --git a/FreeRTOS/Demo/CORTEX_LM3S6965_GCC/makedefs b/FreeRTOS/Demo/CORTEX_LM3S6965_GCC/makedefs
--- a/FreeRTOS/Demo/CORTEX_LM3S6965_GCC/makedefs
+++ b/FreeRTOS/Demo/CORTEX_LM3S6965_GCC/makedefs
@@ -196,13 +196,13 @@ ifeq (${COMPILER}, gcc)
echo ${LD} -T ${SCATTER_${notdir ${@:.axf=}}} \
--entry ${ENTRY_${notdir ${@:.axf=}}} \
${LDFLAGSgcc_${notdir ${@:.axf=}}} \
- ${LDFLAGS} -o ${@} ${^} \
- '${LIBC}' '${LIBGCC}'; \
+ ${LDFLAGS} -o ${@} --start-group ${^} \
+ '${LIBC}' '${LIBGCC}' --end-group; \
fi
@${LD} -T ${SCATTER_${notdir ${@:.axf=}}} \
--entry ${ENTRY_${notdir ${@:.axf=}}} \
${LDFLAGSgcc_${notdir ${@:.axf=}}} \
- ${LDFLAGS} -o ${@} ${^} \
- '${LIBC}' '${LIBGCC}'
+ ${LDFLAGS} -o ${@} --start-group ${^} \
+ '${LIBC}' '${LIBGCC}' --end-group
@${OBJCOPY} -O binary ${@} ${@:.axf=.bin}
endif
Rebuild with make. The following error occurs:
LD gcc/RTOSDemo.axf
microej/lib/microejruntime.a(VMCOREMicroJvm__131.o): In function `VMCOREMicroJvm__1131____1_11046':
_131.c:(.text.VMCOREMicroJvm__1131____1_11046+0x20): undefined reference to `fmodf'
microej/lib/microejruntime.a(VMCOREMicroJvm__131.o): In function `VMCOREMicroJvm__1131____1_11045':
_131.c:(.text.VMCOREMicroJvm__1131____1_11045+0x2c): undefined reference to `fmod'
microej/lib/microejruntime.a(iceTea_lang_Math.o): In function `iceTea_lang_Math___cos':
Math.c:(.text.iceTea_lang_Math___cos+0x2a): undefined reference to `cos'
microej/lib/microejruntime.a(iceTea_lang_Math.o): In function `iceTea_lang_Math___sin':
Math.c:(.text.iceTea_lang_Math___sin+0x2a): undefined reference to `sin'
microej/lib/microejruntime.a(iceTea_lang_Math.o): In function `iceTea_lang_Math___tan':
Math.c:(.text.iceTea_lang_Math___tan+0x2a): undefined reference to `tan'
microej/lib/microejruntime.a(iceTea_lang_Math.o): In function `iceTea_lang_Math___acos__D':
Math.c:(.text.iceTea_lang_Math___acos__D+0x18): undefined reference to `acos'
microej/lib/microejruntime.a(iceTea_lang_Math.o): In function `iceTea_lang_Math___acos(void)':
Math.c:(.text.iceTea_lang_Math___acos__F+0x12): undefined reference to `acosf'
microej/lib/microejruntime.a(iceTea_lang_Math.o): In function `iceTea_lang_Math___asin':
Math.c:(.text.iceTea_lang_Math___asin+0x18): undefined reference to `asin'
microej/lib/microejruntime.a(iceTea_lang_Math.o): In function `iceTea_lang_Math___atan':
Math.c:(.text.iceTea_lang_Math___atan+0x2): undefined reference to `atan'
microej/lib/microejruntime.a(iceTea_lang_Math.o): In function `iceTea_lang_Math___atan2':
Math.c:(.text.iceTea_lang_Math___atan2+0x2): undefined reference to `atan2'
microej/lib/microejruntime.a(iceTea_lang_Math.o): In function `iceTea_lang_Math___log':
Math.c:(.text.iceTea_lang_Math___log+0x2): undefined reference to `log'
microej/lib/microejruntime.a(iceTea_lang_Math.o): In function `iceTea_lang_Math_(...)(long long, *)':
Math.c:(.text.iceTea_lang_Math___exp+0x2): undefined reference to `exp'
microej/lib/microejruntime.a(iceTea_lang_Math.o): In function `iceTea_lang_Math_(char,...)(int, long)':
Math.c:(.text.iceTea_lang_Math___ceil+0x2): undefined reference to `ceil'
microej/lib/microejruntime.a(iceTea_lang_Math.o): In function `iceTea_lang_Math___floor':
... skip ...
This error occurs because the Math library is missing. The rule for
linking the firmware is defined in the file makedefs. Replicating
how the libc is managed, the following patch finds the libm.a
library and add it at link time:
diff --git a/FreeRTOS/Demo/CORTEX_LM3S6965_GCC/makedefs b/FreeRTOS/Demo/CORTEX_LM3S6965_GCC/makedefs
--- a/FreeRTOS/Demo/CORTEX_LM3S6965_GCC/makedefs
+++ b/FreeRTOS/Demo/CORTEX_LM3S6965_GCC/makedefs
@@ -102,6 +102,11 @@ LIBGCC=${shell ${CC} -mthumb -march=armv6t2 -print-libgcc-file-name}
#
LIBC=${shell ${CC} -mthumb -march=armv6t2 -print-file-name=libc.a}
+#
+# Get the location of libm.a from the GCC front-end.
+#
+LIBM=${shell ${CC} -mthumb -march=armv6t2 -print-file-name=libm.a}
+
#
# The command for extracting images from the linked executables.
#
@@ -197,12 +202,12 @@ ifeq (${COMPILER}, gcc)
--entry ${ENTRY_${notdir ${@:.axf=}}} \
${LDFLAGSgcc_${notdir ${@:.axf=}}} \
${LDFLAGS} -o ${@} --start-group ${^} \
- '${LIBC}' '${LIBGCC}' --end-group; \
+ '${LIBM}' '${LIBC}' '${LIBGCC}' --end-group; \
fi
@${LD} -T ${SCATTER_${notdir ${@:.axf=}}} \
--entry ${ENTRY_${notdir ${@:.axf=}}} \
${LDFLAGSgcc_${notdir ${@:.axf=}}} \
${LDFLAGS} -o ${@} --start-group ${^} \
- '${LIBC}' '${LIBGCC}' --end-group
+ '${LIBM}' '${LIBC}' '${LIBGCC}' --end-group;
@${OBJCOPY} -O binary ${@} ${@:.axf=.bin}
endif
Rebuild with make. The following error occurs:
CC microej/src/LLMJVM_stub.c
LD gcc/RTOSDemo.axf
/usr/lib/gcc/arm-none-eabi/6.3.1/../../../arm-none-eabi/lib/thumb/libc.a(lib_a-sbrkr.o): In function `_sbrk_r':
/build/newlib-jo3xW1/newlib-2.4.0.20160527/build/arm-none-eabi/thumb/newlib/libc/reent/../../../../../../newlib/libc/reent/sbrkr.c:58: undefined reference to `_sbrk'
make: *** [makedefs:196: gcc/RTOSDemo.axf] Error 1
Instead of implementing a stub _sbrk function, this training uses
the libnosys.a which provides stub implementation for various
functions.
diff --git a/FreeRTOS/Demo/CORTEX_LM3S6965_GCC/makedefs b/FreeRTOS/Demo/CORTEX_LM3S6965_GCC/makedefs
--- a/FreeRTOS/Demo/CORTEX_LM3S6965_GCC/makedefs
+++ b/FreeRTOS/Demo/CORTEX_LM3S6965_GCC/makedefs
@@ -107,6 +107,11 @@ LIBC=${shell ${CC} -mthumb -march=armv6t2 -print-file-name=libc.a}
#
LIBM=${shell ${CC} -mthumb -march=armv6t2 -print-file-name=libm.a}
+#
+# Get the location of libnosys.a from the GCC front-end.
+#
+LIBNOSYS=${shell ${CC} -mthumb -march=armv6t2 -print-file-name=libnosys.a}
+
#
# The command for extracting images from the linked executables.
#
@@ -202,12 +207,12 @@ ifeq (${COMPILER}, gcc)
--entry ${ENTRY_${notdir ${@:.axf=}}} \
${LDFLAGSgcc_${notdir ${@:.axf=}}} \
${LDFLAGS} -o ${@} --start-group ${^} \
- '${LIBM}' '${LIBC}' '${LIBGCC}' --end-group; \
+ '${LIBNOSYS}' '${LIBM}' '${LIBC}' '${LIBGCC}' --end-group; \
fi
@${LD} -T ${SCATTER_${notdir ${@:.axf=}}} \
--entry ${ENTRY_${notdir ${@:.axf=}}} \
${LDFLAGSgcc_${notdir ${@:.axf=}}} \
${LDFLAGS} -o ${@} --start-group ${^} \
- '${LIBM}' '${LIBC}' '${LIBGCC}' --end-group;
+ '${LIBNOSYS}' '${LIBM}' '${LIBC}' '${LIBGCC}' --end-group;
@${OBJCOPY} -O binary ${@} ${@:.axf=.bin}
endif
Rebuild with make. The following error occurs:
CC microej/src/LLMJVM_stub.c
LD gcc/RTOSDemo.axf
/usr/lib/gcc/arm-none-eabi/6.3.1/../../../arm-none-eabi/lib/thumb/libnosys.a(sbrk.o): In function `_sbrk':
/build/newlib-jo3xW1/newlib-2.4.0.20160527/build/arm-none-eabi/thumb/libgloss/libnosys/../../../../../libgloss/libnosys/sbrk.c:21: undefined reference to `end'
make: *** [makedefs:201: gcc/RTOSDemo.axf] Error 1
The _sbrk implementation needs the end symbol to be defined.
Looking at the implementation,
the end symbol corresponds to the beginning of the C heap. This
training uses the end of the .bss segment as the beginning of the
C heap.
diff --git a/FreeRTOS/Demo/CORTEX_LM3S6965_GCC/standalone.ld b/FreeRTOS/Demo/CORTEX_LM3S6965_GCC/standalone.ld
--- a/FreeRTOS/Demo/CORTEX_LM3S6965_GCC/standalone.ld
+++ b/FreeRTOS/Demo/CORTEX_LM3S6965_GCC/standalone.ld
@@ -64,5 +64,6 @@ SECTIONS
*(.bss)
*(COMMON)
_ebss = .;
+ end = .;
} > SRAM
}
Then rebuild with make. There should be no error. Finally, run the
firmware in QEMU with the following command:
qemu-system-arm -M
lm3s6965evb -nographic -kernel gcc/RTOSDemo.bin
Hello, World! printf function is working.
Hello World!
QEMU: Terminated // press Ctrl-a x to end the QEMU session
The first Hello, World! is from the main.c and the second one
from the MicroEJ Application.
To make this more obvious:
Update the MicroEJ Application to print
Hello World! This is my
first MicroEJ Application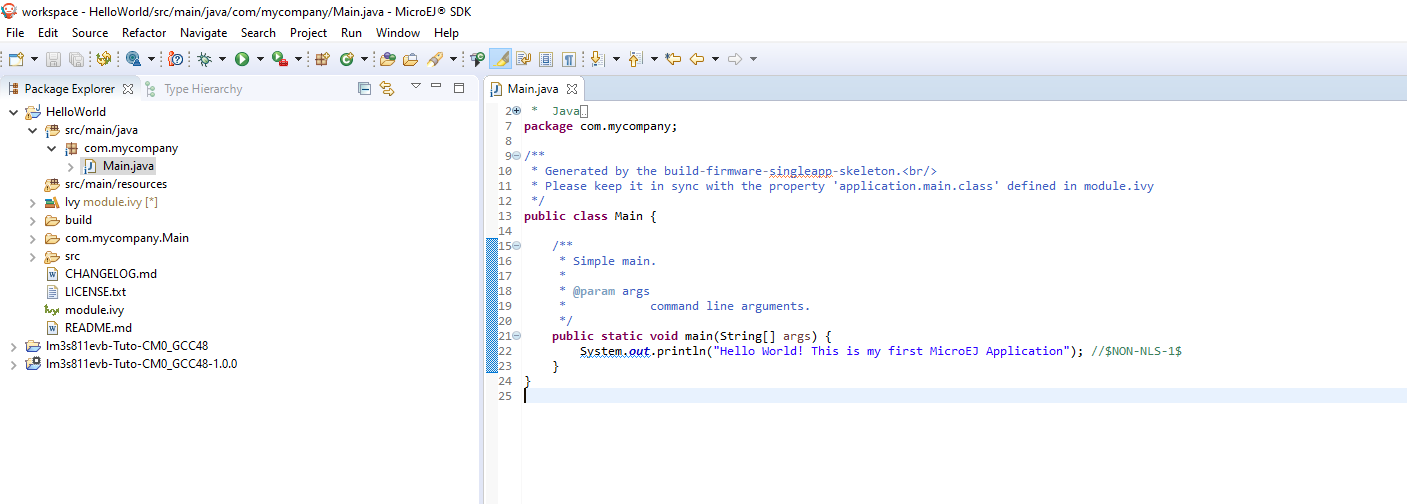
Rebuild the MicroEJ Application
On success, the following message appears in the console:
=============== [ Initialization Stage ] ===============
Platform connected to BSP location 'C:\Users\user\src\tuto-from-scratch\FreeRTOS\FreeRTOS\Demo\CORTEX_LM3S6965_GCC' using application option 'deploy.bsp.root.dir'.
=============== [ Launching SOAR ] ===============
=============== [ Launching Link ] ===============
=============== [ Deployment ] ===============
MicroEJ files for the 3rd-party BSP project are generated to 'C:\Users\user\src\tuto-from-scratch\workspace\HelloWorld\com.mycompany.Main\platform'.
The MicroEJ application (microejapp.o) has been deployed to: 'C:\Users\user\src\tuto-from-scratch\FreeRTOS\FreeRTOS\Demo\CORTEX_LM3S6965_GCC\microej\lib'.
The MicroEJ platform library (microejruntime.a) has been deployed to: 'C:\Users\user\src\tuto-from-scratch\FreeRTOS\FreeRTOS\Demo\CORTEX_LM3S6965_GCC\microej\lib'.
The MicroEJ platform header files (*.h) have been deployed to: 'C:\Users\user\src\tuto-from-scratch\FreeRTOS\FreeRTOS\Demo\CORTEX_LM3S6965_GCC\microej\inc'.
=============== [ Completed Successfully ] ===============

SUCCESS
Then rebuild and run the firmware:
$ make && qemu-system-arm -M lm3s6965evb -nographic -kernel gcc/RTOSDemo.bin

  LD    gcc/RTOSDemo.axf
Hello, World! printf function is working.
Hello World! This is my first MicroEJ Application
QEMU: Terminated
Congratulations!
At this point of the training:
The MicroEJ Platform is connected to the BSP (BSP partial connection).
The MicroEJ Application is deployed within a known location of the BSP (in
microej/folder).The FreeRTOS LM3S6965 port:
provides the minimal Low Level API to run the MicroEJ Application
compiles and links FreeRTOS with the MicroEJ Application and MicroEJ Runtime
runs on QEMU
The next steps recommended are:
Complete the implementation of the Low Level APIs (implement all functions in
LLMJVM_impl.h).Validate the implementation with the PQT Core.
Follow the Create MicroEJ Platform Build and Run Scripts training to get this MicroEJ Platform fully automated for build and execution.