
Test a Project
The SDK provides the capabilities to implement and run tests for a project. It relies on the standard JUnit API.
There are different types of tests:
Test on the Simulator
Test on a device
Test on a Java SE VM
Each type of test is detailed in the next sections.
JUnit Compliance
The SDK relies on JUnit, the most popular Java testing framework, to define and execute the tests.
It supports a subset of JUnit 4, namely the annotations: @After,
@AfterClass, @Before, @BeforeClass, @Ignore, @Test.
Each test case entry point must be declared using the org.junit.Test annotation (@Test before a method declaration).
Refer to JUnit documentation to get details on the usage of other annotations.
Gradle Integration
Tests are configured and launched by Gradle. Gradle provides 2 ways to configure tests in a project:
By using the built-in
Testtask, as described in Testing in Java & JVM projects.By using the new
JVM Testsuiteplugin, as described in The JVM Testsuite Plugin.
The JVM Testsuite plugin provides an enhanced model to declare multiple groups of automated testsuites,
and is therefore the recommended way to configure your tests.
The next sections use the JVM Testsuite plugin to explain how to configure and run tests, but the same results
can be achieved with the Test task.
Test on Simulator
Tests can be executed on the Simulator. They are run on a target VEE Port and generate a JUnit XML report.
Executing tests on the Simulator allows to check the behavior of the code in an environment similar to the target device but without requiring the board. This solution is therefore less constraining and more portable than testing on the board.
Configure the Testsuite
The configuration of the testsuites of a project must be defined inside the following block in the build.gradle.kts file:
testing {
   suites { // (1)
      val test by getting(JvmTestSuite::class) { // (2)
         microej.useMicroejTestEngine(this) // (3)

         dependencies { // (4)
             implementation(project())
             implementation("ej.api:edc:1.3.5")
             implementation("ej.library.test:junit:1.12.0")
         }
      }
   }
}
This piece of configuration is the minimum configuration required to define a testsuite on the Simulator:
(1): configures all the testsuites of the project.(2): configures the built-intestsuite provided by Gradle. Use this testsuite to configure the tests on the Simulator.(3): declares that this testsuite uses the MicroEJ Testsuite Engine. By default, the MicroEJ Testsuite Engine executes the tests on the Simulator.(4): adds the dependencies required by the tests. The first line declares a dependency to the code of the project. The second line declares a dependency on theedcLibrary. The third line declares a dependency to the JUnit API used to annotate Java Test classes.
Warning
With SDK 6 prior to 1.1.0, junit-platform-launcher must be added as a test dependency:
implementation("org.junit.platform:junit-platform-launcher:1.8.2")
Configure the VEE
The VEE used to execute the tests must be declared in the project dependencies,
with the microejVee or the testMicroejVee configuration (refer to Select a VEE Port for more details on the selection capabilities).
A VEE declared with the microejVee configuration is used to run the Application, as well as to execute the testsuites.
The microejVee is generally used in Application projects, since the tests should run on the same Application target VEE:
dependencies {
    ...
    microejVee("com.mycompany:vee-port:1.0.0")
}
A VEE declared with the testMicroejVee configuration is used only for the testsuites.
It is recommended in Library projects, since they don’t need a VEE to run, the VEE is scoped for the tests only:
dependencies {
    ...
    testMicroejVee("com.mycompany:vee-port:1.0.0")
}
As a summary, the rules are:
Only one VEE must be declared globally.
If the VEE is declared with
microejVee, it is used to run the Application (if it is an Application) and to execute the tests.If the VEE is declared with
testMicroejVee, it is only used to execute the tests.
Warning
Declaring a VEE in project dependencies only applies to the current project.
By default the transitive resolution of the VEE is disabled but you can enable it with the project property feature.vee.transitivity.enabled.
For more information, refer to Resolve a VEE Port transitively.
Create a Test Class
The SDK provides a JUnit library containing the subset of the supported JUnit API: ej.library.test:junit.
Before creating the Test class, make sure this library is declared in the testsuite dependencies:
testing {
   suites {
      val test by getting(JvmTestSuite::class) {
         ...
         dependencies {
            implementation("ej.library.test:junit:1.12.0")
         }
         ...
      }
   }
}
The test class can now be created in the src/test/java folder.
This can be done manually or with IDE menu:
right-click on the
src/test/javafolder.select New > Java Class, then press
Alt+Insertand selectTest Method.
right-click on the
src/test/javafolder.select New > Other… > Java > JUnit > New JUnit Test Case.
right-click on the
src/test/javafolder in JAVA PROJECTS view.select the + icon (New…) > Class, then enter the test class name you want to create.
Note
Gradle allows to define alternative folders for test sources but it would require additional configuration,
so it is recommended to stick with the src/test/java folder.
Execute the Tests
Once the testsuite is configured, it can be run thanks to the test Gradle task.
This task is bound to the check and the build Gradle lifecycle tasks,
which means that the tests are also executed when launching one of these tasks.
In order to execute the testsuite from IntelliJ IDEA or Android Studio, double-click on the task in the Gradle tasks view:
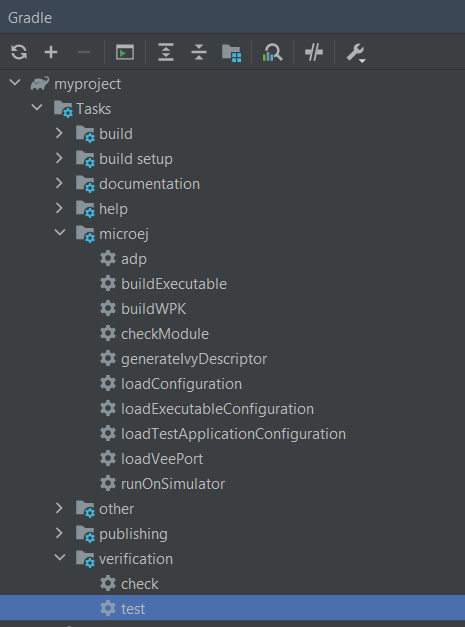
Run Gradle test task from IntelliJ IDEA / Android Studio
In order to execute the testsuite from Eclipse, double-click on the task in the Gradle tasks view:
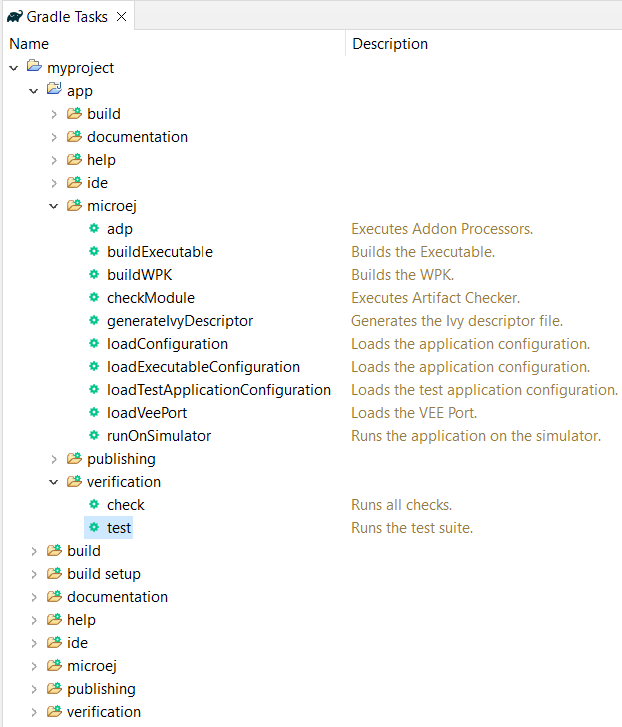
Run Gradle test task from Eclipse
Warning
By right-clicking on a test class file, the menu proposes Gradle Test and JUnit Test in the Run As entry.
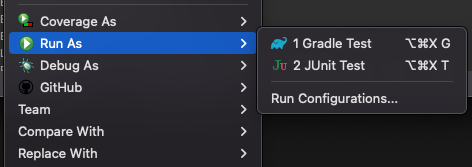
Run test as Gradle test in a class right-click menu
Always use the Run > Gradle Test entry.
In order to execute the testsuite from VS Code, double-click on the task in the Gradle tasks view:

Run Gradle test task from Visual Studio Code
Warning
Test start buttons (represented as green triangle) may appear on the left side of class and method definitions.
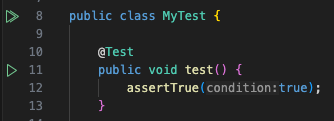
Green triangles are test start buttons
Running tests from these buttons may fail because they do not use the Gradle Runner by default. To run a test with Gradle, right-click on the green triangle and select Execute Using Profile…
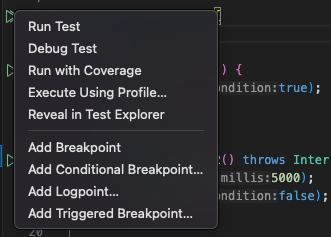
Right-click menu on test start buttons
and then select Delegate Test to Gradle.
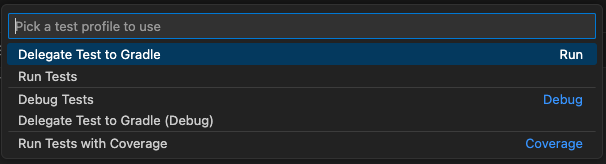
Run test class or test method with Gradle
In order to execute the testsuite from the Command Line Interface, execute this command:
$ ./gradlew test
Generate Code Coverage
To generate the Code Coverage files (.cc) for each test, configure the testsuite as follows:
testing {
   suites {
      val test by getting(JvmTestSuite::class) {

         ...

         targets {
            all {
               testTask.configure {
                  doFirst {
                     systemProperties["microej.testsuite.properties.s3.cc.activated"] = "true"
                     systemProperties["microej.testsuite.properties.s3.cc.thread.period"] = "15"
                  }
               }
            }
         }
      }
   }
}
Then, to generate an HTML report, see Code Coverage Analyzer.
Filter the Tests
Gradle automatically executes all the tests located in the test source folder. If you want to execute only a subset of these tests, Gradle provides 2 solutions:
Filtering configuration in the build script file.
Filtering option in the command line.
The tests filtering configuration must be done in the filter block of the test task:
testing {
   suites {
     val test by getting(JvmTestSuite::class) {

         ...

         targets {
             all {
                 testTask.configure {
                     filter {
                         includeTestsMatching("com.mycompany.*")
                     }
                 }
             }
         }
     }
   }
}
This example tells Gradle to run the tests located in the com.mycompany package only.
Other methods are available for test filtering, such as excludeTestsMatching to exclude tests.
Refer to the TestFilter
documentation for the complete list of available filtering methods.
Gradle also allows to filter the tests from the command line directly, thanks to the --tests option.
For example, to execute only the tests from the class MyTestClass, run this command:
./gradlew test --tests MyTestClass
This can be convenient to quickly execute one test, without requiring a change in the build script file.
Note
The test class referenced by the --tests option is executed only if it is not excluded in the test
configuration in the build.gradle.kts file. Therefore, make sure to adapt your test configuration
when using this option.
Refer to the Gradle Test filtering documentation for more details on how to filter the tests and on the available patterns.
Warning
At the moment, only class-level filtering is supported. This means that, for instance, it is not possible to run a single test method within a test class.
Debug the Tests on Simulator
A test can be executed on the Simulator in debug mode by setting the property debug.mode to true
when executing the test task:
./gradlew test --tests MyTest -P"debug.mode"=true -P"debug.port"=12000
Once started, the Simulator waits for the connection of a debugger.
If you want to connect the IDE debugger:
Warning
IntelliJ IDEA and Android Studio need an Architecture 8.1 or higher for debug mode.
Add a breakpoint in your Application code.
Click on Run > Edit Configurations….
Click on + button (Add New Configuration).
Select Remote JVM Debug.
Click on the New launch configuration button.
Give a name to the launcher in the Name field.
Set the debug host and port.
Click on the Debug button.
Add a breakpoint in your Application code.
Click on Run > Debug Configurations….
Select Remote Java Application.
Click on the New launch configuration button.
Give a name to the launcher in the Name field.
Set the debug host and port.
Click on the Debug button.
Warning
VS Code needs an Architecture 8.1 or higher for debug mode.
Add a breakpoint in your Application code.

Click on the Run and Debug (Ctrl+Shift+D) icon on the right panel.
Click on
create a launch.json filein the opened panel.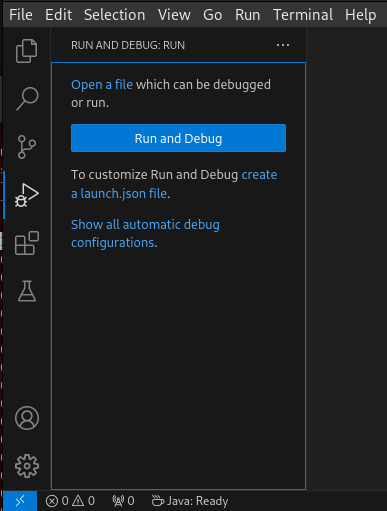
Click on the
Javaentry proposed in the search field.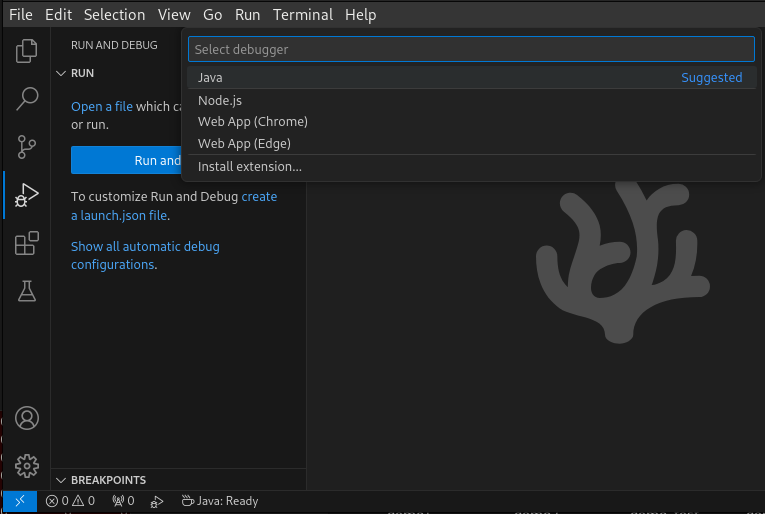
Click on Add Configuration button
Select
{} Java: Attach to Remote Programentry in the popup list.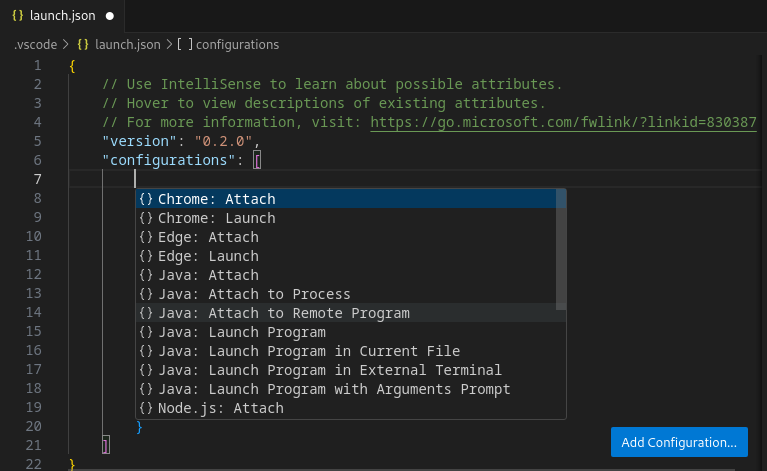
Set
localhostashostNameand theport(default is1200) in the generated json.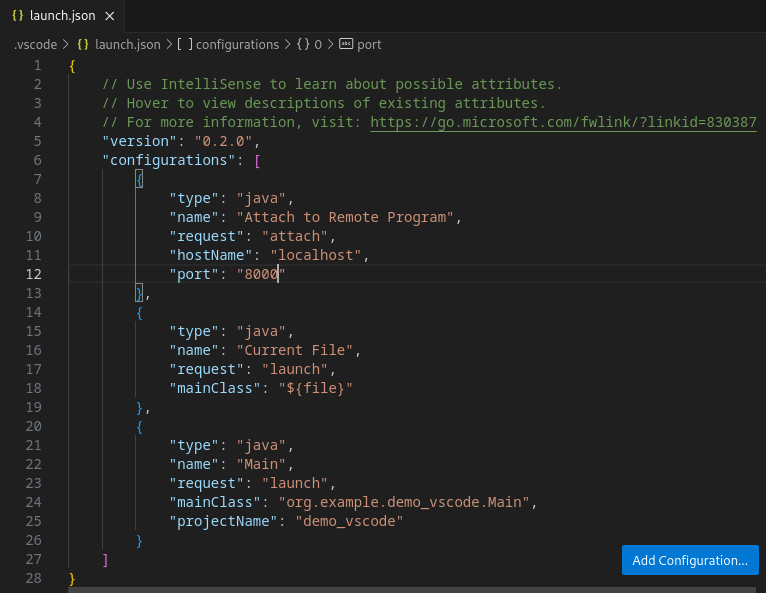
Select
Attach to Remote Programin the selection box of the launcher.
Click on the
Startbutton
The debugger should connect to the Simulator and you should be able to debug your test.
Test on Device
The SDK allows to execute a testsuite on a device. This requires to:
Have a VEE Port which implements the BSP Connection.
Have a device connected to your workstation both for programming the Executable and getting the output traces. Consult your VEE Port specific documentation for setup.
Start the Serial to Socket Transmitter tool if the VEE Port does not redirect execution traces.
The configuration is similar to the one used to execute a testsuite on the Simulator.
Follow the instructions to setup a testsuite on the Simulator.
In the build script file, replace the line:
microej.useMicroejTestEngine(this)
by:
microej.useMicroejTestEngine(this, TestTarget.EMB)
Add the
importstatement at the beginning of the file:import com.microej.gradle.plugins.TestTarget
Add the required properties as follows:
val test by getting(JvmTestSuite::class) {
   microej.useMicroejTestEngine(this, TestTarget.EMB)

   targets {
      all {
         testTask.configure {
            doFirst {
                  systemProperties = mapOf(
                     // Enable the build of the Executable
                     "microej.testsuite.properties.deploy.bsp.microejscript" to "true",
                     "microej.testsuite.properties.microejtool.deploy.name" to "deployToolBSPRun",

                     // Configure the TCP/IP address and port if the VEE Port Run script does not redirect execution traces
                     "microej.testsuite.properties.testsuite.trace.ip" to "localhost",
                     "microej.testsuite.properties.testsuite.trace.port" to "5555",
                     // Tell the testsuite engine that the VEE Port Run script redirects execution traces.
                     // Uncomment this line and comment the 2 lines above if the VEE Port supports it.
                     //"microej.testsuite.properties.launch.test.trace.file" to "true"
                  )
            }
         }
      }
   }
}
The properties are:
microej.testsuite.properties.deploy.bsp.microejscript: enables the build of the Executable. It is required.microej.testsuite.properties.microejtool.deploy.name: name of the tool used to deploy the Executable to the board. It is required. It is generally set todeployToolBSPRun.microej.testsuite.properties.launch.test.trace.file: enables the redirection of the traces in file. If the VEE Port does not have this capability, the Serial to Socket Transmitter tool must be used to redirect the traces to a socket.microej.testsuite.properties.testsuite.trace.ip: TCP/IP address used by the Serial to Socket Transmitter tool to redirect traces from the board. This property is only required if the VEE Port does not redirect execution traces.microej.testsuite.properties.testsuite.trace.port: TCP/IP port used by the Serial to Socket Transmitter tool to redirect traces from the board. This property is only required if the VEE Port does not redirect execution traces.
Any other property can be passed to the Test Engine by prefixing it by microej.testsuite.properties..
For example, to set the Immortals Heap size:
systemProperties = mapOf(
   "microej.testsuite.properties.core.memory.immortal.size" to "8192",
   ...
)
Test on Java SE VM
The SDK allows to run tests on a Java SE VM.
This can be useful, for example, when the usage of mock libraries like Mockito is
needed (this kind of library is not supported by the MicroEJ Core Engine).
There is nothing specific related to MicroEJ to run tests on a Java SE VM.
Follow the Gradle documentation to setup such tests.
As an example, here is a typical configuration to execute the tests located in the src/test/java folder:
testing {
   suites {
      val test by getting(JvmTestSuite::class) {
         useJUnitJupiter()

         dependencies {
            runtimeOnly("org.junit.platform:junit-platform-launcher:1.8.2")
         }
      }
   }
}
If you want to use Mockito, add it in the testsuite dependencies:
testing {
   suites {
      val test by getting(JvmTestSuite::class) {
         useJUnitJupiter()

         dependencies {
            implementation("org.mockito:mockito-core:4.11.0")
            runtimeOnly("org.junit.platform:junit-platform-launcher:1.8.2")
         }
      }
   }
}
Then you can use it in your test classes:
import org.junit.jupiter.api.Test;
import org.mockito.Mockito;

import static org.junit.jupiter.api.Assertions.assertNotNull;

public class MyTest {
   @Test
   public void test() {
      MyClass mock = Mockito.mock(MyClass.class);

      assertNotNull(mock);
   }
}
Testsuite Reports
Once a testsuite is completed, the JUnit HTML report is generated in the module project location build/reports/tests/<testsuite>/index.html.
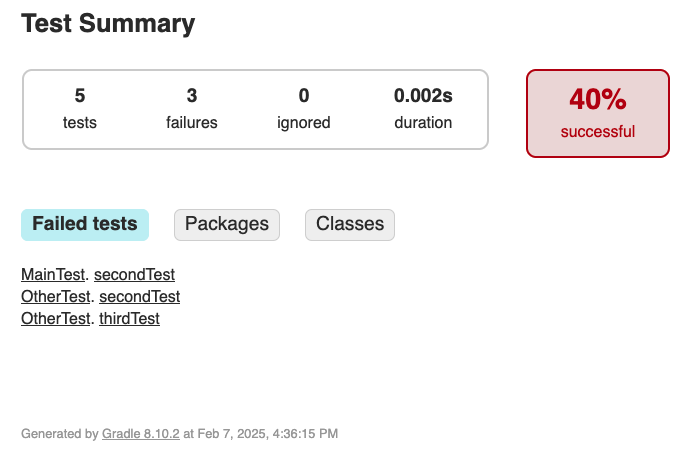
Example of JUnit HTML Report
Once a testsuite is completed, the JUnit XML report is generated in the module project location build/testsuite/output/<date>/testsuite-report.xml.
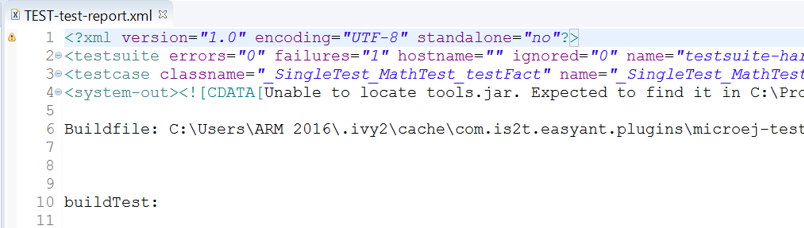
Example of MicroEJ Testsuite XML Report
XML report file can also be opened In Eclipse in the JUnit View. Right-click on the file > Open With > JUnit View:

Example of MicroEJ Testsuite XML Report in JUnit View
Publish Testsuite Reports
Starting from SDK 6 1.2.0, it is possible to publish an archive file containing all testsuite reports of a project.
By default, the tests are not executed when publishing a project, so you must explicitly run your testsuite to publish the reports:
./gradlew test publish
The published archive file contains the HTML and XML reports of all testsuites that have been executed. If your project contains multiple testsuites, you must execute each testsuite whose report must be published:
./gradlew testOnSim testOnJavaSE publish
You can also bind the check task to all your testsuites in the build.gradle.kts file of your project:
tasks.named("check") {
    dependsOn("testOnSim", "testOnJavaSE")
}
and execute the check task when publishing the project:
./gradlew check publish
Mixing tests
The SDK allows to define multiple testsuites on different targets. For example, you can configure a testsuite to run tests on the Simulator and a testsuite to run tests on a device.
Configuring multiple testsuites is almost only a matter of aggregating the testsuite declarations documented in the previous sections, as described in the Gradle documentation.
Mixing tests on the Simulator and on a device
If you need to define a testsuite to run on the Simulator and a testsuite to run on a device, the only point to take care is related to the tests source location, because:
Gradle automatically uses the testsuite name to know the tests source folder to use. For example, for a testsuite named
test(the built-in testsuite), the foldersrc/test/javais used, and for a testsuite namedtestOnDevice, the foldersrc/testOnDevice/javais used.Tests classes executed by the MicroEJ Test Engine on the Simulator and on device are not directly the tests source classes. The SDK generates new tests classes, based on the original ones, but compliant with the MicroEJ Testsuite mechanism. This process assumes by default that the tests classes are located in the
src/test/javafolder.
Therefore:
It is recommended to use the built-in
testtestsuite for either the tests on the Simulator or the tests on device. This avoids extra configuration to change the location of the tests source folder.The tests source folder of the other testsuite must be changed to use the
src/test/javafolder as well:
testing {
   suites {
      val test by getting(JvmTestSuite::class) {
         microej.useMicroejTestEngine(this)

         dependencies {
            implementation(project())
            implementation("ej.library.test:junit:1.12.0")
         }
      }

      val testOnDevice by registering(JvmTestSuite::class) {
         microej.useMicroejTestEngine(this, TestTarget.EMB)

         sources {
            java {
               setSrcDirs(listOf(sourceSets.getByName(SourceSet.TEST_SOURCE_SET_NAME).java))
            }
            resources {
               setSrcDirs(listOf(sourceSets.getByName(SourceSet.TEST_SOURCE_SET_NAME).resources))
            }
         }

         dependencies {
            implementation(project())
            implementation("ej.library.test:junit:1.12.0")
         }

         targets {
             all {
               testTask.configure {
                  doFirst {
                     systemProperties = mapOf(
                        "microej.testsuite.properties.deploy.bsp.microejscript" to "true",
                        "microej.testsuite.properties.microejtool.deploy.name" to "deployToolBSPRun",
                        "microej.testsuite.properties.testsuite.trace.ip" to "localhost",
                        "microej.testsuite.properties.testsuite.trace.port" to "5555"
                     )
                  }
               }
            }
         }
      }
   }
}
The important part is the sources block of the testOnDevice testsuite.
This allows to use the src/test/java and src/test/resources folders as the tests source folders.
With this configuration, all tests are executed on both the Simulator and the device.
If you want to have different tests for each testsuite, it is recommended to separate the tests in different packages.
For example the tests on the Simulator could be in src/test/java/com/mycompany/sim
and the tests on the device could be in src/test/java/com/mycompany/emb.
Then you use the test filtering capabilities to configure which package to run in which testsuite:
testing {
   suites {
      val test by getting(JvmTestSuite::class) {
         ...

         targets {
             all {
               testTask.configure {
                  ...

                  filter {
                     includeTestsMatching("com.mycompany.sim.*")
                  }
               }
            }
         }
      }

      val testOnDevice by registering(JvmTestSuite::class) {
         ...

         targets {
             all {
               testTask.configure {
                  ...

                  filter {
                     includeTestsMatching("com.mycompany.emb.*")
                  }
               }
            }
         }
      }
   }
}
Mixing tests on the Simulator and on a Java SE VM
Defining tests on the Simulator and on a Java SE VM is only a matter of aggregating the configuration of each testsuite:
testing {
   suites {
      val test by getting(JvmTestSuite::class) {
         microej.useMicroejTestEngine(this)
         ...
      }

      val testOnJavaSE by registering(JvmTestSuite::class) {
         useJUnitJupiter()

         dependencies {
            runtimeOnly("org.junit.platform:junit-platform-launcher:1.8.2")
         }

         ...
      }
   }
}
As explained in the previous section, it is recommended to use the built-in test testsuite for the tests on the Simulator
since it avoids adding configuration to change the tests sources folder.
With this configuration, tests on the Simulator are located in the src/test/java folder,
and tests on a Java SE VM are located in the src/testOnJavaSe/java folder.
Configure the Testsuite Engine
The engine used to execute the testsuite provides a set of configuration parameters that can be defined with System Properties. For example, to set the timeout of the tests:
In the command line with
-D:./gradlew test -Dmicroej.testsuite.timeout=120
In the build script file:
testing {
   suites {
      val test by getting(JvmTestSuite::class) {
         ...

         targets {
            all {
               testTask.configure {
                  ...

                  doFirst {
                     systemProperties = mapOf(
                        "microej.testsuite.timeout" to "120"
                     )
                  }
               }
            }
         }
      }
   }
}
The following configuration parameters are available:
Name |
Description |
Default |
|---|---|---|
|
The time in seconds before a test is considered as failed. Set it to |
|
|
The arguments to pass to the Java SE VM started for each test. |
Not set |
|
The localhost port used by the framework to synchronize its execution with other frameworks on same computer.
Synchronization is not performed when this port is |
|
|
A test execution may not be able to produce the success trace for an external reason, for example an unreliable harness script that may lose some trace characters or crop the end of the trace. For all these unlikely reasons, it is possible to configure the number of retries before a test is considered to have failed. |
|
|
Regular expression checked against the test output to retry the test.
If the regular expression is found in the test output, the test is retried (up to the value of |
Not set |
|
Regular expression checked against the test output to retry the test.
If the regular expression is not found in the test output, the test is retried (up to the value of |
Not set |
|
Verbose level of the testsuite output. Available values are Deprecated since version 1.2.0: The testsuite verbose level follows Gradle log level. |
|
|
Requires SDK 6 1.3.0 and ej.library.test:junit:1.12.0 minimum. Pattern of the test passed (default is |
|
Inject Application Options
Standalone Application Options can be defined to configure the Application or Library being tested. They can be defined globally, to be applied on all tests, or specifically to a test.
Inject Application Options Globally
In order to define an Application Option globally,
it must be prefixed by microej.testsuite.properties. and passed as a System Property,
either in the command line or in the build script file.
For example, to inject the property core.memory.immortal.size:
In the command line with
-D:./gradlew test -Dmicroej.testsuite.properties.core.memory.immortal.size=8192
In the build script file:
testing {
   suites {
      val test by getting(JvmTestSuite::class) {
         ...

         targets {
            all {
               testTask.configure {
                  ...

                  doFirst {
                     systemProperties = mapOf(
                        "microej.testsuite.properties.core.memory.immortal.size" to "8192"
                     )
                  }
               }
            }
         }
      }
   }
}
Inject Application Options For a Specific Test
In order to define an Application Option for a specific test,
it must be set in a file with the same name as the test case file,
but with the .properties extension instead of the .java extension.
The file must be put in the src/test/resources folder and within the same package than the test file.
For example, to inject an Application Option for the test class MyTest located in the com.mycompany package,
a MyTest.properties file must be created. Its path must be: src/test/resources/com/mycompany/MyTest.properties.
Application Options defined in this file do not require the microej.testsuite.properties. prefix.
Note
If the testsuite is configured to execute main classes (thanks to the parameter TestMode.MAIN):
microej.useMicroejTestEngine(this, TestTarget.SIM, TestMode.MAIN)
the properties file must be named after the main class.
If the main class has been generated from a JUnit test class, its class name is prefixed by _AllTests_.
Inject Resources For a Specific Test
To embed resources for a specific test (image, model, …), set the application.resources property in the test properties file (See Inject Application Options For a Specific Test). For example:
application.resources=/samples/sample0.txt;/samples/sample1.json;/samples/sample2.bin
Each path is relative to the resources folder root. Use a semicolon (;) to separate multiple resources.
Testsuite Advanced Configuration
Configure a VEE by Testsuite
The VEE declared in the project dependencies with the microejVee or the testMicroejVee configuration
(refer to Configure the VEE for more details) is used to execute all testsuites.
If your project contains a testsuite other than the built-in test testsuite,
it is also possible to run the testsuite on a dedicated VEE. To define a VEE for your custom testsuite, you must:
Create a new
<testsuite_name>MicroejVeeconfiguration depending on your testsuite name in thebuild.gradle.ktsfile of your project. For example:configurations.create("testOnDeviceMicroejVee") { isCanBeConsumed = false isCanBeResolved = false isTransitive = false }
Declare the VEE in the project dependencies with your new configuration:
dependencies {
    ...
    "testOnDeviceMicroejVee"("com.mycompany:vee-port:1.0.0")
}