
Get Started with Sandboxed Applications
Description
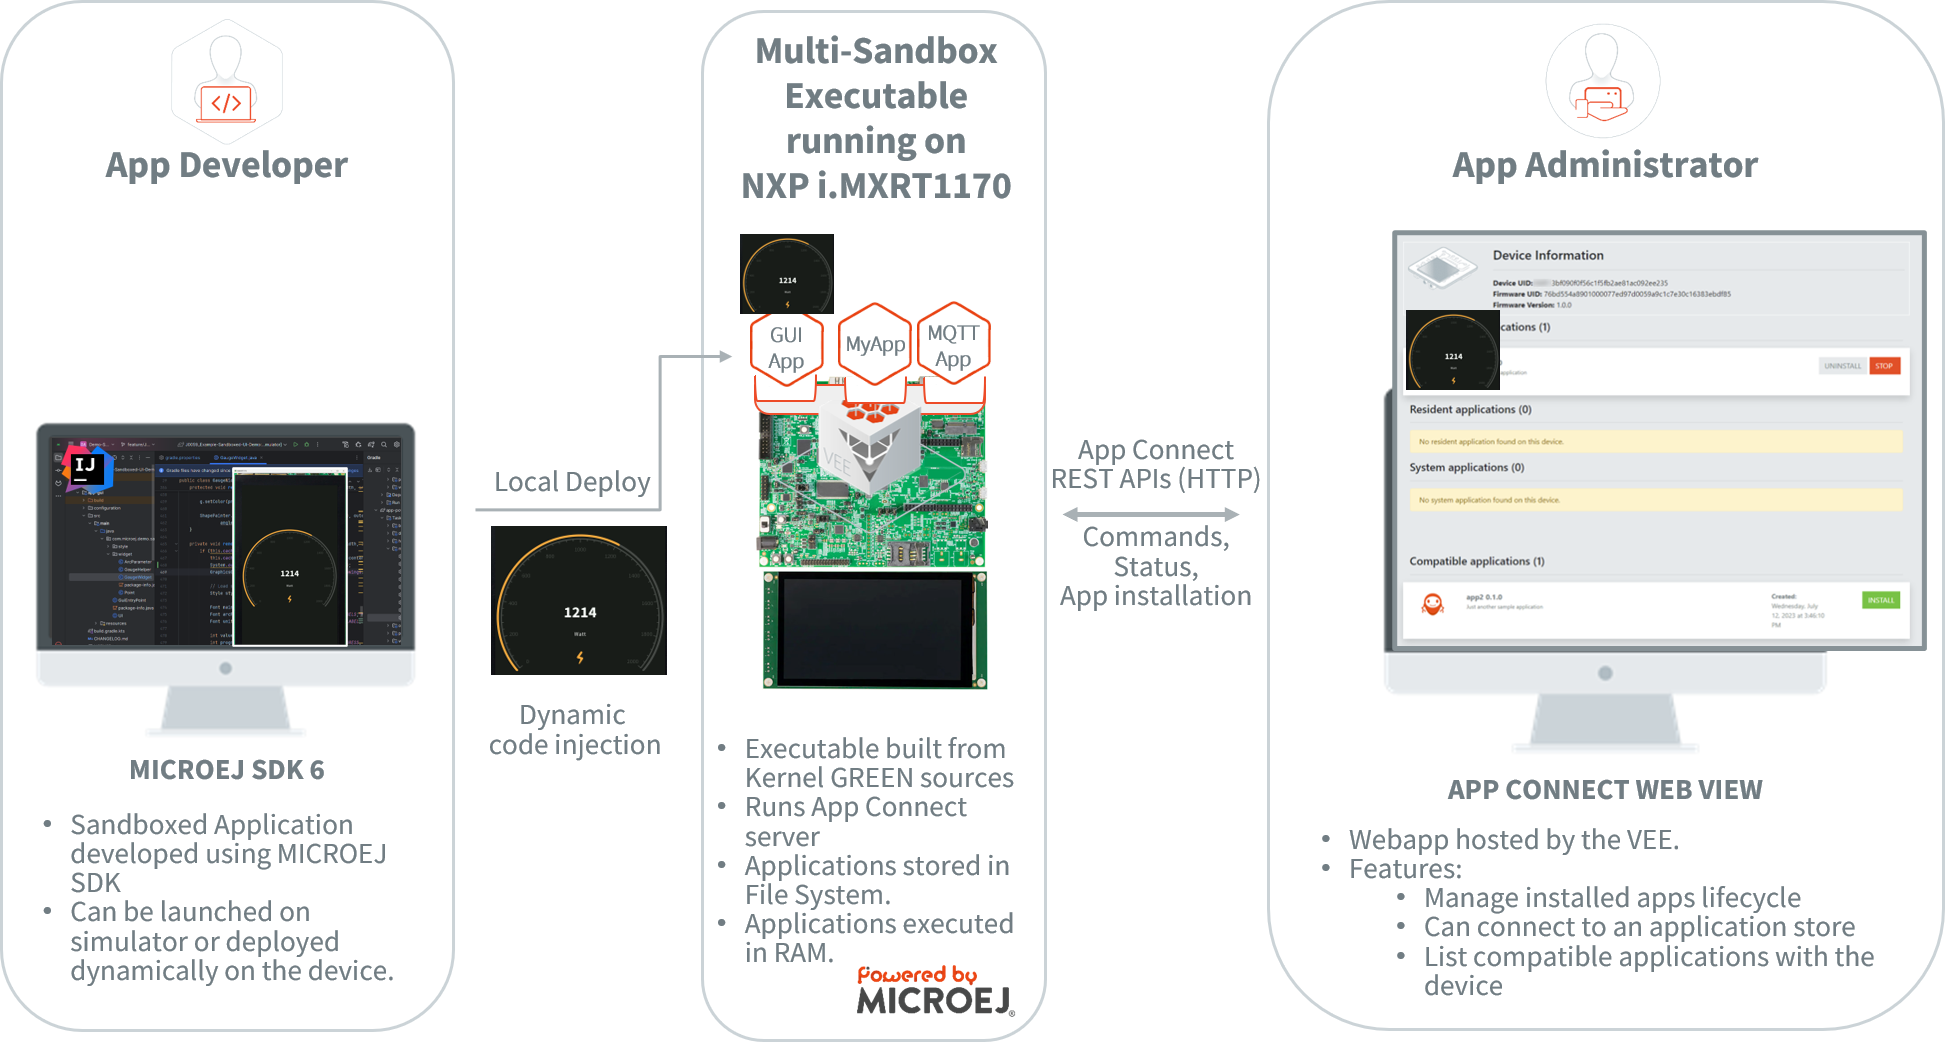
This training will show you how to run Sandboxed Applications on top of a pre-built Multi-Sandbox Executable for the NXP i.MXRT1170 Evaluation Kit.
During this training, you will learn how to run Sandboxed Applications in Simulation using the Virtual Device and on NXP i.MXRT1170 Evaluation Kit:
In case you are not familiar with MicroEJ, please visit Discover MicroEJ to understand the principles of our technology.
The below schematic summarizes the Multi-Sandbox features that will be demonstrated in this training:
Intended Audience
This training is designed for application developers looking to gain a first understanding of the Multi-Sandbox development flow.
Prerequisites
Note
This Getting Started has been tested in the following conditions:
Windows 10/11.
Multi-Sandbox Executable: NXP-MIMXRT1170-3.0.0_GCC_GREEN-2.1.1.elf.
Demo-Sandboxed-Applications
2.0.0.
To get the most out of this training, participants should have:
A good understanding of the Overview section.
A basic knowledge of the MicroEJ Glossary.
Hardware setup
To follow this training, you need:
A FAT32-formatted microSD card.
An Ethernet cable
Environment Setup
To follow this training, you need:
An RS232 Terminal (e.g. Termite).
Also, follow the steps described in the sections below to complete your environment setup.
Install MICROEJ SDK 6
Follow MICROEJ SDK 6 installation Guide. IntelliJ IDEA is used in this training, but feel free to use your favorite IDE.
Accept the MICROEJ SDK EULA
You may have to accept the SDK EULA if you haven’t already done it, please have a look at SDK EULA Acceptation.
Hardware Setup for NXP i.MXRT1170 EVKB
Refer to the NXP i.MXRT1170 EVKB Hardware Setup guide.
Additionally, make sure to:
Insert a micro-SD card (FAT32-formatted) in the board connector.
Connect the
1GBEthernet connector to the internet.
Flash the Multi-Sandbox Executable on your NXP i.MXRT1170 Evaluation Kit
Download the Multi-Sandbox Executable: NXP-MIMXRT1170-3.0.0_GCC_GREEN-2.1.1.elf.
Note
The Multi-Sandbox Executable used in this documentation is built from the Kernel GREEN sources. Refer to the Get Started with Kernel training to build your own Multi-Sandbox Executable.
If you want more information about this Multi-Sandbox Executable, the Javadoc and the Release notes are available in this directory.
Flash the Multi-Sandbox Executable using LinkServer:
Download and install LinkServer for Microcontroller (minimum version 1.6.133).
Once installed, the
LinkServerinstallation folder must be set on your Path. To do so:Open the Edit the system environment variables application on Windows.
Click on the
Environment Variables…button.Select
Pathvariable under theUservariables section and edit it.Click on
Newand point to theLinkServerinstallation folder located where you installedLinkServer(e.g.nxp/LinkServer_1.6.133/).
Run the command
LinkServer flash MIMXRT1176xxxxx:MIMXRT1170-EVKB load NXP-MIMXRT1170-3_0_0_GCC_GREEN-2.1.1.elf.
Set up the logs output:
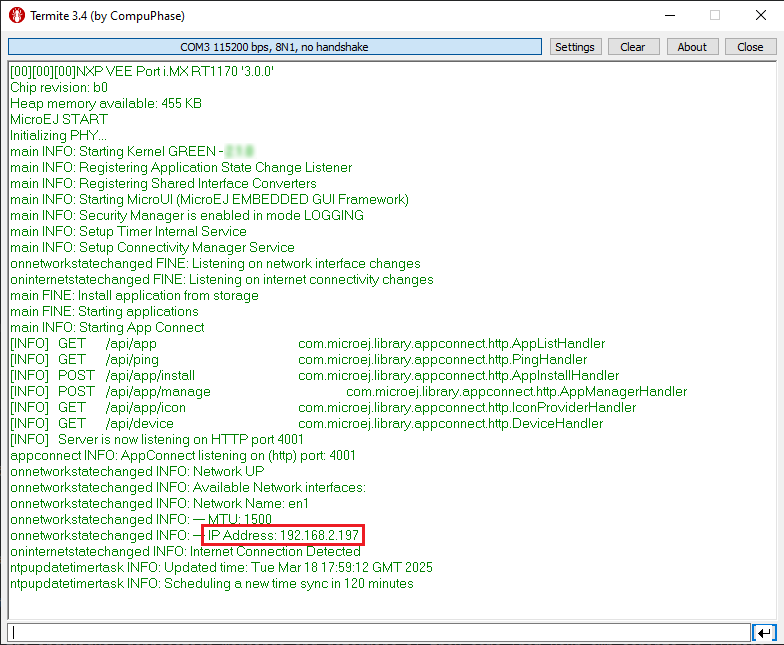
Get the COM port where your board is connected (if you are using Windows, you can open your Device Manager from the Windows menu).
Set up a serial terminal (e.g. Termite) to see output logs from the board. Refer to the NXP i.MXRT1170 EVKB Hardware Setup to setup the serial terminal.
Press the board’s reset button.
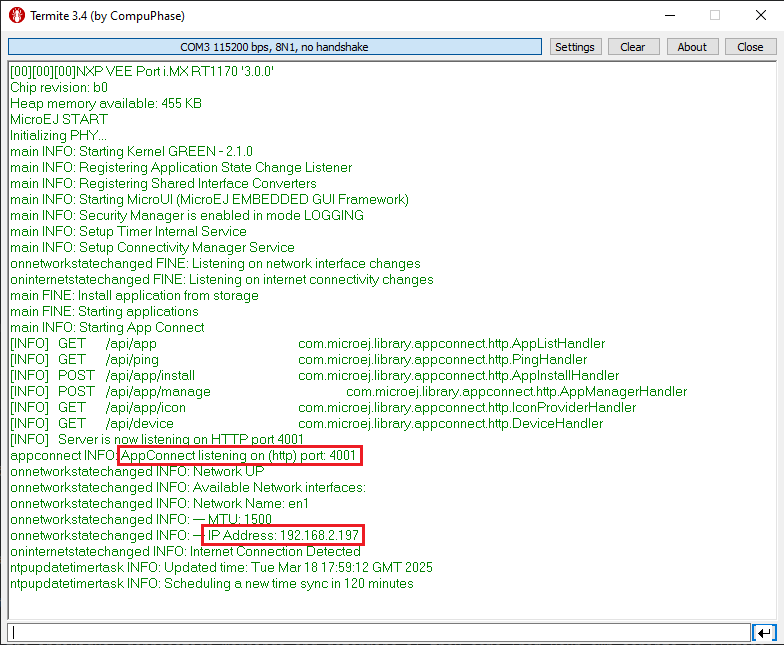
Get your board’s IP address. You will find it in the logs output:
Congratulations! The Multi-Sandbox Executable is running on the NXP i.MXRT1170 Evaluation Kit and is ready to be used.
Training Course
Run the Demo-Sandboxed-Applications
The Demo-Sandboxed-Applications showcases the communication between Sandboxed Applications using the Shared Interfaces.
The following projects are provided:
app-power-provider: application responsible for providing random power values in the system.
app-gui: application responsible for visualizing the power values provided by app-power-provider.
app-mqtt-publisher: application responsible for publishing the power values provided by app-power-provider to an MQTT topic.
sharedinterface: shared library between apps that defines the shared interface for inter-app communication.
Warning
If you are using your own Multi-Sandbox Executable to run this demo, make sure to configure the
Images Heap size of your Kernel project to the size of your screen.
The formula to compute the required size is SCREEN_WIDTH x SCREEN_HEIGHT x BPP / 2.
Example with a 1280x720 screen in RGB565 format (16BPP). Images Heap size should be:
1280x720x16/2 = 1843200 bytes
Import the Project
Import the project into your IDE:
Note
If you are using an IDE other than IntelliJ, please have a look at Import a Project section.
If you are on the Welcome Screen, click on the Open button. Otherwise click either on File > Open….
Select the Demo-Sandboxed-Applications directory located where you downloaded it and click on the OK button.
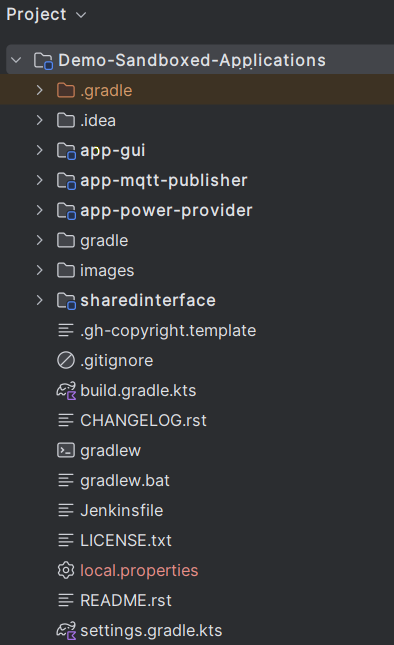
The Gradle project should now be imported in IntelliJ, your workspace contains the following project in the Projects view:
Run the Demo-Sandboxed-Applications on the Virtual Device
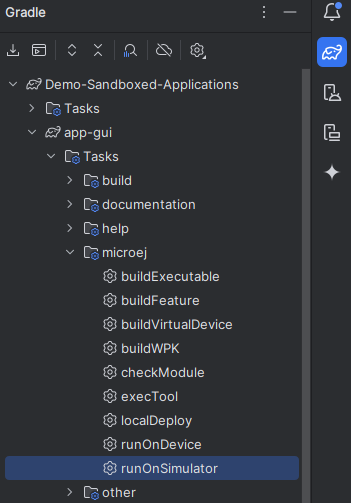
In order to execute the applications on the Virtual Device, use the Gradle runOnSimulator task:
Double-click on the runOnSimulator task of one the applications (app-gui, app-power-provider, app-mqtt-publisher):
Note
Each application is bound to each other. Running one of the applications on the Simulator will run all the applications.
The Virtual Device starts and executes the Demo-Sandboxed-Applications:
Run the Demo on the NXP i.MXRT1170 Evaluation Kit
The Demo-Sandboxed-Applications applications can be deployed on the NXP i.MXRT1170 Evaluation Kit using the localDeploy tool.
Each application needs to be deployed individually.
Configure the localDeploy tool in the project:
Open the
gradle.propertiesfile located at the root of the Demo-Sandboxed-Applications project.Get your board’s IP address and add it to the
ipAddressfield.
Open the Gradle tasks view to deploy the applications on your NXP i.MXRT1170 Evaluation Kit. Deploy them in the following order:
Deploy app-power-provider: double-click on the app-power-provider > Tasks > microej > localDeploy task.
Deploy app-gui: double-click on the app-gui > Tasks > microej > localDeploy task.
Deploy app-mqtt-publisher: double-click on the app-mqtt-publisher > Tasks > microej > localDeploy task.
The applications are running on the NXP i.MXRT1170 Evaluation Kit:
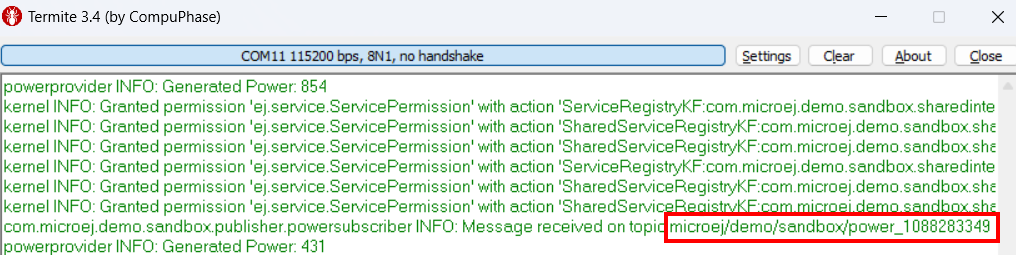
Subscribe to the MQTT Topic to Get the Power Values
By default, the app-mqtt-publisher publishes the power values
to a public MQTT Broker: test.mosquitto.org.
The MQTT topic is randomly generated at each application startup. It can be seen in the console logs:
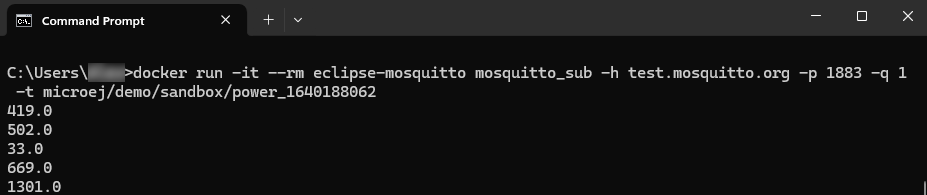
Use an MQTT client to subscribe to the topic, for example, using Docker:
docker run -it --rm eclipse-mosquitto mosquitto_sub -h test.mosquitto.org -p 1883 -q 1 -t microej/demo/sandbox/power_[YOUR_TOPIC_ID]
Every time a power value is published, it can be seen in the MQTT client console:
Managing Applications Lifecycle
The Multi-Sandbox Executable provides a web server
to interact with the applications. Either through a Web UI or an HTTP API.
This server listens on port 4001 by default.
The Server URL can be seen in the console logs:
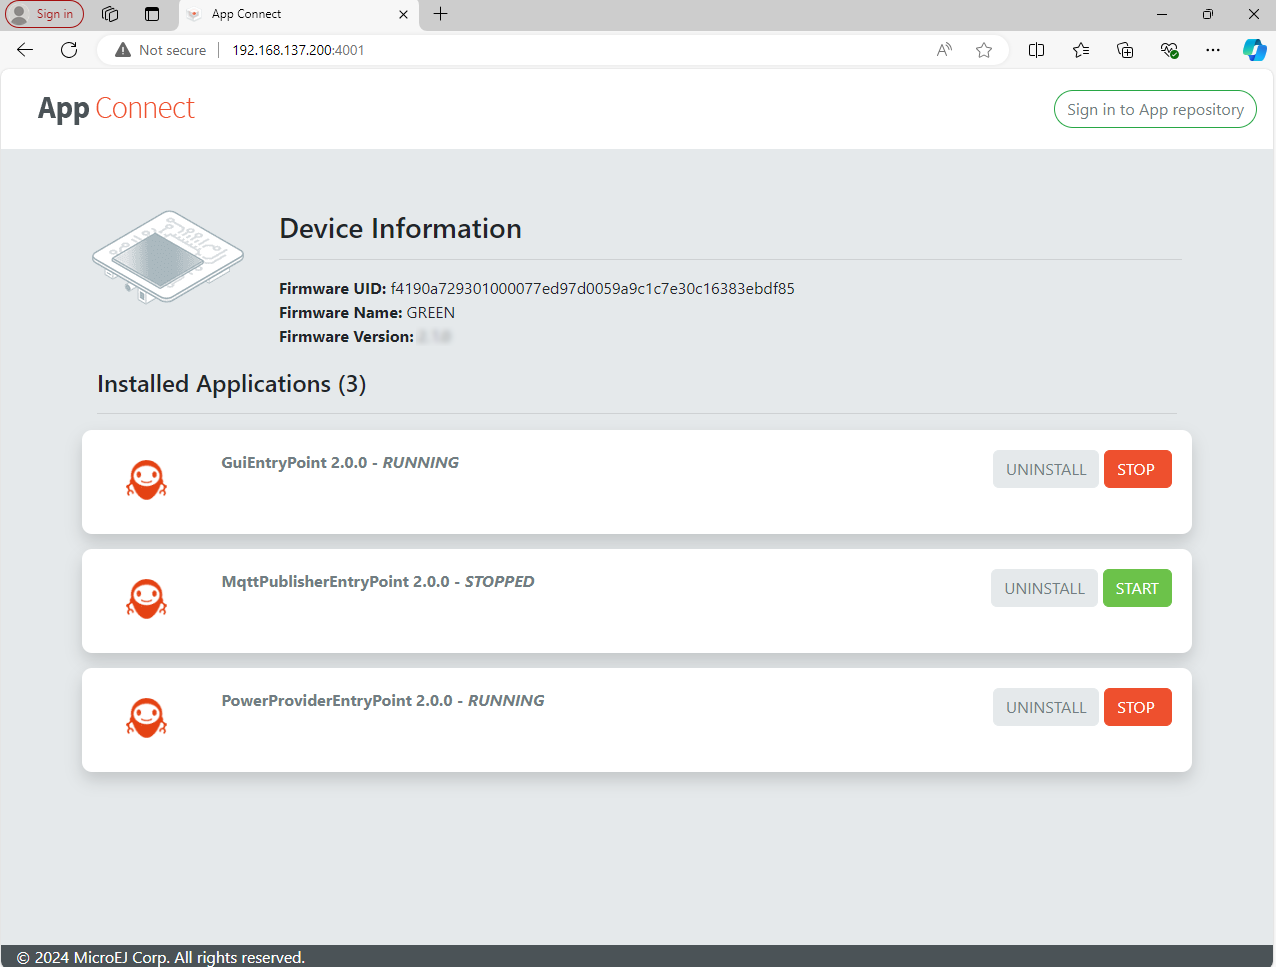
Open the URL in a web browser, the installed applications can be seen.
They can be Started / Stopped / Uninstalled:

Well Done!
Now you know how to run Sandboxed Applications on a Multi-Sandbox Executable!
The next step is about creating a Sandboxed Application project from scratch and running it on the Virtual Device and on the NXP i.MXRT1170 board.
Create and Run a Sandboxed Application
Create the Sandboxed Application Project
Note
If you are using an IDE other than IntelliJ IDEA, please have a look at Create a Project section.
Create a new Sandboxed Application project as follows in IntelliJ IDEA:
Click on File > New > Project….
Select MicroEJ.
Fill in the name of the project in the Name field.
Select the location of the project in the Location field.
Select the Application project type.
Fill the version of the artifact to publish in the Version field.
Fill the group of the artifact to publish in the Group field.
Fill the name of the artifact to publish in the Artifact field.
Keep the default JDK in the JDK field.
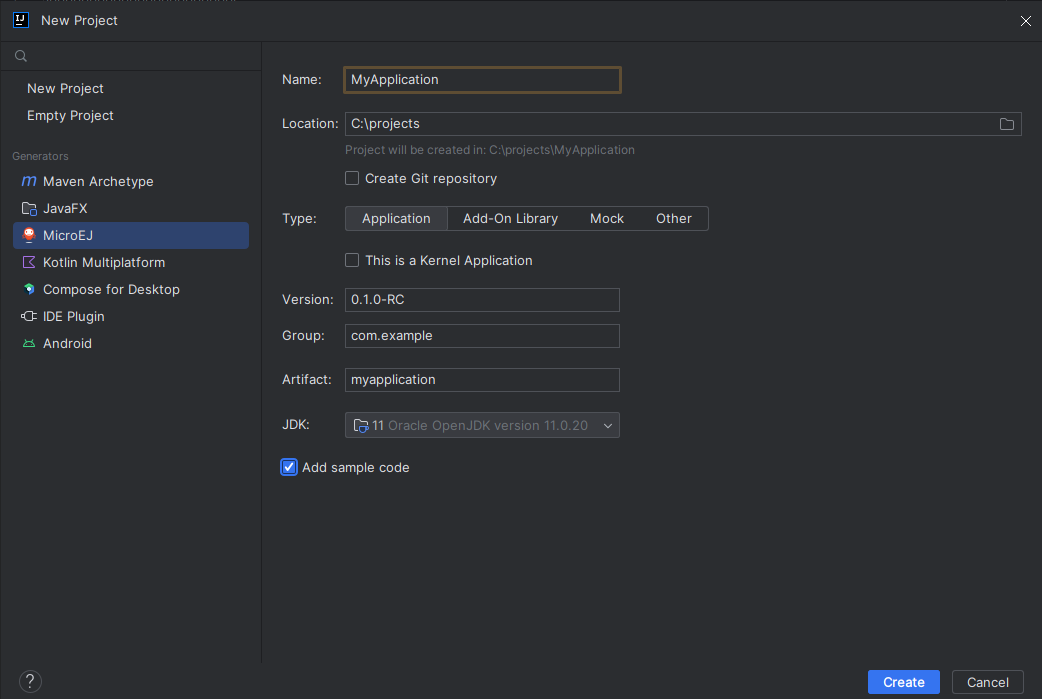
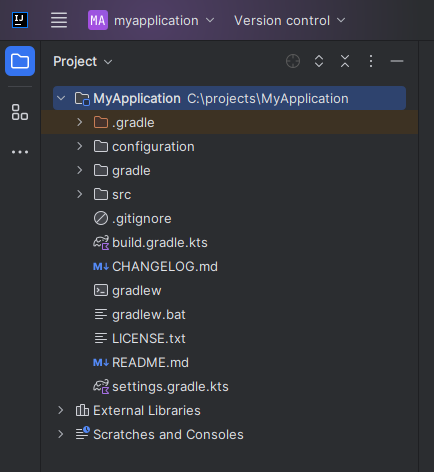
Click on the Create button. The new project is created and opened:
Run the Sandboxed Application on the Virtual Device
MicroEJ provides ready to use kernels on the Developer Repository.
The MyApplication project needs to be configured to use a kernel:
Open the
build.gradle.ktsfile of the MyApplication project.Add the dependency to the NXP i.MXRT1170 kernel:
microejVee("com.microej.kernel:NXP-MIMXRT1170-3_0_0_GCC_GREEN:2.1.1")
Note
To use your own Kernel, refer to the procedure described in Run a Sandboxed Application on your Multi-Sandbox Executable and Virtual Device.
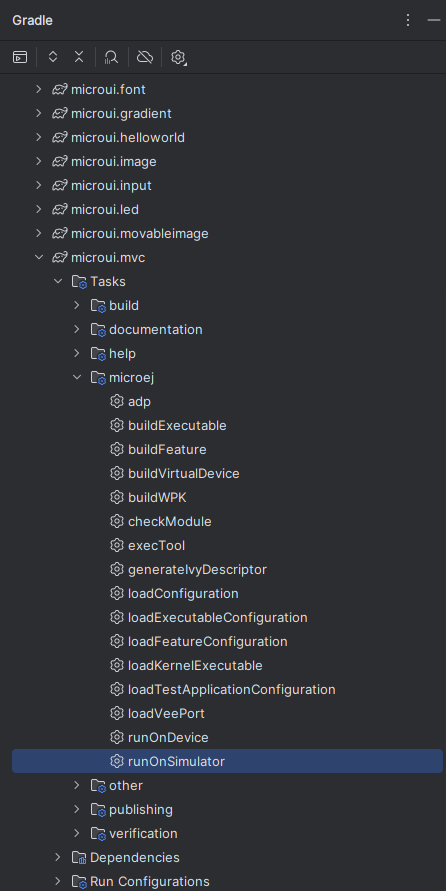
In order to execute the MyApplication project on the Virtual Device, the SDK provides the Gradle runOnSimulator task.
Note
If you are using an IDE other than IntelliJ IDEA, please have a look at Run on Simulator section.
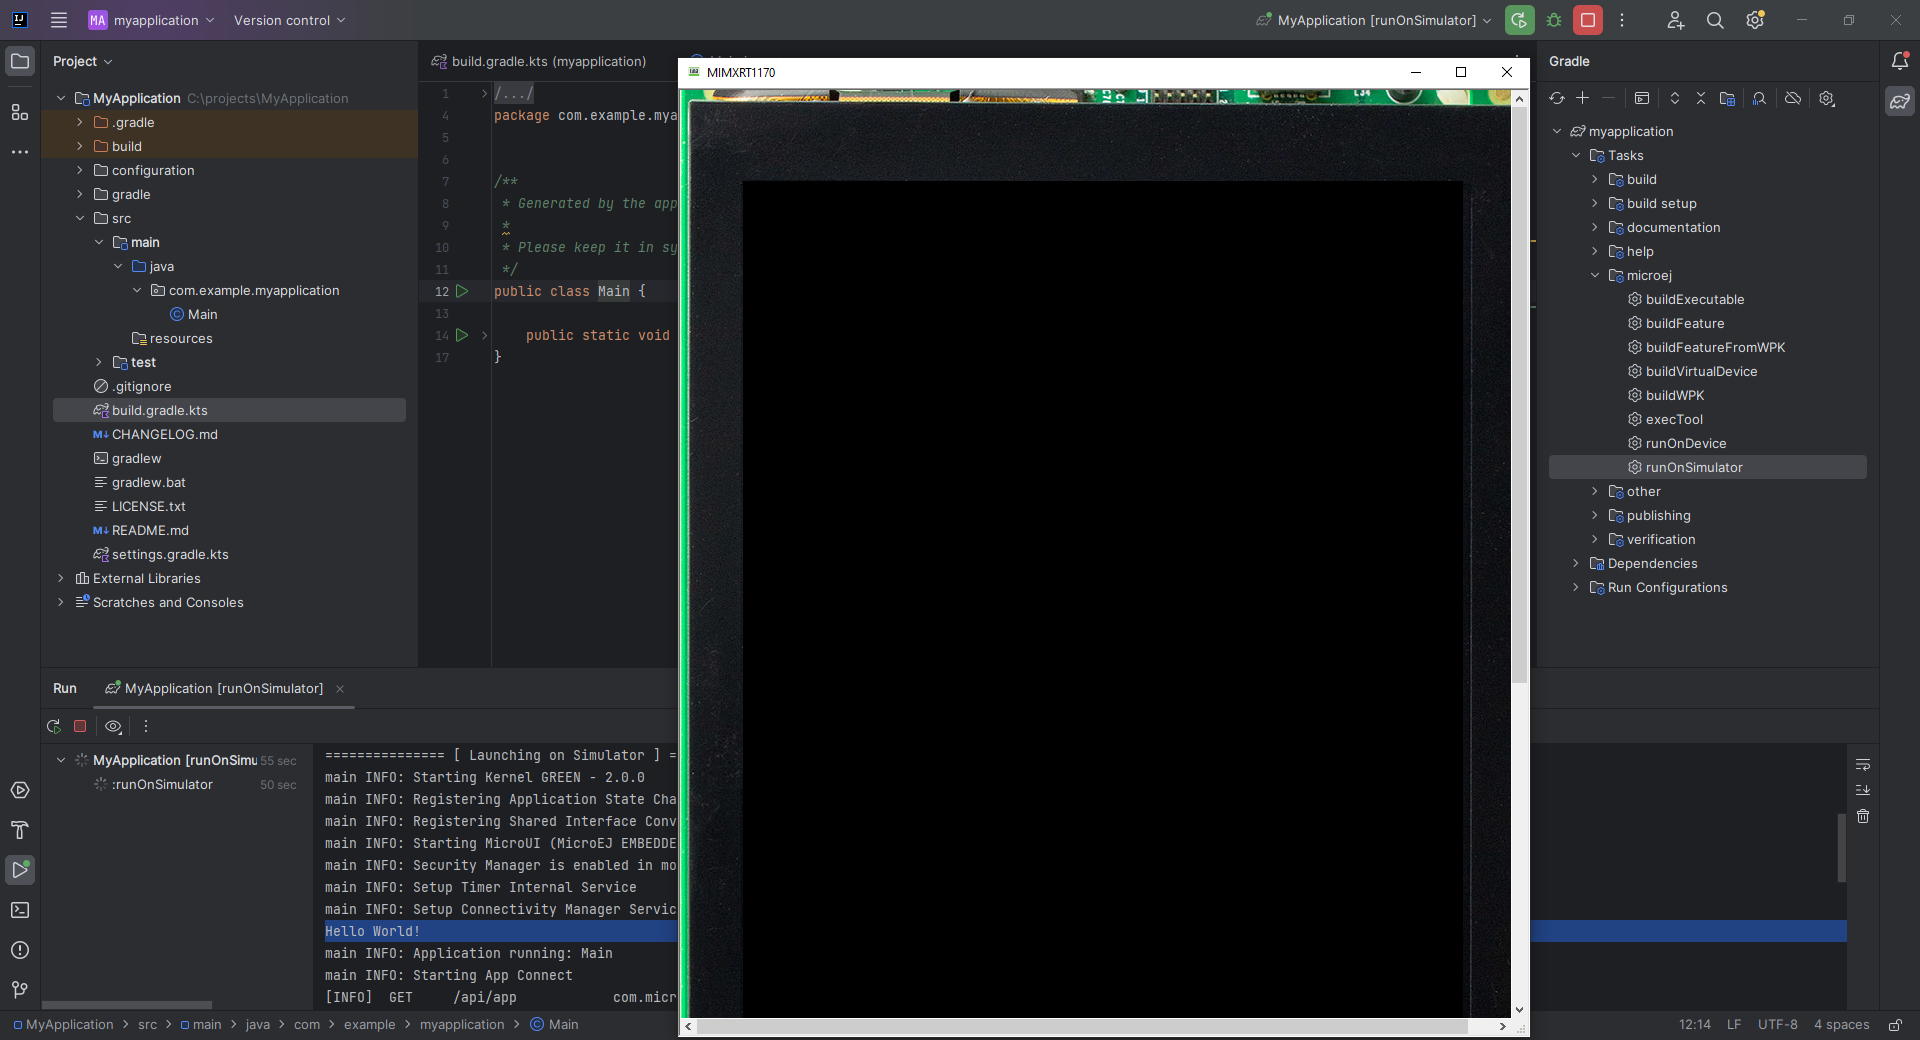
Double-click on the runOnSimulator task in the Gradle tasks view. It may take a few seconds to start:
The Virtual Device starts and executes the MyApplication project.
The Hello World! message can be seen in the console:
Run the Sandboxed Application on the NXP i.MXRT1170 Evaluation Kit
The Multi-Sandbox Executable embeds a server that listens for Sandboxed Applications deployment commands.
The MyApplication project can be deployed on the NXP i.MXRT1170 Evaluation Kit using the localDeploy tool.
This tool will deploy the application on the NXP i.MXRT1170 Evaluation Kit through your local network.
Configure the localDeploy tool in MyApplication project:
Open the
build.gradle.ktsfile of the MyApplication project.Paste the following code at the beginning of the file:
import com.microej.gradle.tasks.BuildFeatureTask
import okhttp3.MediaType.Companion.toMediaType
import okhttp3.MultipartBody
import okhttp3.OkHttpClient
import okhttp3.Request
import okhttp3.RequestBody.Companion.asRequestBody
import java.util.*
Paste the following code at the end of the file:
val buildFeatureTask = tasks.withType(BuildFeatureTask::class).named("buildFeature")
tasks.register("localDeploy") {
dependsOn("buildFeature")
group = "microej"

// Adjust the following variables to your needs
val boardIP = "<Board IP Address>" // board ip address
val boardPort = 4001 // AppConnect port
val force = true // overwrote existing app with same name
val start = true // start app after install
// Note: if your metadata (feature.kf) is part of '/src/main/resources', modify this path accordingly
val featureKFFilePath = "generated/microej-app-wrapper/feature-resources/feature.kf"

doLast {
   val applicationFOFile = buildFeatureTask.get().featureFile.get().asFile
   val properties = Properties()
   project.layout.buildDirectory.file(featureKFFilePath).get().asFile.inputStream().use(properties::load)
   val appName = properties.getProperty("name") ?: error("App name not found in $featureKFFilePath")
   val appVersion = properties.getProperty("version") ?: error("App version not found in $featureKFFilePath")

   println("Deploying app $appName $appVersion to board at $boardIP:$boardPort")
   val url = "http://$boardIP:$boardPort/api/app/install?force=$force&start=$start&name=$appName"
   val client = OkHttpClient()
   val multipartBody = MultipartBody.Builder().setType(MultipartBody.FORM) //
      .addFormDataPart(
      "binary",
      applicationFOFile.name,
      applicationFOFile.asRequestBody("application/octet-stream".toMediaType())
      )//
      .build()
   val request = Request.Builder().url(url).post(multipartBody).build()
   client.newCall(request).execute().use { response ->
      if (response.isSuccessful) {
      println("Deployment Successful! Response Code: ${response.code}")
      println("App info: ${response.body?.string()}")
      } else {
      System.err.println("Deployment Failed. Response Code: ${response.code}")
      System.err.println("Cause: ${response.body?.string()}")
      }
   }
}
}

buildscript {
repositories {
   maven {
      name = "mavenCentral"
      url = uri("https://repo.maven.apache.org/maven2/")
   }
}
dependencies {
   classpath("com.squareup.okhttp3:okhttp:4.12.0")
}
}
Update the
boardIPvariable with your board IP address.Reload the Gradle project:
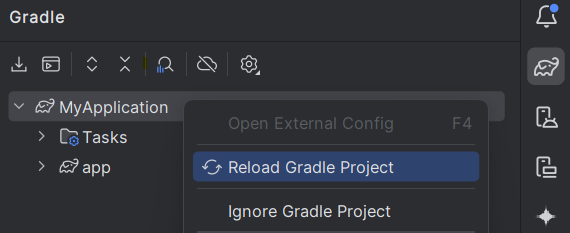
A localDeploy task is now visible in the microej tasks list.
Double-click on the localDeploy task to deploy MyApplication on the board.
MyApplication is successfully deployed and the
Hello World!is displayed in the serial terminal: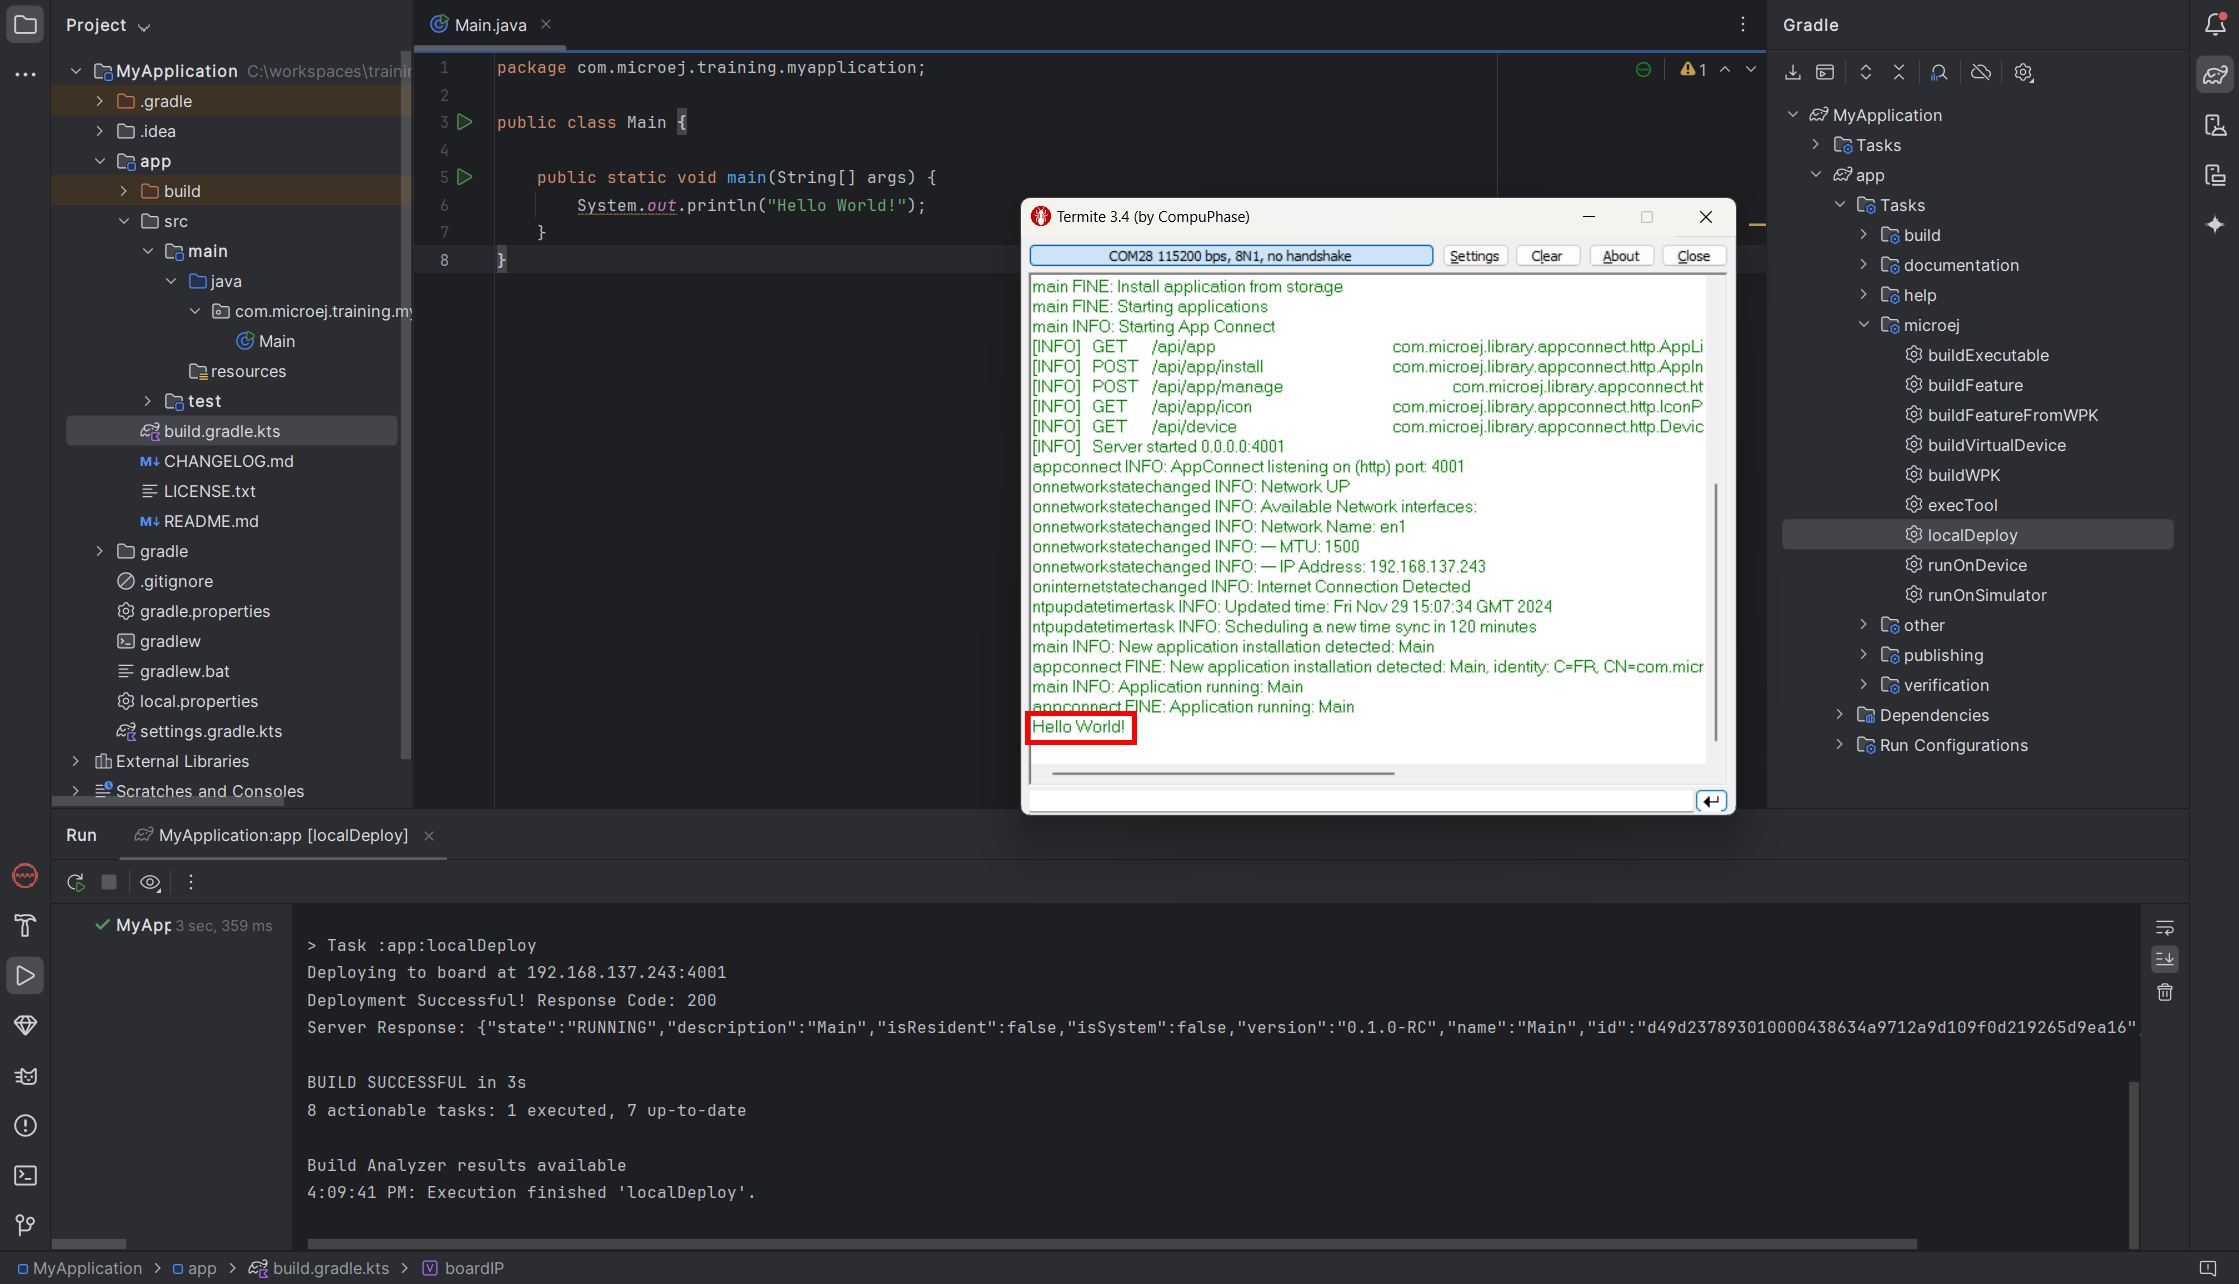
Note
If you update your application, just run the localDeploy task again to test the updated application on your board!
Well Done!
Now you know how to create a Sandboxed Application project from scratch and run it on your device!
Going Further
You have now successfully executed Sandboxed Applications on an embedded device, so what’s next?
If you are a Kernel Developer, you can follow the For Kernel Developers courses to get familiar with Kernel development.
If you are an application developer, you can continue to explore MicroEJ’s APIs and functionalities by running and studying our samples at GitHub:
Foundation Libraries |
Eclasspath |
IoT |
This project gathers all the basic examples of the foundation libraries. |
This project gathers all the examples of eclasspath. |
This project gathers simple applications using net libraries. |
You can also learn how to build bigger and better applications by reading our Application Developer Guide.
If you are an embedded engineer, you could look at our VEE port examples at GitHub. And to learn how to create custom VEE ports, you can read our VEE Porting Guide.
You can also follow the Kernel Developer Guide for more information on our multi-application framework or read about our powerful wearable solution called VEE Wear.
Last but not least, you can choose to learn about specific topics by following one of our many Training Courses ranging from how to easily debug applications to setting up a Continuous Integration process and a lot of things in between.