
Font Designer
Principle
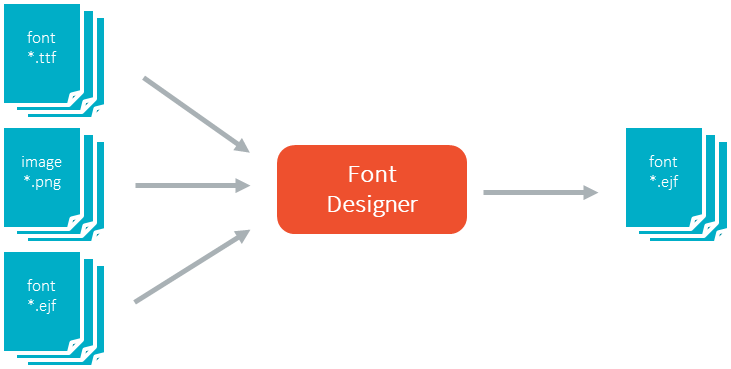
The Font Designer module is a graphical tool (Eclipse plugin) that runs within the MicroEJ IDE used to build and edit .ejf fonts.
It stores fonts in a VEE Port independent format.
Functional Description
Font Generation
Create an EJF Font
To create an EJF font, follow the steps below:
Open the Eclipse wizard: File > New > Other… > MicroEJ > MicroEJ Font.
Select a directory and a name.
Click Finish.
Once the font is created, a new editor is opened: the MicroEJ Font Designer.
Edit an EJF Font
You can edit your font with the MicroEJ Font Designer (by
double-clicking on a *.ejf file or after running the new MicroEJ
Font wizard).
This editor is divided into three main parts:
The top left part manages the main font properties.
The top right part manages the character to embed in your font.
The bottom part allows you to edit a set of characters or an individual character.
Main Properties
The main font properties are:
font size: height and width (in pixels).
baseline (in pixels).
space character size (in pixels).
styles and filters.
identifiers.
Refer to the following sections for more information about these properties.
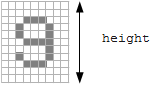
Font Height
A font has a fixed height. This height includes the white pixels at the top and at the bottom of each character simulating line spacing in paragraphs.
Font Height
Font Width: Proportional and Monospace Fonts
A monospace font is a font in which all characters have the same width.
For example a ! representation will be the same width as a w (they
will be in the same size rectangle of pixels). In a proportional font, a
w will be wider than a !.
A monospace font usually offers a smaller memory footprint than a proportional font because the Font Designer does not need to store the size of each character. As a result, this option can be useful if the difference between the size of the smallest character and the biggest one is small.
Baseline
Characters have a baseline: an imaginary line on top of which the
characters seem to stand. Note that characters can be partly under the
line, for example, g or }.

The Baseline
Space Character
The Space character (0x20) is a specific character because it has no
filled pixels. From the Main Properties Menu you can fix the space
character size in pixels.
Note
When the font is monospace, the space size is equal to the font width.
Styles
Font Designer allows creating a font file that holds several combinations of built-in styles (styles hardcoded in pixels map) and runtime styles (styles rendered dynamically at runtime). However, since MicroUI 3, a MicroUI font holds only one style: PLAIN, BOLD, ITALIC or BOLD + ITALIC.
Font Designer features three drop-downs, one for each of BOLD, ITALIC, and UNDERLINED. Each drop-down has three options: None, Built-in and Dynamic. The font options must be adjusted to be compatible with MicroUI 3:
The style option
Dynamic(that targets the runtime style) is forbidden; selectNoneinstead.The style
UNDERLINEDis forbidden; selectNoneinstead.
The styles options Built-in tag the font as bold, italic, or bold and italic.
Adjust the styles options according to the font:
The font is a plain font: select
Noneoption for each style.The font is a bold font: select
Built-infor the style bold andNonefor the other styles.The font is an italic font: select
Built-infor the style italic andNonefor the other styles.The font is a bold and italic font: select
Built-infor the styles bold and italic andNoneforUNDERLINED.
Warning
When a font holds a dynamic style or when the style UNDERLINED is not None, an error at MicroEJ application compile-time is thrown (incompatible font file).
Identifiers
A number of identifiers can be attached to an EJF font. At least one identifier is required to specify the font. Identifiers are a mechanism for specifying the contents of the font – the set or sets of characters it contains. The identifier may be a standard identifier (for example, LATIN) or a user-defined identifier. Identifiers are numbers, but standard identifiers, which are in the range 0 to 80, are typically associated with a handy name. A user-defined identifier is an identifier with a value of 81 or higher.
Character List
The list of characters can be populated through the import button, which allows you to import characters from system fonts, images or another EJF font.
Import from System Font
This page allows you to select the system font to use (left part) and
the range of characters. There are predefined ranges of characters below
the font selection, as well as a custom selection picker (for example
0x21 to 0xfe for Latin characters).
The right part displays the selected characters with the selected font. If the background color of a displayed character is red, it means that the character is too large for the defined height, or in the case of a monospace font, it means the character is too high or too wide. You can then adjust the font properties (font size and style) to ensure that characters will not be truncated.
When your selection is done, click the Finish button to import this selection into your font.
Import from Images
This page allows the loading of images from a directory. The images must
be named as follows: 0x[UTF-8].[extension].
When your selection is done, click the Finish button to import the images into your font.
Character Editor
When a single character is selected in the list, the character editor is opened.
Character Editor
Properties
You can define specific properties, such as left and right space, or index. You can also draw the character pixel by pixel - a left-click in the grid draws the pixel, a right-click erases it.
The changes are not saved until you click the Apply button. When changes
are applied to a character, the editor shows that the font has changed,
so you can now save it.
The same part of the editor is also used to edit a set of characters selected in the top right list. You can then edit the common editable properties (left and right space) for all those characters at the same time.
Anti-Aliased Fonts
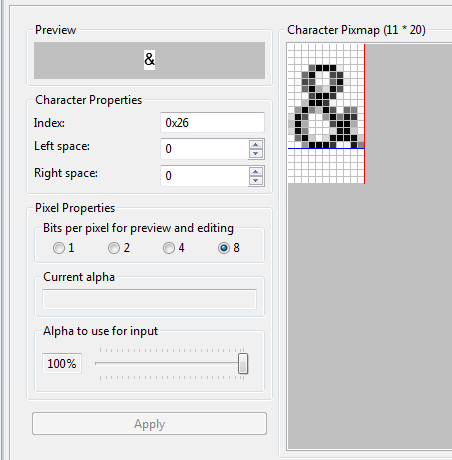
By default, when characters are imported from a system font, each pixel is either fully opaque or fully transparent. Fully opaque pixels show as black squares in the character grid in the right-hand part of the character editor; fully transparent pixels show as white squares.
However, the pixels stored in an ejf file can take one of 256
grayscale values. A fully-transparent pixel has the value 255 (the RGB
value for white), and a fully-opaque pixel has the value 0 (the RGB
value for black). These grayscale values are shown in parentheses at the
end of the text in the Current alpha field when the mouse cursor hovers
over a pixel in the grid. That field also shows the transparency level
of the pixel, as a percentage, where 100% means fully opaque.
It is possible to achieve better-looking characters by using a
combination of fully-opaque and partially-transparent pixels. This
technique is called anti-aliasing. Anti-aliased characters can be
imported from system fonts by checking the anti aliasing box in the
import dialog. The & character shown in the screenshot above was
imported using anti aliasing, and you can see the various gray levels of
the pixels.
When the Font Generator converts an ejf file into the raw format
used at runtime, it can create fonts with characters that have 1, 2, 4
or 8 bits-per-pixel (bpp). If the raw font has 8 bpp, then no conversion
is necessary and the characters will render with the same quality as
seen in the character editor. However, if the raw font has less than 8
bpp (the default is 1 bpp) any gray pixels in the input file are
compressed to fit, and the final rendering will be of lower quality (but
less memory will be required to hold the font).
It is useful to be able to see the effects of this compression, so the character editor provides radio buttons that allow the user to preview the character at 1, 2, 4, or 8 bpp. Furthermore, when 2, 4 or 8 bpp is selected, a slider allows the user to select the transparency level of the pixels drawn when the left mouse button is clicked in the grid.
Character Pixmap
This view allows to previewing and editing the character’s pixels. The closer the pixel’s color is to black, the more opaque the encoded opacity will be.
Left or right click on a pixel to draw or erase it.
Preview
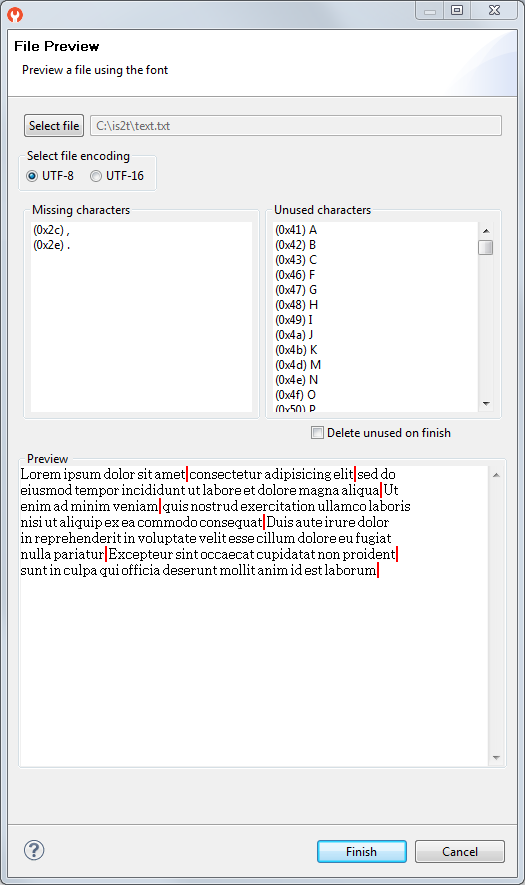
You can preview your font by pressing the Preview... button, which opens
the Preview wizard. In the Preview wizard, press the Select File button,
and select a text file which contains text that you want to see rendered
using your font. Characters that are in the selected text file but not
available in the font will be shown as red rectangles.
Font Preview
Removing Unused Characters
In order to reduce the size of a font file, you can reduce the number of
characters in your font to be only those characters used by your
application. To do this, create a file which contains all the characters
used by your application (for example, concatenating all your NLS files
is a good starting point). Then open the Preview wizard as described
above, selecting that file. If you select the check box Delete unused on
finish, then those characters that are in the font but not in the text
file will be deleted from the font when you press the Finish button,
leaving your font containing the minimum number of characters. As this
font will contain only characters used by a specific application, it is
best to prepare a “complete” font, and then apply this technique to a
copy of that font to produce an application specific cut-down version of
the font.
Use an EJF Font
An EJF Font must be converted to a format which is specific to the targeted VEE Port. The Font Generator tool performs this operation for all fonts specified in the list of fonts configured in the application launch.
Dependencies
No dependency.
Installation
The Font Designer module is already installed in the MicroEJ SDK5.
Use
Create a new ejf font file or open an existing one in order to open
the Font Designer plugin.