
Former Platform Migration
This chapter describes the steps to migrate a former MicroEJ Platform in its latest form described in Create a VEE Port chapter.
As a reminder, this new form brings two main features:
Both Platform build and dependencies declaration are managed by MicroEJ Module Manager. This allows a fully automated build and continuous integration.
The configuration of the target Board Support Package (BSP) has been revisited to support any BSP Connection cases.
Former MicroEJ Platforms were usually distributed by MicroEJ Corp. in an all-in-one ZIP file also called fullPackaging.
In this document, the MicroEJ Platform for STMicroelectronics STM32F746G-DISCO board will be used as an example.
The following figure shows the fullPackaging structure once extracted.
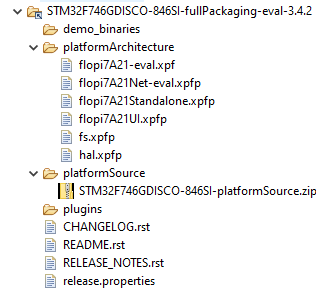
STM32F746G-DISCO Platform Full Packaging Structure
The migration steps are:
Create a Module Repository to store the MicroEJ Architecture and MicroEJ Packs used by the Platform.
Import the Platform Configuration Additions into the Platform Configuration project.
Update the Front Panel project configuration.
Configure the BSP Connection.
Add the Build Script and Run Script.
Note
The migration of a Platform requires at least the version 5.4.0 of the SDK.
Create an Architecture Repository
The first step is to create an Architecture Repository containing the Architecture
and Packs provided in the platformArchitecture directory of the fullPackaging package.
Note
If the Architecture and Packs used by the Platform are already stored in the module repositories provided by MicroEJ Corp (Central Repository, Developer Repository), or in your organization’s repositories, then move to the next step.
By default, we provide the steps to extend the default MicroEJ SDK settings file configuration with local Architecture and Packs modules. The following steps can be adapted to custom settings file.
Create a new empty project named
architecture-repositoryCreate a new file named
ivysettings.xmlwith the following content and update the included settings file according to your MicroEJ SDK version (see SDK Version)<?xml version="1.0" encoding="UTF-8"?> <ivysettings> <property name="local.repo.url" value="${ivy.settings.dir}" override="false"/> <!-- Include default settings file for MicroEJ SDK version: - MICROEJ SDK 5.4.0 or higher: ${user.home}/.microej/microej-ivysettings-5.4.xml - MICROEJ SDK 5.0.0 to 5.3.1: ${user.home}/.microej/microej-ivysettings-5.xml - MICROEJ SDK 4.1.x: ${user.home}/.ivy2/microej-ivysettings-4.1.xml --> <include file="${user.home}/.microej/microej-ivysettings-5.xml"/> <settings defaultResolver="ArchitectureResolver"/> <resolvers> <chain name="ArchitectureResolver"> <filesystem m2compatible="true"> <artifact pattern="${local.repo.url}/${microej.artifact.pattern}" /> <ivy pattern="${local.repo.url}/${microej.ivy.pattern}" /> </filesystem> <resolver ref="${microej.default.resolver}"/> </chain> </resolvers> </ivysettings>
Copy the Architecture file (
.xpf) into the correct directory following its naming convention).Open or extract the Architecture file (
.xpf)Open the
release.propertiesfile to retrieve the naming convention mapping:architectureis theISA(e.g.CM7)toolchainis theTOOLCHAIN(e.g.CM7hardfp_ARMCC5)nameis theUID(e.g.flopi7A21)versionis theVERSION(e.g.7.11.0)
For example, in the STM32F746G-DISCO Platform, the Architecture file
flopi7A21-eval.xpfshall be copied and renamed toarchitecture-repository/com/microej/architecture/CM7/CM7hardfp_ARMCC5/flopi7A21/7.11.0/flopi7A21-7.11.0-eval.xpf.Copy the Architecture Specific Packs files (
.xpfp) into the correct directory following MicroEJ Naming Convention (see Pack Import) with the exception of the Standalone pack that should not be imported (e.g. namedflopi7A21Standalone.xpfp).Open or extract the Architecture Specific Pack (
.xpfp).Note
The Architecture Specific Packs have the
UIDof the Architecture in their name (e.g.flopi7A21UI.xpfp) and theirrelease_pack.propertiesfile contains the information of the Architecture.Open the
release_pack.propertiesfile to retrieve the naming convention mapping:architectureis theISA(e.g.CM7)toolchainis theTOOLCHAIN(e.g.CM7hardfp_ARMCC5)nameis theUID(e.g.flopi7A21)packNameis theNAME(e.g.ui)packVersionis theVERSION(e.g.12.0.1)
For example, in the STM32F746G-DISCO Platform, the Architecture Specific Pack UI
flopi7A21UI.xpfpshall be copied and renamed toarchitecture-repository/com/microej/architecture/CM7/CM7hardfp_ARMCC5/flopi7A21-ui-pack/12.0.1/flopi7A21-ui-pack-12.0.1.xpfp.Copy the Legacy Generic Packs (
.xpfpfiles) into the correct directory following MicroEJ Naming Convention (see Pack Import).Open or extract the Generic Pack (
.xpfp).Note
The
release_pack.propertiesof Legacy Generic Packs does not contain information about Architecture.Open the
release_pack.propertiesfile:packNameis theNAME(e.g.fs)packVersionis theVERSION(e.g.4.0.2)
For example, in the STM32F746G-DISCO Platform, the Legacy Generic Pack FS
fs.xpfpshall be copied and renamed toarchitecture-repository/com/microej/pack/fs/4.0.2/fs-4.0.2.xpfp.Configure MicroEJ Module Manager to use the Architecture Repository:
Go to Window > Preferences > MicroEJ > Module Manager
In Module Repository set Settings File: to
${workspace_loc:architecture-repository/ivysettings.xml}.Apply and Close
Here is the layout of the Architecture Repository for the STM32F746G-DISCO Platform.
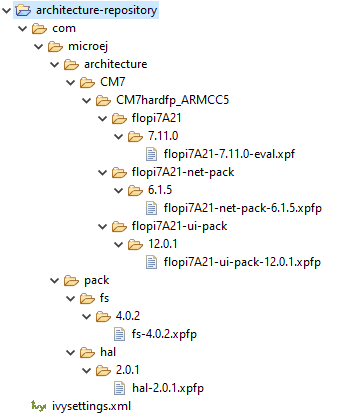
Architecture Repository for STM32F746G-DISCO fullPackaging
Import the Former Platform Sources
Go to File > Import… > General > Existing Projects into Workspace.
Browse to the archive file that contains the platform sources, like in the example below.
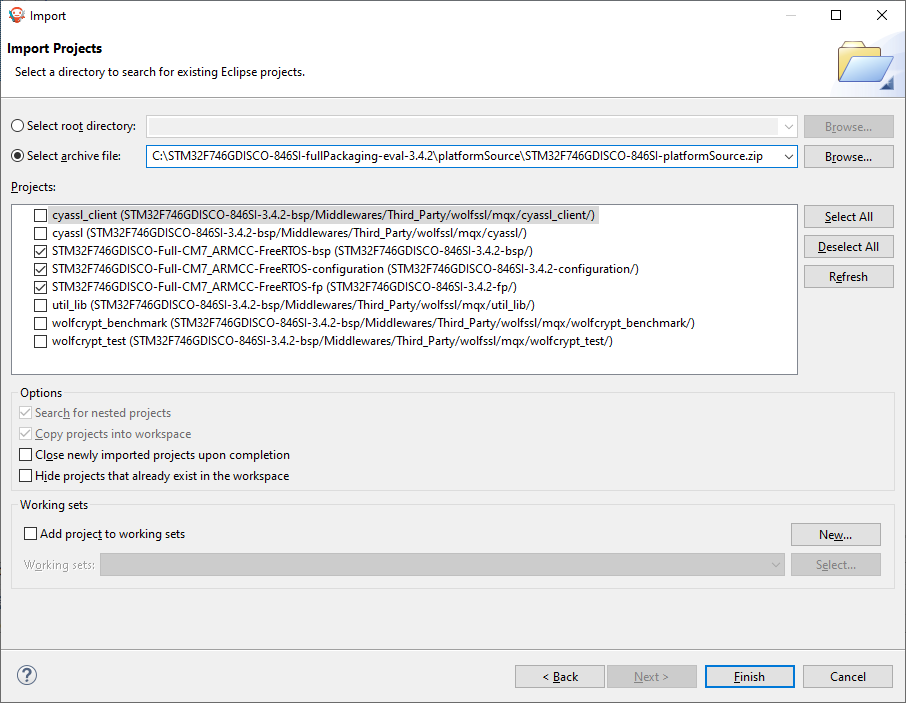
Select the
-configuration,-fpand-bspprojects prefixed with the Platform name (e.g.,STM32F746GDISCO-Full-CM7_ARMCC-FreeRTOS).Click
Finish.
Install the Platform Configuration Additions
Rename the file
bsp.propertieslocated in the Platform Configuration Project tobsp2.properties(save it for later).Install Platform Configuration Additions, by following instructions described at https://github.com/MicroEJ/VEEPortQualificationTools/blob/master/framework/platform/README.rst. Files within the
contentfolder have to be copied to the-configurationproject (e.g.STM32F746GDISCO-Full-CM7_ARMCC-FreeRTOS-configuration).Edit the
module.propertiesfile and setcom.microej.platformbuilder.platform.filenameto the name of the platform configuration file (e.g.STM32F746GDISCO.platform).Update the default name of the Platform module in the
module.ivy. Replace with<info organisation="com.microej.platform.st.stm32f746g-disco" module="Platform" status="integration" revision="1.0.0">.Update the
module.ivywith the Architecture and Packs dependencies.
Here is the module dependencies declared for the STM32F746G-DISCO Platform.
<dependencies>
  <!-- MicroEJ Architecture -->
  <dependency org="com.microej.architecture.CM7.CM7hardfp_ARMCC5" name="flopi7A21" rev="7.11.0">
    <artifact name="flopi7A21" m:classifier="${com.microej.platformbuilder.architecture.usage}" ext="xpf"/>
  </dependency>

  <!-- MicroEJ Architecture Specific Packs  -->
  <dependency org="com.microej.architecture.CM7.CM7hardfp_ARMCC5" name="flopi7A21-ui-pack" rev="12.0.1">
    <artifact name="flopi7A21-ui-pack" ext="xpfp"/>
  </dependency>
  <dependency org="com.microej.architecture.CM7.CM7hardfp_ARMCC5" name="flopi7A21-net-pack" rev="6.1.5">
    <artifact name="flopi7A21-net-pack" ext="xpfp"/>
  </dependency>

  <!-- Legacy MicroEJ Generic Packs -->
  <dependency org="com.microej.pack" name="fs" rev="4.0.2">
    <artifact name="fs" ext="xpfp"/>
  </dependency>
  <dependency org="com.microej.pack" name="hal" rev="2.0.1">
    <artifact name="hal" ext="xpfp"/>
  </dependency>

</dependencies>
Update the Front Panel Configuration
In
-configuration/frontpanel/frontpanel.propertiesset theproject.nameto the folder name that contains the front-panel (e.g.project.name=STM32F746GDISCO-Full-CM7_ARMCC-FreeRTOS-fp).
At this state, the Platform is not connected to the BSP yet, but you can check that everything is properly configured so far by building it:
Right-click on the
-configurationproject and select Build ModuleImport the Platform built into the workspace by following the instructions available at the end of the build logs (see logs example below).
module-platform:report:
    [echo]     ============================================================================================================
    [echo]     Platform has been built in this directory 'C:\STM32F746GDISCO-Platform-CM7hardfp_ARMCC5-0.1.0'.
    [echo]     To import this project in your MicroEJ SDK workspace (if not already available):
    [echo]      - Select 'File' > 'Import...' > 'General' > 'Existing Projects into Workspace' > 'Next'
    [echo]      - Check 'Select root directory' and browse 'C:\STM32F746GDISCO-Platform-CM7hardfp_ARMCC5-0.1.0' > 'Finish'
    [echo]     ============================================================================================================
At this stage the Platform is built and imported in the workspace, so you can create a Standalone Application and run it on the Simulator (see Create a MicroEJ Standalone Application).
Note
If the build failed, it might be because the Architecture and Packs can not be retrieved from the Architecture Repository. Ensure that the Architecture Repository is correctly configured and that it contains the required artifacts (as described in the first step).
Configure the BSP Connection
This section explains how to configure a full BSP Connection on the STM32F746G-DISCO Platform. See BSP Connection for more information.
Open
-configuration/bsp/bsp.properties.Comment out and set the following variables:
root.dirmicroejapp.relative.dirmicroejlib.relative.dirmicroejinc.relative.dirmicroejscript.relative.dir
For example:
# Specify the MicroEJ Application file ('microejapp.o') parent directory.
# This is a '/' separated directory relative to 'bsp.root.dir'.
microejapp.relative.dir=Projects/STM32746G-Discovery/Applications/MicroEJ/platform/lib

# Specify the MicroEJ Platform runtime file ('microejruntime.a') parent directory.
# This is a '/' separated directory relative to 'bsp.root.dir'.
microejlib.relative.dir=Projects/STM32746G-Discovery/Applications/MicroEJ/platform/lib

# Specify MicroEJ Platform header files ('*.h') parent directory.
# This is a '/' separated directory relative to 'bsp.root.dir'.
microejinc.relative.dir=Projects/STM32746G-Discovery/Applications/MicroEJ/platform/inc

# Specify BSP external scripts files ('build.bat' and 'run.bat') parent directory.
# This is a '/' separated directory relative to 'bsp.root.dir'.
microejscript.relative.dir=Projects/STM32746G-Discovery/Applications/MicroEJ/scripts

# Specify the BSP root directory. Can use ${project.parent.dir} which target the parent of platform configuration project
# For example, '${project.parent.dir}/PROJECT-NAME-bsp' specifies a BSP project beside the '-configuration' project
root.dir=${project.parent.dir}/STM32F746GDISCO-Full-CM7_ARMCC-FreeRTOS-bsp/
The paths to microejXXX.relative.dir can be inferred by looking at
the output.dir value in bsp2.properties saved earlier. For
example on the STM32F746G-DISCO project, its value is
${workspace}/${project.prefix}-bsp/Projects/STM32746G-Discovery/Applications/MicroEJ/platform.
The BSP project path
${workspace}/${project.prefix}-bspbecomes${project.parent.dir}/STM32F746GDISCO-Full-CM7_ARMCC-FreeRTOS-bsp/.Projects/STM32746G-Discovery/Applications/MicroEJ/platformis the path to the Application file, Platform header and runtime files. MicroEJ convention is to put the Application file and Platform runtime files toplatform/lib/and the Platform header files toplatform/inc/.Build Script File and Run Script File are PCA-specific and did not exist before. By convention we put them in a
scripts/directory.
The paths to microejXXX.relative.dir can be also be checked by
looking at the C TOOLCHAIN configuration of the BSP. For example on
the STM32F746G-DISCO project, the BSP configuration is located at
STM32F746GDISCO-Full-CM7_ARMCC-FreeRTOS-bsp/Projects/STM32746G-Discovery/Applications/MicroEJ/MDK-ARM/Project.uvprojx.
In Project > Options for Target ‘standalone’… > C/C++ > Include Paths contains
../platform/inc. This corresponds to themicroejinc.relative.dirrelative the TOOLCHAIN project’s file.In the Project pane, there is a folder
MicroEJ/Libsthat containsmicroejruntime.libandmicroejapp.o.Right-click on
microejruntime.lib> Options for File ‘XXX’…. The Path is../platform/lib/microejruntime.lib. This corresponds to themicroejlib.relative.dir.Right-click on
microejapp.o> Options for File ‘XXX’…. The Path is../platform/lib/microejapp.o. This corresponds to themicroejapp.relative.dir.
Rebuild the platform (Right-click on the
-configurationproject and select Build Module)
At this stage the Platform is connected to the BSP so you can build and program a Firmware (see Run on the Device).
Add the Build and Run Scripts
The final stage consists of adding the Build Script, to automate the build of a Firmware, and the Run Script, to automate the programming of a MicroEJ Firmware onto the device.
The Platform Qualification Tools provides examples of Build Script and Run Script for various C TOOLCHAIN here. This training also describes the steps to create and use these scripts.
On the STM32F746G-DISCO, the C TOOLCHAIN used is Keil uVision.
Create the directory pointed by
microejscript.relative.dir(e.g.STM32F746GDISCO-Full-CM7_ARMCC-FreeRTOS-bsp\Projects\STM32746G-Discovery\Applications\MicroEJ\scripts).Copy the example scripts from the Platform Qualification Tools for the C TOOLCHAIN of the BSP (e.g.
PlatformQualificationTools/framework/platform/scripts/KEILuV5/)Configure the scripts. Refer to the documentation in the scripts comments for this step.
Enable the execution of the build script:
Go to Run > Run Configurations…
Select the launch configuration
Go to Configuration > Device > Deploy
Ensure Execute the MicroEJ build script (build.bat) at a location known by the 3rd-party BSP project. is checked.
Use the Platform in Module Projects
Module projects may require the Platform, for example to build an Application or to run a Testsuite. One way of selecting the Platform in a module project is to declare it as a module dependency (see Select a VEE Port).
In case a former Platform is loaded this way in your existing module projects, the dependency has to be updated. In this example, the Platform would now be selected like this:
<dependency org="com.microej.platform.st.stm32f746g-disco" name="Platform" rev="1.0.0" conf="platform->default" transitive="false"/>
This also requires that your module projects use a compatible version of the associated build type (the build type relates to the Module Natures).
As stated before, loading a Platform in its latest form requires at least the version 5.4.0 of the SDK.
Therefore, make sure to use versions of the build types that come with the SDK 5.4.0 and above.
Here is a brief summary of the minimum version for the most common module natures:
Add-On Library: build type
com.is2t.easyant.buildtypes#build-microej-javalibversion5.0.0and above.Standalone Application: build type
com.is2t.easyant.buildtypes#build-firmware-singleappversion1.4.0and above.Sandboxed Application: build type
com.is2t.easyant.buildtypes#build-applicationversion8.0.0and above.
Going further
Now that the Platform is connected to the BSP it can leverage the Java Testsuites provided by the Platform Qualification Tools. See Configure and Run the Testsuite documentation for a step by step explanation on how to do so.