
Create a Project
This chapter explains the different ways to create a new Application, Library or Mock project. If you want to create a VEE Port project, refer to the Create a VEE Port section.
Note
The different project creation systems do not produce exactly the same project content and structure. Especially, the IntelliJ IDEA wizard produces a simple project whereas the Android Studio, Command Line Interface and Eclipse wizards create multi-projects builds. Both structures (single and multi projects) can be used, the recommended one depends on the context (components, size of the project, …). Refer to the official Gradle documentation for more information.
The creation of a project with IntelliJ IDEA is done as follows:
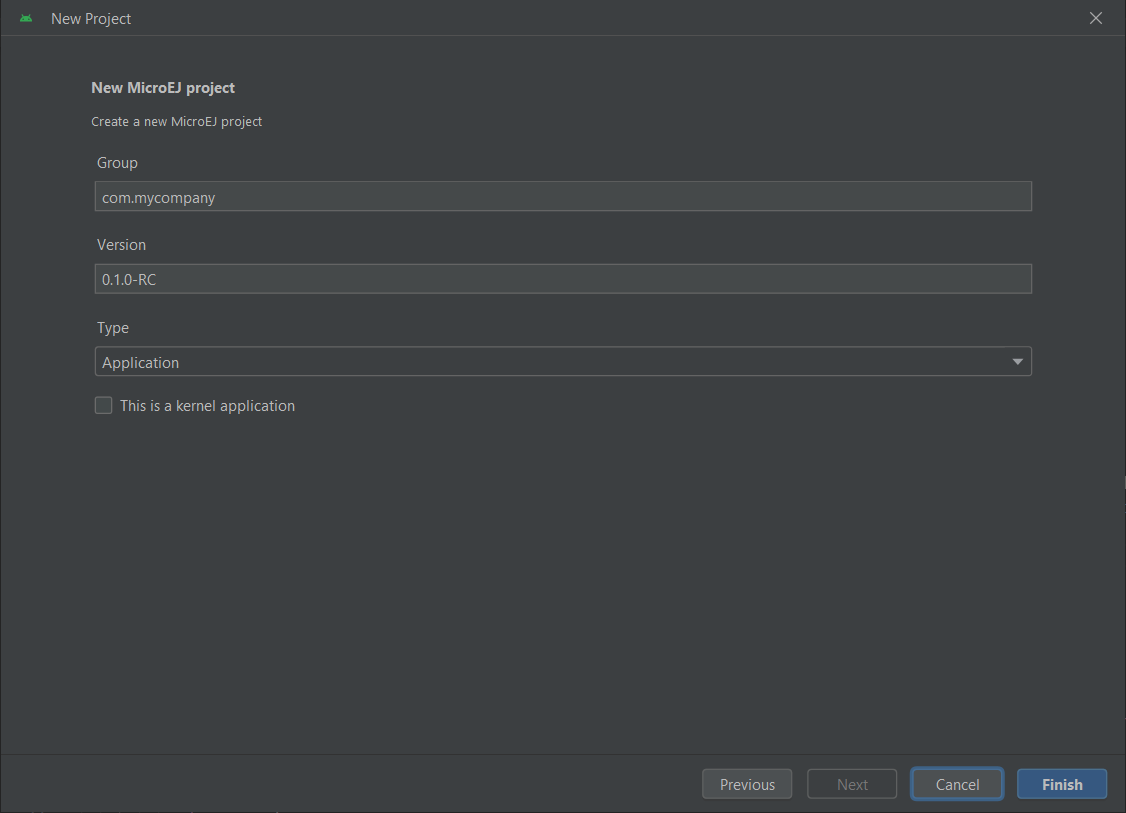
Click on File > New > Project….
Select MicroEJ in Generators list on the left panel.
Fill the name of the project in the Name field.
Select the location of the project in the Location field.
Select the project type. If there is no button for your project type, click on Other button and select it in the drop-down list.
If you selected Application project type, you can check This is a kernel application checkbox if your Application is a Kernel.
Fill the version of the artifact to publish in the Version field.
Fill the group of the artifact to publish in the Group field.
Fill the name of the artifact to publish in the Artifact field.
Select the JVM used by Gradle in the JDK combobox.
Check the Add sample code checkbox.
Click on Create button.
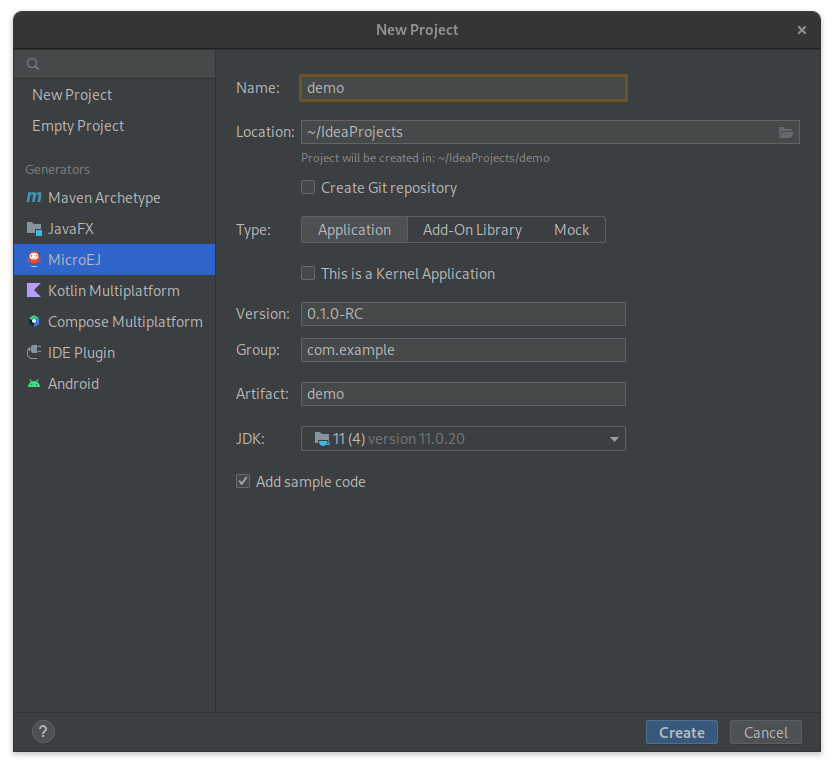
Project Creation in IntelliJ IDEA
Note
The Gradle project created by the wizard uses Gradle Wrapper with Gradle version 8.10.2.
Refer to the Gradle Wrapper section for more information.
Note
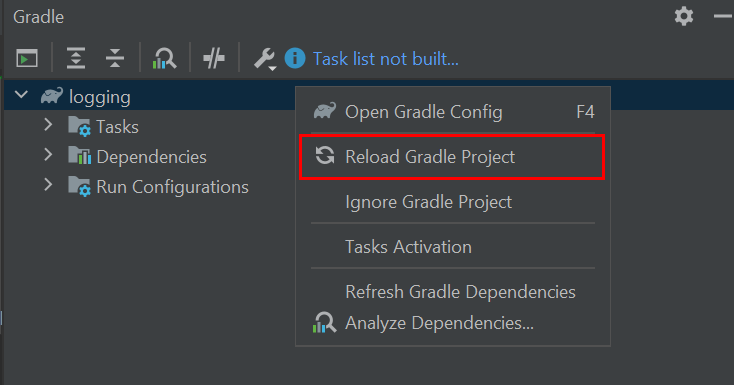
By default, IntelliJ IDEA automatically saves any file change, but requires the user to explicitly trigger the reload of a Gradle project when its configuration has changed. Therefore, when the configuration of a Gradle project has been updated, you have to click on the reload icon button which appears on the right of the editor:
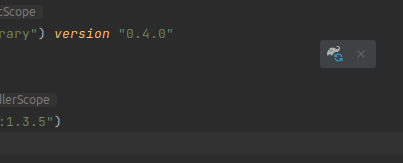
Gradle Project reload in IntelliJ IDEA
You can also configure IntelliJ IDEA to automatically reload a Gradle project after a change. Refer to the How To Automatically reload a Gradle project section for more information.
Warning
When reloading your Gradle project, the build can fail if the SDK EULA has not been accepted.
In that case, you must set the ACCEPT_MICROEJ_SDK_EULA_V4_1A environment variable to YES and
restart IntelliJ IDEA. For more information about SDK EULA, refer to the Licenses chapter.
When the Gradle project is loaded, it should compile successfully, without any error. You can then learn how to launch the build of the project, or how to run it on the Simulator in the case of an Application.
The creation of a project with Android Studio is done as follows:
Click on File > New > Project….
Select Generic > New MicroEJ project.
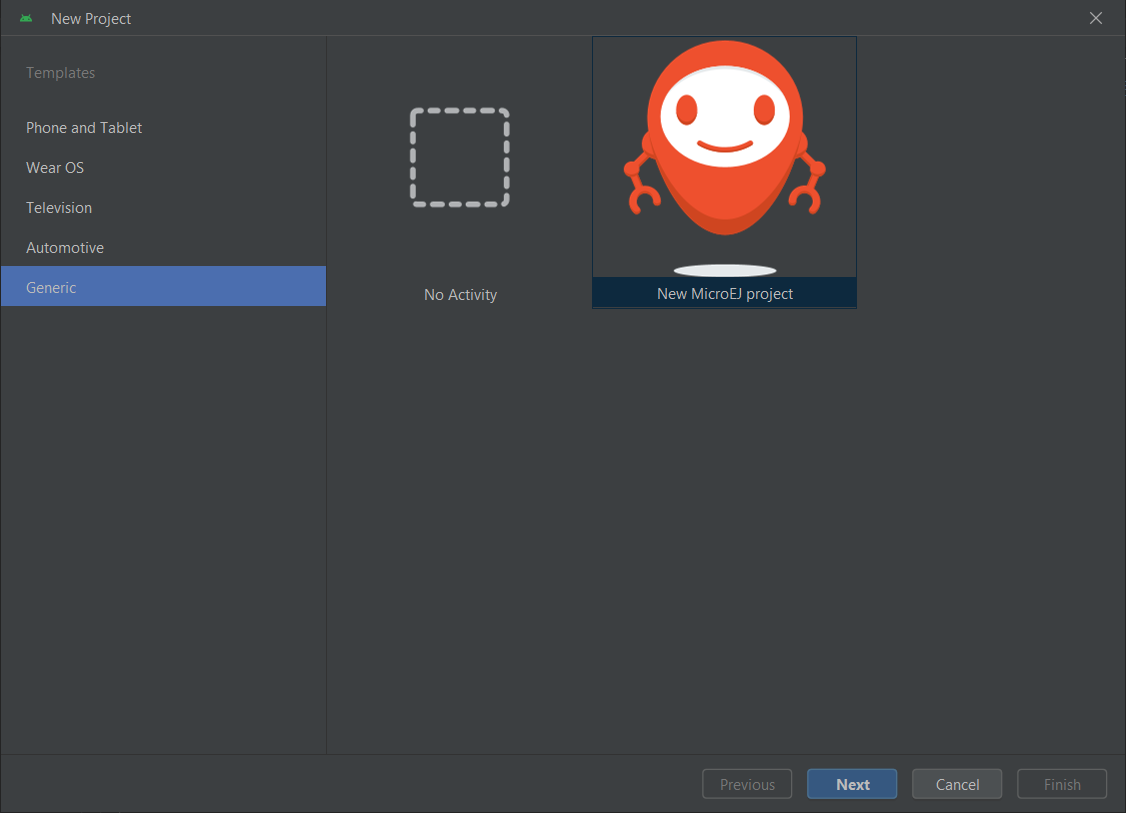
Project Creation in Android Studio
Click on the Next button.
Fill the name of the project in the Name field.
Fill the package name of the project in the Package name field.
Select the location of the project in the Save location field.
Keep the default Android SDK in the Minimum SDK field.
Select Kotlin for the Build configuration language field.
Note
Groovy build script DSL is not officially supported by the SDK, so the project created by the Wizard uses Kotlin regardless of the language selected by the user.
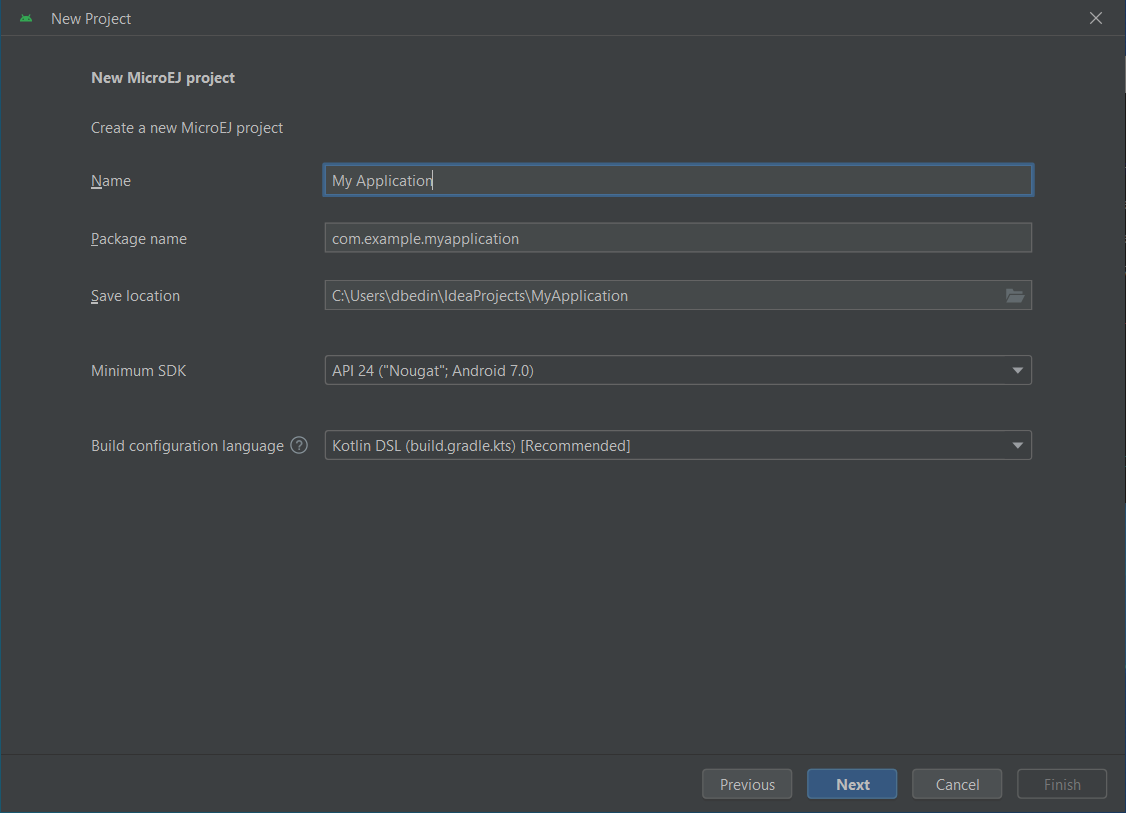
Project Creation in Android Studio
Click on Next button.
Fill the group of the artifact to publish in the Group field.
Fill the version of the artifact to publish in the Version field.
Select the project type in the drop-down list.
If you selected Application project type, you can check This is a kernel application checkbox if your Application is a Kernel.
Click on Finish button.
Project Creation in Android Studio
Change the view from Android to Project in the selectbox at the top of the project’s files tree:
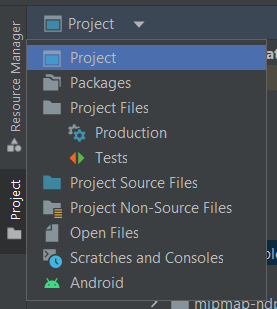
Project View in Android Studio
Note
If you do not use the last version of Android Studio, refer to the SDK and Gradle Compatibility table to use the right Gradle version in the Gradle Wrapper configuration.
The project created by the wizard is a multi-project with a single subproject (named app).
The type of this subproject is the type that has previously been chosen.
Note
By default, Android Studio automatically saves any file change, but requires the user to explicitly trigger the reload of a Gradle project when its configuration has changed. Therefore, when the configuration of a Gradle project has been updated, you have to click on the Sync Now action which appears on the top-right of the editor:
Gradle Project reload in Android Studio
You can also configure Android Studio to automatically reload a Gradle project after a change. Refer to the How To Automatically reload a Gradle project section for more information.
Warning
When reloading your Gradle project, the build can fail if the SDK EULA has not been accepted.
In that case, you must set the ACCEPT_MICROEJ_SDK_EULA_V4_1A environment variable to YES and
restart Android Studio. For more information about SDK EULA, refer to the Licenses chapter.
When the Gradle project has been reloaded, it should compile successfully, without any error. You can then learn how to launch the build of the project, or how to run it on the Simulator in the case of an Application.
The creation of a project with Eclipse is done as follows:
Click on File > New > Project….
Select MicroEJ > <Type> project depending on your project type and click on the Next button.
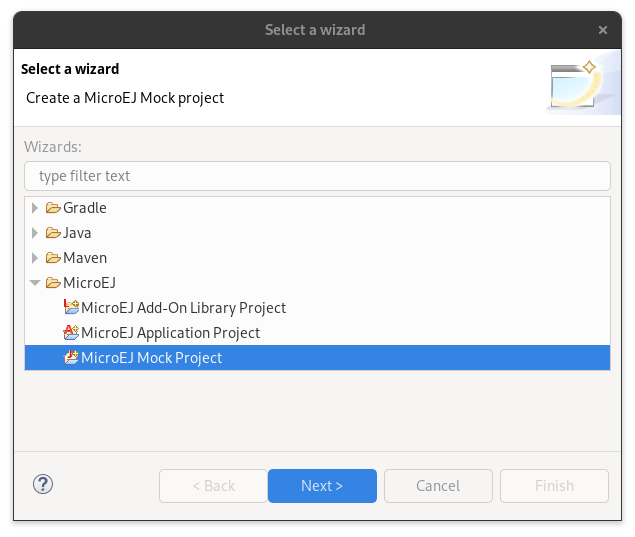
Project Type Selection in Eclipse
Fill the name of the project in the Name field, for example
My Project.Fill the group of the artifact to publish in the Organization field.
Fill the name of the artifact to publish in the Module field.
Fill the version of the artifact to publish in the Revision field.
If you selected Application module type, you can check This is a kernel application checkbox if your Application is a Kernel.
Click on Finish button.
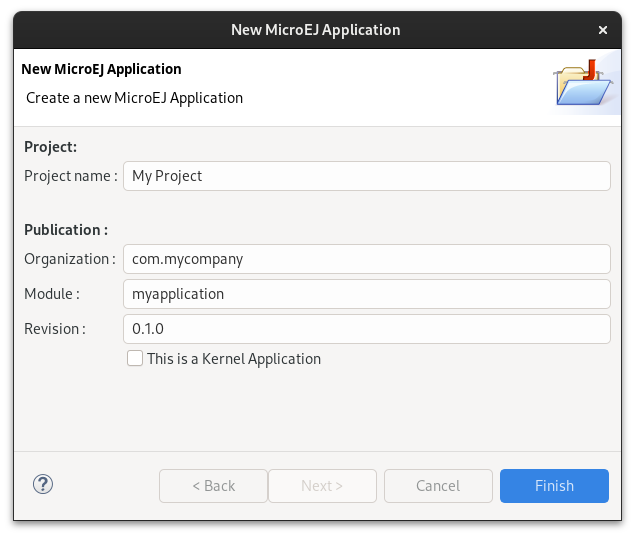
Application Creation in Eclipse
Note
The Gradle project created by the wizard uses Gradle Wrapper with Gradle version 8.10.2.
Refer to the Gradle Wrapper section for more information.
Warning
When reloading your Gradle project, the build can fail if the SDK EULA has not been accepted.
In that case, you must set the ACCEPT_MICROEJ_SDK_EULA_V4_1A environment variable to YES and
restart Eclipse. For more information about SDK EULA, refer to the Licenses chapter.
When the Gradle project is loaded, it should compile successfully, without any error. You can then learn how to launch the build of the project, or how to run it on the Simulator in the case of an Application.
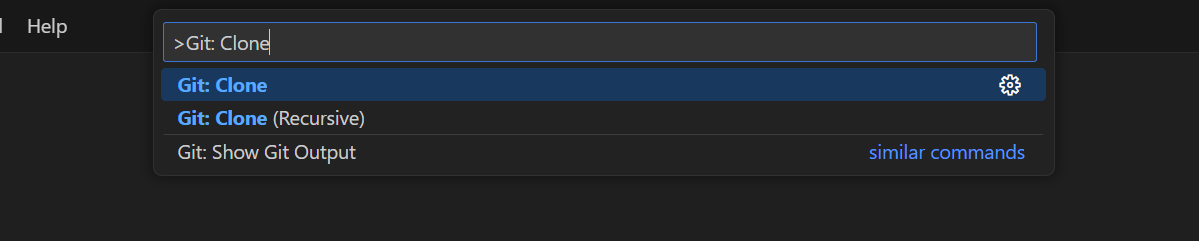
The creation of a project with Visual Studio Code is done as follows:
Select View > Command Palette….
Run the
Git: Clonecommand in the Command Palette.
Command Palette in VS Code
Depending on the type of your project, fill the URI of the corresponding Github template repository in the Search Bar. The available templates are:
Click on Clone from URL.

Search Bar in VS Code
In the upcoming popup, choose a folder and click on the
Select as Repository Destinationbutton.When the Gradle project is loaded, select Terminal > New Terminal.
In the integrated terminal, run the following command at the root of the project to remove the Git Repository:
rm -r -Force .git*
rm -rf .git*
Rename the project and change its group and version in the
build.gradle.ktsbuild script.
The creation of a project via Command Line Interface is done as follows:
Depending on the type of your project, retrieve the URI of the corresponding Github template repository. The available templates are:
Clone the repository:
git clone <template-repository>
Remove the Git Repository from the project:
rm -r -Force .git*
rm -rf .git*
Rename the project and change its group and version in the
build.gradle.ktsbuild script.
Configure a Project
The SDK allows to build several types of modules. Each type has its own Gradle plugin and configuration options. Refer to the module type you want to build to configure your project:
Refer to the page Module Natures for a complete list of the available MicroEJ natures and their corresponding plugins.
Application Project
The required configuration elements to define for an Application Project are:
The Application Entry Point. It is defined by the
applicationEntryPointproperty in themicroejconfiguration block of thebuild.gradle.ktsfile. It must be set to the Full Qualified Name of the Application main class, for example:microej { applicationEntryPoint = "com.mycompany.Main" }
The Project Wizards define a default value, adapt it if you change the main class of your Application.
The VEE to use to build and run the Application. It is defined using the
microejVeeconfiguration in thedependenciesblock of thebuild.gradle.ktsfile:dependencies { microejVee("com.mycompany:vee-port:1.0.0") }
Refer to the Select a VEE Port page to learn more about the different ways to define the VEE.
Refer to the Application Developer Guide to learn more on Applications.
Library Project
A Library project does not require any specific configuration. Refer to the Libraries and Foundation Libraries pages to learn more on Libraries.
Mock
A Mock project does not require any specific configuration. Refer to the VEE Porting Guide Mock chapter page to learn more on how to develop a Mock.
Java SE Library Project
A Java SE Library project does not require any specific configuration.
Runtime Environment Project
A Runtime Environment project does not require any specific configuration. Refer to the Runtime Environment page to learn more on how to develop a Runtime Environment.
Create a subproject in an existing project
This section explains the different ways to add a module to an existing project.
Warning
If you want to add a MicroEJ module to a non MicroEJ project, for example an Android project,
you must configure the repositories before creating the module.
If the repositories used by your project are centralized
in the settings.gradle.kts file of the project, the MicroEJ repositories defined in
this file must be added to your settings.gradle.kts file.
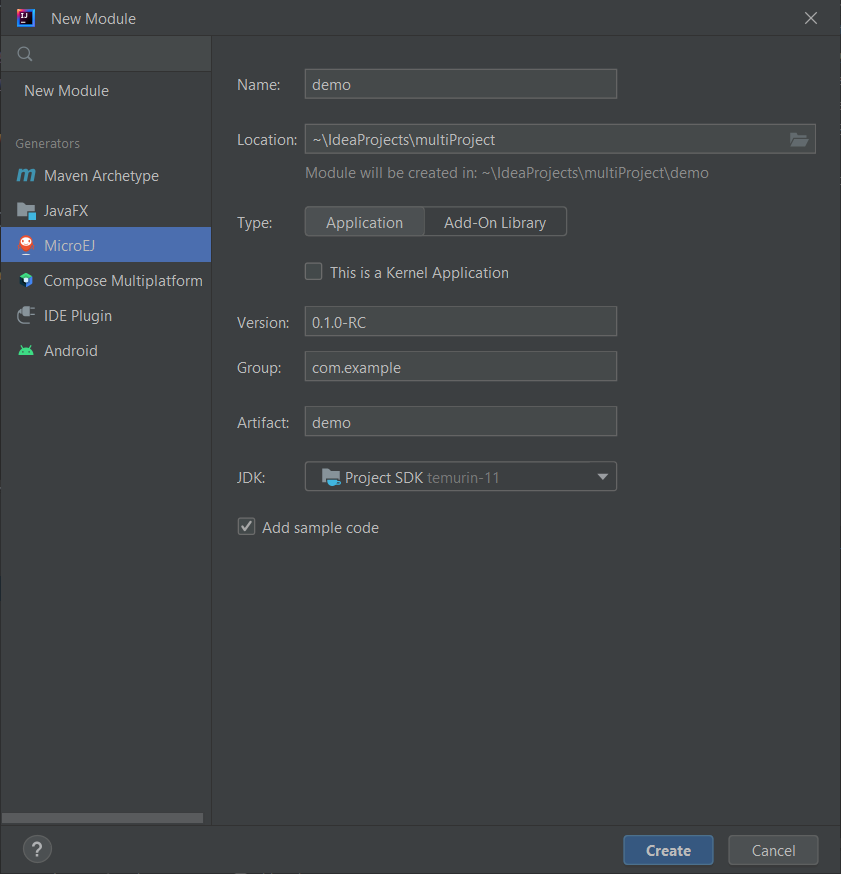
The creation of a module with IntelliJ IDEA is done as follows:
Click on File > New > Module….
Select MicroEJ in Generators list on the left panel.
Fill the name of the module in the Name field.
Select the location of the module in the Location field.
Select the module type. If there is no button for your module type, click on Other button and select it in the drop-down list.
If you selected Application module type, you can check This is a kernel application checkbox if your Application is a Kernel.
Fill the version of the artifact to publish in the Version field.
Fill the group of the artifact to publish in the Group field.
Fill the name of the artifact to publish in the Artifact field.
Select the JVM used by Gradle in the JDK combobox.
Check the Add sample code checkbox.
Click on Create button.
Module Creation in IntelliJ IDEA
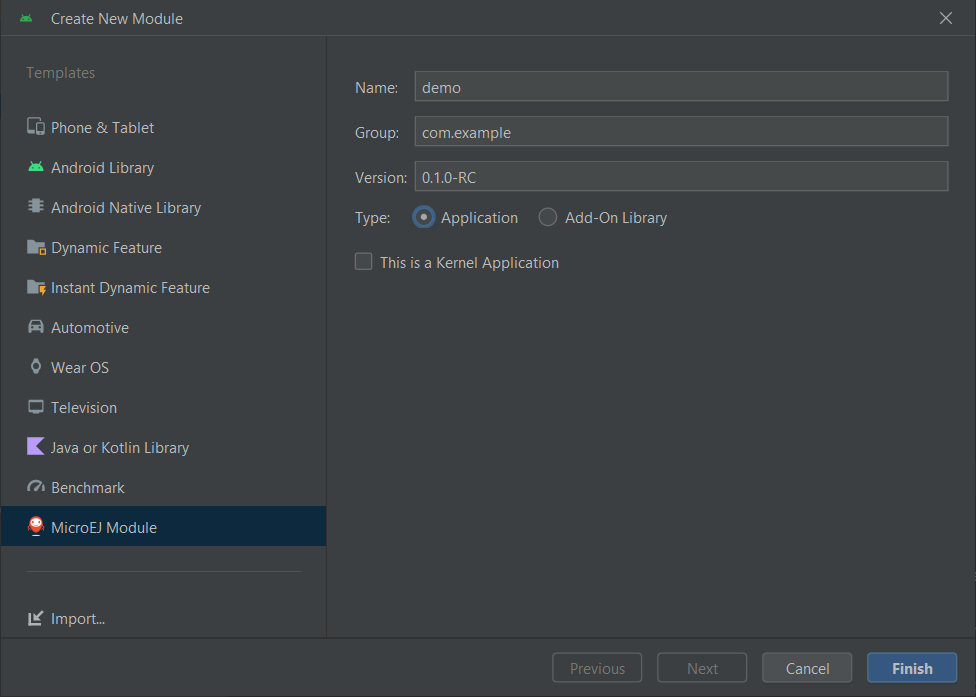
The creation of a module with Android Studio is done as follows:
Click on File > New > New Module….
Select MicroEJ Module in Templates list on the left panel.
Fill the name of the module in the Name field.
Fill the group of the artifact to publish in the Group field.
Fill the version of the artifact to publish in the Version field.
Select the module type in the drop-down list.
If you selected Application module type, you can check This is a kernel application checkbox if your Application is a Kernel.
Click on Finish button.
Module Creation in Android Studio
The creation of a module with Eclipse is done as follows:
Right-click on your project and click on New > Folder.
Select your project as parent folder.
Fill the name of the module in the Folder name field.
Click on Finish button.
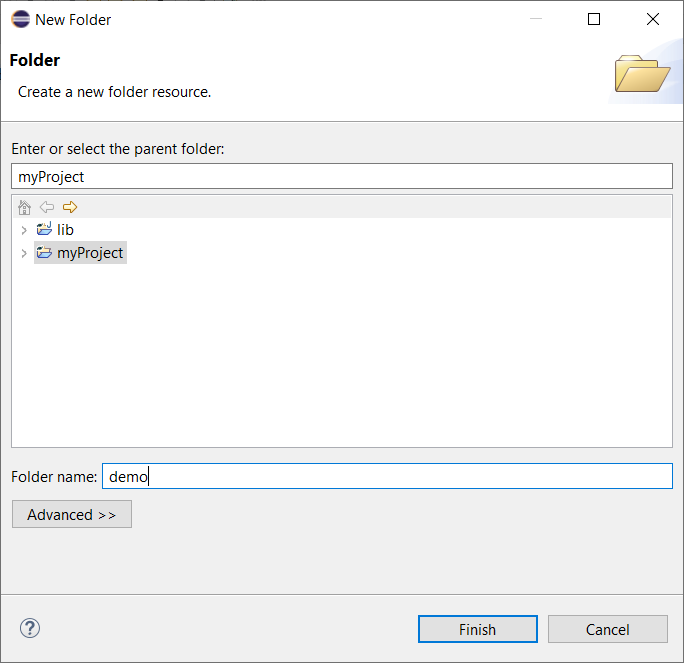
Module Creation in Eclipse
Right-click on your newly created folder and click on New > File.
Enter
build.gradle.ktsin the File name field.Click on Finish button and open the
build.gradle.ktsfile.Configure your module depending on its type.
Declare the dependencies required by your project in the
dependenciesblock. For example:dependencies { implementation("ej.api:edc:1.3.7") }
Open the
settings.gradle.ktsfile of your project and add the following content:include("<module_name>")
Note
By default, Eclipse requires the user to explicitly trigger the reload of a Gradle project when its content has changed. Therefore, when the content of a Gradle project has been updated, you have to right-click on the project, then click on Gradle and Refresh Gradle Project:
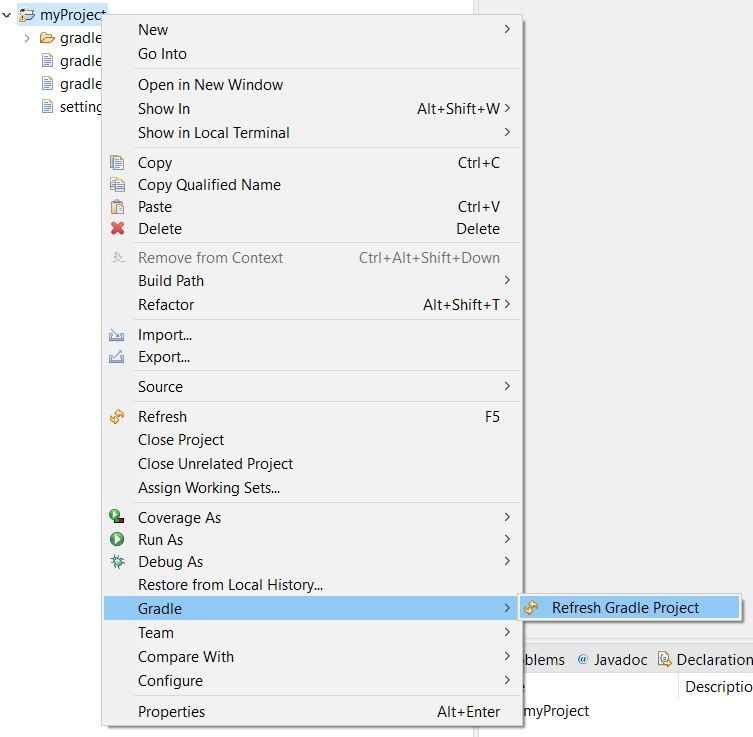
Gradle Project reload in Eclipse
You can also configure Eclipse to automatically reload a Gradle project after a change. Refer to the How To Automatically reload a Gradle project section for more information.
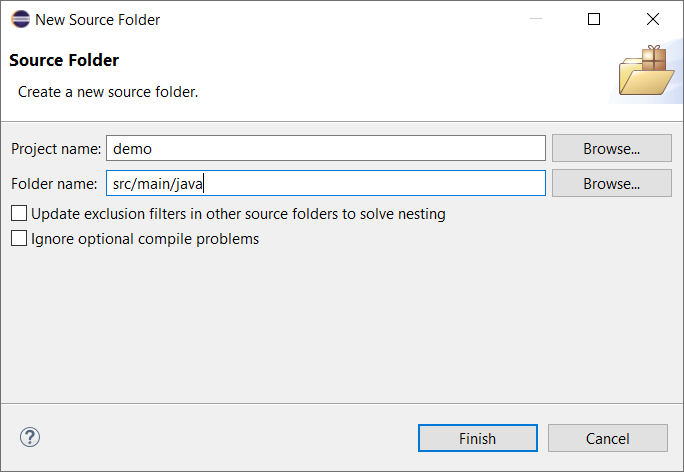
Right-click on the newly created module and click on New > Source Folder.
Enter
src/main/javain the Folder name field.Click on Finish button.
Source Folder Creation in Eclipse
Follow the same steps to create the
src/main/resources,src/test/javaandsrc/test/resourcesfolders.
The creation of a module with Visual Studio Code is done as follows:
If the Explorer view is not already opened, open it by selecting View > Open View… > Explorer.
Right-click in the Explorer view and click on New Folder….
Fill the name of the module and press Enter.
Create a new
build.gradle.ktsfile by right-clicking on your newly created folder and clicking on New File….Configure your module depending on its type.
Declare the dependencies required by your module in the
dependenciesblock. For example:dependencies { implementation("ej.api:edc:1.3.7") }
Open the
settings.gradle.ktsfile of your project and add the following content:include("<module_name>")
Create the
src/main/javafolder by right-clicking on the newly created module and clicking on New Folder….Follow the same steps to create the
src/main/resources,src/test/javaandsrc/test/resourcesfolders.
Gradle Wrapper
It is recommended to use the Gradle Wrapper to execute a build. The Wrapper is a script that ensures that the required version of Gradle is downloaded and used during the build of a project.
When creating a project following one of the project creation systems described in the Create a Project section,
the Wrapper files are automatically generated in the gradle/wrapper folder of the project.
It is also possible to add the Wrapper to an existing project.
This requires to install the Gradle distribution, then to execute the wrapper task with:
gradle wrapper
The Gradle version used by the project can then be updated in the gradle/wrapper/gradle-wrapper.properties file:
distributionUrl=https://services.gradle.org/distributions/gradle-8.6-bin.zip
Check the SDK and Gradle Compatibility table to use the right Gradle version.
Since SDK 1.6.0 you can use Gradle 9 and later versions.
Note
If you are using Gradle 9 and are building an Application on a Kernel defined as a project dependency, the Kernel Application project must explicitly be configured to produce the Executable and the Virtual Device in the build.gradle.kts file:
microej {
   produceVirtualDeviceDuringBuild()
   produceExecutableDuringBuild()
}
To use the Wrapper during a build, use gradlew or ./gradlew depending on your OS instead of gradle in the command line:
gradlew build
./gradlew build
In the following chapters of the documentation, the Linux command ./gradlew is used in all examples to execute a build.
Refer to the official Gradle documentation for more information about the Wrapper.
SDK and Gradle Compatibility
The following table lists which version of Gradle is supported for each version of the SDK:
SDK Version |
Gradle Version |
|---|---|
|
|
|
|