Warning

This documentation is for SDK 5. The latest major version is SDK 6. SDK 5 is in maintenance mode since the release of SDK 5.8.0. Consequently, as stated in the SDK End User License Agreement (EULA), the SDK will reach the end of its life by July 2028. Contact our support team for assistance with migrating to the new SDK, or your sales representative if you require an extension of SDK maintenance as a service.

Test a VEE Port

VEE Port Qualification

The SDK provides the capability to test a VEE Port. While you can create your own tests (see Create a VEE Port Testsuite), MicroEJ provides a set of tools and pre-defined projects aimed at simplifying the steps for validating VEE Ports in the form of the VEE Port Qualification Tools (PQT).

Please refer to the VEE Port Qualification Tools README to learn how to setup and run this Qualification process.

Create a VEE Port Testsuite

A VEE Port Testsuite is composed of two projects:

  • the Testsuite module: the project that contains test cases. Test cases are written in Junit. When this project is built, it produces a versionned library. See Testsuite Versioning for available Testsuite modules for the most common Packs provided by MicroEJ Corp.

  • the Testsuite runner: the project that contains the configuration for its execution on a VEE Port. When this project is built, it runs the Testsuite on a Device and generates the Testsuite report.

Note

Creating a VEE Port Testsuite requires SDK 5.6.0 or higher.

Create the Testsuite Module

The Testsuite module contains the tests of the Foundation Library to be qualified.

Create the Testsuite Module Project

A new Testsuite module is created using the microej-javaimpl Skeleton (see Foundation Library Implementation).

To create the Testsuite module, click on: File > New > Project… then select MicroEJ > Module Project

Fill up the following fields of the form:

  • Project name (e.g: myFoundationLib-testsuite).

  • Organization (e.g: com.mycompany).

  • Module (e.g: myFoundationLib-testsuite).

  • Revision (version of your Testsuite module).

  • Select the Skeleton: microej-javaimpl.

Then, create two test source folders:

  • Right-click on your project.

  • Click on: New > Source Folder.

  • Fill up the Folder name field of the form with: src/test/java and for the second folder: src/test/resources.

You should get a Foundation Library Testsuite project that looks like:

Foundation Library Testsuite Project Skeleton

Foundation Library Testsuite Project Skeleton

Your Testsuite module project is created and ready to be setup.

Configure the Testsuite Module Project

Open the module.ivy file and follow steps below:

  • Edit the module ivy-module > info > ea:build node to update rip.printableName:

    <ea:build organisation="com.is2t.easyant.buildtypes" module="build-microej-javaimpl" microej.lib.name="myFoundationLib-testsuite-1.0" rip.printableName="myFoundationLib Testsuite Impl" revision="5.2.+">
    
  • Add the following properties in the ivy-module > info node:

    <ea:property name="skip.test" value="set"/>
    <ea:property name="target.main.classes" value="${basedir}/target~/test/classes"/>
    <ea:property name="addon-processor.src.test.java.path.ref.name" value="src.java.path"/>
    
  • Update the JUnit dependency to:

    <dependency org="ej.library.test" name="junit" rev="1.7.1" conf="default;test->*"/>
    
  • Add a module.ant file at the root of the Testsuite project with the following content:

    <project>
            <target name="BuildTestTarget" extensionOf="abstract-compile:compile-ready" depends="resources-std:copy-test-resources">
                    <augment id="src.java.path">
                            <path location="${basedir}/src/test/java" />
                            <path location="${target}/adpgenerated/src-adpgenerated/junit/java"/>
                    </augment>
            </target>
    </project>
    

Note

An error on module.ant file can occurred with message Target resources-std:copy-test-resources does not exist in this project. Please ignore it.

Create a New Test Case

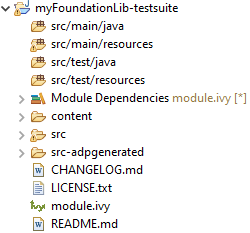
Right click on src/test/java, then click on New > Class. Fill Name: with the MyTest and then click on Finish. Copy/paste the following example in MyTest.java file:

import org.junit.Assert;
import org.junit.Test;

public class MyTest {

        @Test
        public static void Test() {
                Assert.assertTrue(true);
        }
}

The console output on the Simulator for this test should be:

=============== [ Initialization Stage ] ===============
=============== [ Launching on Simulator ] ===============
OK: Test
PASSED: 1
=============== [ Completed Successfully ] ===============

SUCCESS

Build the Testsuite Module

Once the test cases are implemented, you can build the module. The next step is to create a Testsuite Runner. The Testsuite Runner will fetch the Testsuite Module dependency.

Create the Testsuite Runner

The Testsuite runner project contains configuration files for running a Testsuite module on a Device using a VEE Port.

Create the Testsuite Runner Project

  • To create the Testsuite runner project, click on: File > New > Other… > MicroEJ > Module Project.

  • Fill up the following fields of the form:

    • Project name

    • Organization

    • Module

    • Revision (version of your Testsuite module)

    • Select the Skeleton: microej-testsuite

  • Inside the module.ivy file, add the dependency to the Testsuite module as following:

    <dependency org="com.mycompany" name="myFoundationLib-testsuite" rev="0.1.0" conf="test->default;provided->provided"/>
    
  • Inside the module.ant, add the following ANT target to configure trace redirection options :

    <target name="tracefile:init" extensionOf="abstract-test:test-ready">
            <!-- Set the launch.test.trace.file when the testsuite.trace.ip properties is not set -->
            <condition property="microej.testsuite.properties.launch.test.trace.file">
                    <not>
                            <isset property="microej.testsuite.properties.testsuite.trace.ip" />
                    </not>
            </condition>
    </target>
    
  • Create the file override.module.ant at the root of the project. Add the following content to configure the load of testsuite options:

    <project name="myFoundationlib.testsuite.override" xmlns:ac="antlib:net.sf.antcontrib">
            <!-- Load options from 'local.properties' beside this file -->
            <ac:if>
                    <available file="local.properties" type="file"/>
                    <ac:then>
                            <property file="local.properties"/>
                    </ac:then>
            </ac:if>
            <!-- Load options from 'config.properties' beside this file -->
            <property file="config.properties"/>
    </project>
    
  • Create the following .properties files:

Note

{PROJECT_LOC} refers here to the location of your Testsuite runner project.

Configure and Run the Testsuite

Follow the Run the FS Testsuite on ESP32-WROVER VEE Port tutorial to configure your VEE Port and run the Testsuite on your Device.