
Mock
Principle
The HIL engine is a Java standard-based engine that runs Mocks. A Mock is a jar file containing some Java classes that simulate natives for the Simulator. Mocks allow applications to be run unchanged in the Virtual Device while still appearing to interact with native code.
Functional Description
As with SNI, HIL is responsible for finding the method to execute as a replacement for the native Java method that the Simulator tries to run. Following the SNI specification philosophy, the matching algorithm uses a naming convention. When a native method is called in the MicroEJ Simulator, it requests that the HIL engine execute it. The corresponding Mock executes the method and provides the result back to the MicroEJ Simulator.
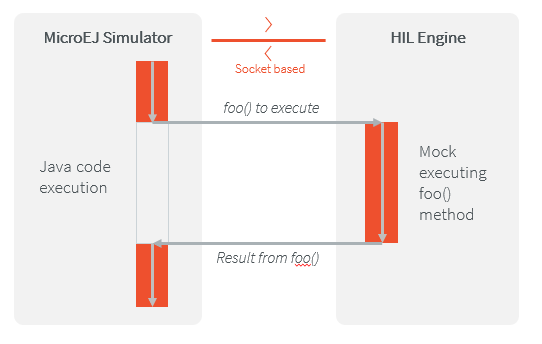
The Simulator Executes a Native Java Method foo().
Example
package com.mycompany;

import java.io.IOException;

/**
 * Class providing a native method to access sensor value.
 * This method will be executed out of the Core Engine.
 */
public abstract class Sensor {

    public static final int ERROR = -1;

    public int getValue() throws IOException {
        int value = getSensorValue();
        if (value == ERROR) {
            throw new IOException("Unsupported sensor");
        }
        return value;
    }

    public static native int getSensorValue();
}
To implement the native method getSensorValue(), you
need to create a MicroEJ mock project containing the same Sensor
class on the same com.mycompany package.
To create a new MicroEJ mock project:
Follow the steps described in SDK 6 User Guide - Create a Project depending on your IDE.
Select File > New > Module Project,
Fill the module information (project name, module organization, name and revision),
Select the microej-mock skeleton,
Click on Finish.
The following code is the required Sensor class of the created Mock
project:
package com.mycompany;

import java.util.Random;

/**
 * Java standard class included in a Mock jar file.
 * It implements the native method using a Java method.
 */
public class Sensor {

    /**
     * Constants
     */
    private static final Random RANDOM = new Random();

    /**
     * Implementation of native method "getSensorValue()"
     *
     * @return Simulated sensor value
     */
    public static int getSensorValue() {
         // For the simulation, Mock returns a random value
         return RANDOM.nextInt();
    }

}
Note
The visibility of the native method implemented in the mock must be public regardless of the visibility of the native method in the application.
Otherwise the following exception is raised: java.lang.UnsatisfiedLinkError: No such method in remote class.
Mocks Design Support
Interface
The Simulator interface is defined by static methods on the Java
class com.is2t.hil.NativeInterface.
Array Type Arguments
Both [SNI] and HIL allow arguments that are arrays of base types. By default the contents of an array are NOT sent over to the Mock. An “empty copy” is sent by the HIL engine, and the contents of the array must be explicitly fetched by the Mock. The array within the Mock can be modified using a regular assignment. Then to apply these changes in the Simulator, the modifications must be flushed back. There are two methods provided to support fetch and flush between the MicroEJ Simulator and the HIL:
refreshContent: initializes the array argument from the contents of its Simulator counterpart.flushContent: propagates (to the Simulator) the contents of the array that is used within the HIL engine.
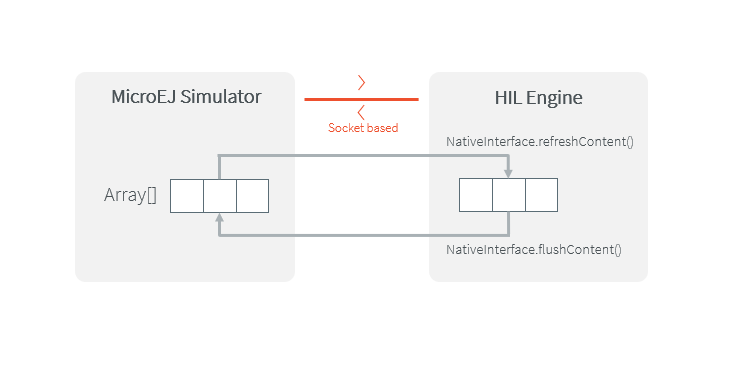
An Array and Its Counterpart in the HIL Engine.
Below is a typical usage.
public static void foo(char[] chars, int offset, int length){
        NativeInterface ni = HIL.getInstance();
        //inside the Mock
        ni.refreshContent(chars, offset, length);
        chars[offset] = 'A';
        ni.flushContent(chars, offset, 1);
}
Blocking Native Methods
Some native methods block until an event has arrived [SNI]. Such behavior is implemented in native using the following three functions:
int32_t SNI_suspendCurrentJavaThread(int64_t timeout)int32_t SNI_getCurrentJavaThreadID(void)int32_t SNI_resumeJavaThread(int32_t id)
This behavior is implemented in a Mock using the following methods on a lock object:
Object.wait(long timeout): Causes the current thread to wait until another thread invokes the notify() method or the notifyAll() method for this object.
Object.notifyAll(): Wakes up all the threads that are waiting on this object’s monitor.
NativeInterface.notifySuspendStart(): Notifies the Simulator that the current native is suspended so it can schedule a thread with a lower priority.NativeInterface.notifySuspendEnd(): Notifies the Simulator that the current native is no more suspended. Lower priority threads in the Simulator will not be scheduled anymore.
public static byte[] data = new byte[BUFFER_SIZE];
public static int dataLength = 0;
private static Object lock = new Object();

     // Mock native method
     public static void waitForData() {
             NativeInterface ni = HIL.getInstance();
             // inside the Mock
             // wait until the data is received
             synchronized (lock) {
                     while (dataLength == 0) {
                             try {
                                     ni.notifySuspendStart();
                                     lock.wait(); // equivalent to lock.wait(0)
                             } catch (InterruptedException e) {
                                     // Use the error code specific to your library
                                     throw new NativeException(-1, "InterruptedException", e);
                             } finally {
                                     ni.notifySuspendEnd();
                             }
                     }
             }
     }

// Mock data reader thread
public static void notifyDataReception() {
      synchronized (lock) {
            dataLength = readFromInputStream(data);
            lock.notifyAll();
      }
}
Resource Management
Every Java class can play the role of a small read-only file system root: The stored files are called “Java resources” and are accessible using a path as a String.
The Simulator interface allows the retrieval of any resource
from the original Managed world, using the getResourceContent method.
public static void bar(byte[] path, int offset, int length) {
   NativeInterface ni = HIL.getInstance();
   ni.refreshContent(path, offset, length);
   String pathStr = new String(path, offset, length);
   byte[] data = ni.getResourceContent(pathStr);
   ...
}
Note
By default the maximum HIL frame size in bytes is 262144. If needed, the size can be increased by setting com.microej.simulator.hil.frame.size application option.
com.is2t.hil.BrokenConnection will be thrown by the HIL Engine if a frame is larger than the maximum HIL frame size (e.g. dealing with large Java resources).
Synchronous Terminations
To terminate the whole simulation (Simulator and HIL), use the
stop() method.
public static void windowClosed() {
      HIL.getInstance().stop();
}
Define a Mock Option
Starting from Architecture 8.3.0, it is possible to define a mock option using the following Application Option:
microej.mock.property.mymockoption=mymockvalue
Then the option can be retrieved as a System Property in the mock:
public static void myNativeImplementation() {
      String myOption = System.getProperty("mymockoption"); // returns "mymockvalue"
}
Dependencies
A Mock project must include the Mock API module dependency for bi-directional communication with the Simulator via the HIL Engine.
Add a dependency to the Mock API in the build.gradle.kts file:
compileOnly("com.microej.tool.runtime:mock-api:2.5.0")
The Mock API is automatically provided by the microej-mock project skeleton.
Other dependencies to standard Java modules can be added, such as the JavaFX Mock.
Installation
In a VEE Port
Add the Mock as a dependency of your VEE Port project:
either as a project dependency if both projects are in the same multi-project:
microejMock(project(":myMockProject"))
or as a module dependency:
microejMock("com.mycompany:my-mock:1.0.0")
First create a new module project using the microej-mock skeleton.
Once implemented, right-click on the repository project and select Build Module.
Once the module is built, the mock can be installed in a VEE Port in one of the two ways:
by adding the mock module as a regular VEE Port module dependency (if your VEE Port configuration project contains a
module.ivyfile),or by manually copying the JAR file
[mock_project]/target~/rip/mocks/[mock_name].jarto the VEE Port configuration mock dropins folderdropins/mocks/dropins/.
Make sure the option Resolve Foundation Libraries in Workspace is enabled to use the mock without having to install it after each modification during development.
In an Application
You can also install a Mock from an Application project, for example when a native function is added directly in the Application project. When a Mock is declared in an Application, it is automatically added in the VEE Port used to build or run the Application.
Warning
A Mock can be installed from an SDK 6 Application project only if the VEE Port used in the project is an SDK 6 VEE Port.
add the Mock as a dependency of your Application project:
either as a project dependency if both projects are in the same multi-project:
microejMock(project(":myMockProject"))
or as a module dependency:
microejMock("com.mycompany:my-mock:1.0.0")
Installing a Mock from an Application project is not supported in SDK 5.
Use
Once installed, a Mock is used automatically by the Simulator when the MicroEJ Application calls a native method which is implemented into the Mock.
JavaFX
JavaFX is an open-source library for creating modern Java user interfaces that is highly portable. It can be used to quickly create graphical Mocks for your VEE Port.
The installation instructions depend on the SDK version:
Add JavaFX as a compile-time dependency in your Mock project:
compileOnly(group="com.microej.tool", name="javafx", version="1.2.0", configuration="provided")
If your VEE Port contains at least one Mock, add JavaFX as a Mock dependency in your VEE Port project:
microejMock("com.microej.tool:javafx:1.2.0")
If your SDK is running on JDK 8, the Oracle JDK contains JavaFX, so this version allows you to use it right now in your project.
If your SDK is running on JDK 11, JavaFX must be added as an additional dependency to your Mock and VEE Port project. For that, MicroEJ Corp. provides a ready-to-use packaged module for all supported OS versions.
<dependency org="com.microej.tool" name="javafx" rev="1.2.0" />
The Module serves two purposes, depending on whether it is added to a Mock or a VEE Port project:
In a Mock project, JavaFX is added as a compile-time dependency, its content is not included in the Mock.
If your VEE Port contains at least one Mock, JavaFX must be added to the VEE Port project in order to embed its content in the VEE Port.
Warning
There is a known issue with JavaFX and Apple Silicon computers. The task runOnSimulator fails with
an error
libc++abi: terminating due to uncaught exception of type NSException
Exiting /Users/microej/Git/J0059_Example-Mock-Framework/custom-widgets-app/build/vee/scripts/hil.xml.
Exception in thread "thread2" java.lang.UnsatisfiedLinkError: Broken connection with client
        at java.lang.Throwable.fillInStackTrace(Throwable.java:82)
        at java.lang.Throwable.<init>(Throwable.java:37)
        at java.lang.Error.<init>(Error.java:18)
        at java.lang.LinkageError.<init>(LinkageError.java:18)
        at java.lang.UnsatisfiedLinkError.<init>(UnsatisfiedLinkError.java:10)
        at com.microej.example.mockframework.Main$1.run(Main.java:45)
        at com.is2t.bon.timer.TimerTaskList.runLaunchedTasks(TimerTaskList.java:237)
        at ej.bon.Timer.run(Timer.java:431)
        at java.lang.Thread.run(Thread.java:325)
        at java.lang.Thread.runWrapper(Thread.java:387)
This issue affects most JDK distributions. As a workaround, we recommend to use one of the following Eclipse Temurin distributions: 17.0.9 or 21.0.1 to avoid this issue.
You need to make your MICROEJ SDK installation point to one of the decompressed JDK archives given above.
Note that newer versions of these JDKs (17.0.10 or higher, and 21.0.2 or higher) will have this issue. Installation from the .pkg
distribution might be overwritten by a newer version.
Mock Framework
The Mock Framework is a library based on JavaFX, it aims to ease the development of mock UIs.
The Mock Framework provides a set of widgets. It allows to automatically generate the native method implementation of an application and link it with the widgets of the mock UI.
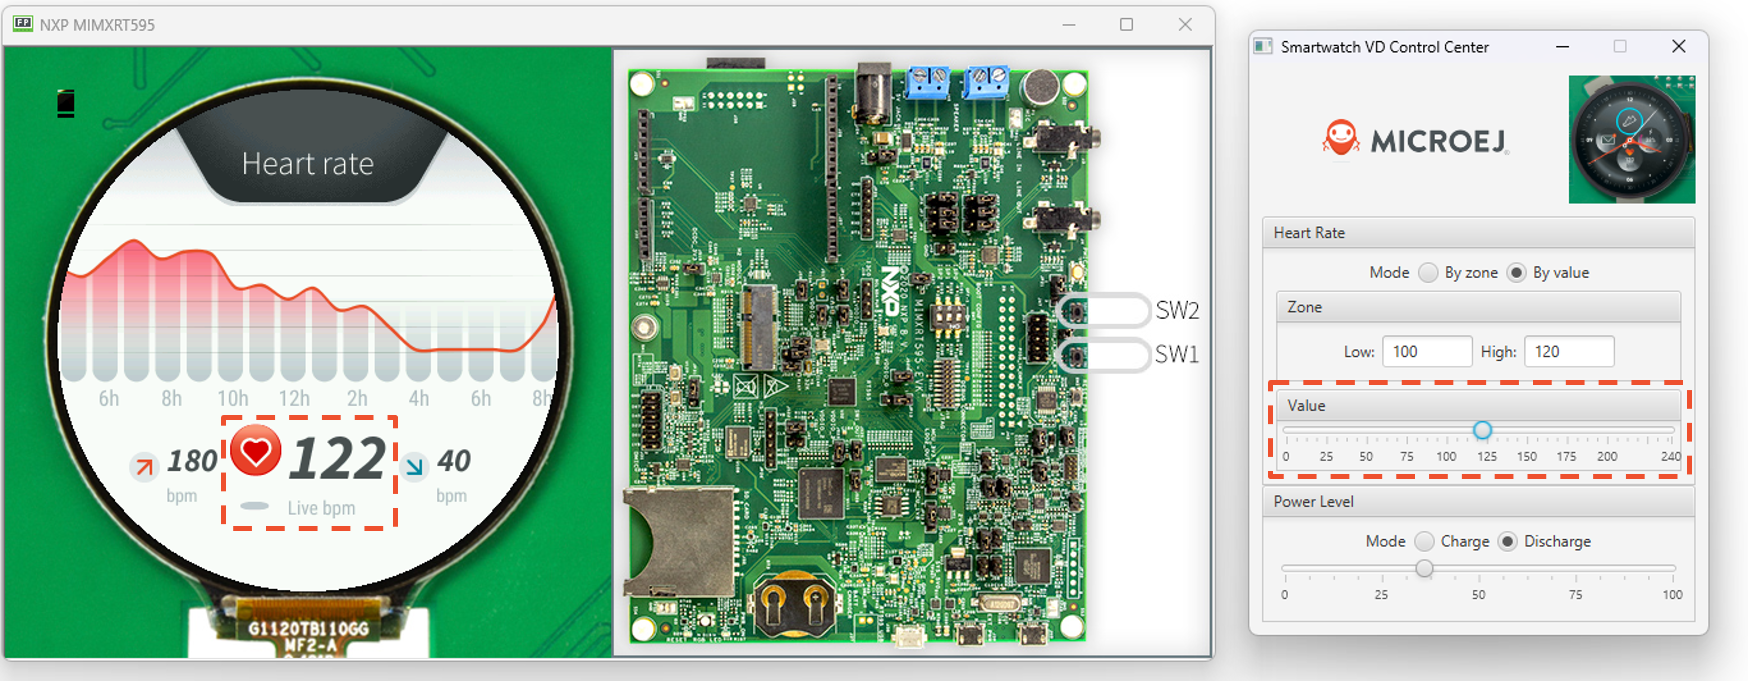
Mock Framework used to mock Heart Rate sensor on Wearable Demo.
Usage
The following steps should be followed to create a mock using the Mock Framework:
Create Mock Framework Properties to bind the native methods to the mock UI,
Create Widgets to manipulate the values of the above Properties,
Create a Dashboard to hold the Widgets.
Mock Framework Property
The Mock Framework uses a property system to bind widgets to the native methods. A property holds a value and can trigger listeners when updated.
A property must extend MockProperty and be annotated with @Property:
@Property
public class MyProperty extends MockProperty {
    ...
}
The annotation is used by the framework to find any property declared in the mock project. The property can then be retrieved from its class:
MyProperty property = MockupApplication.getProperty(MyProperty.class);
There are ready to use implementations of MockProperty:
BooleanPropertyIntegerPropertyLongPropertyFloatPropertyDoublePropertyNumberPropertyStringPropertyFileProperty
Getter and Setter Attributes
Let’s consider the following application code that defines getter and setter native methods:
package com.microej.example;

public class RandomService {

   private RandomService() {
   }

   /**
   * Gets the service state.
   *
   * @return true if the service is enabled, false otherwise.
   */
   public static native boolean getEnable();

   /**
   * Sets the service state.
   *
   * @param enable
   *            enables or disables the service.
   */
   public static native void setEnable(boolean enable);

   ...
The native method implementation code can be generated using the following attributes in the Property annotation:
getter="<method name>"for the native method that retrieves a value from the mock.setter="<method name>"for the native method that sets a value in the mock.
@Property(getter = "com.microej.example.RandomService.getEnable")
public class MyProperty extends BooleanProperty {
    ...
}
or
@Property(getter = "com.microej.example.RandomService.getEnable", setter = "com.microej.example.RandomService.setEnable")
public class MyProperty extends BooleanProperty {
    ...
}
These attributes are optional. When no attribute is specified, the corresponding code will not be generated.
The <method name> is the fully qualified name of the method,
it must contain the package, the name of the class in which the native is implemented, and the native method name.
It must not contain parenthesis and arguments.
Note that the class containing the getter and the setter can be different.
Property values can be changed from the mock code with getValue() and setValue() methods:
/* Get MyProperty value */
boolean state = MockupApplication.getProperty(MyProperty.class).getValue();

/* Set MyProperty value */
MockupApplication.getProperty(MyProperty.class).setValue(!state);
Mock Framework Widgets
The Mock Framework provides some widgets to manipulate properties.
Interacting with the widget modifies the underlying property, and similarly, updating the property value modifies the state of the widget.
CheckBox: sets the value of aBooleanProperty. The property is set totruewhen the box is checked, andfalseotherwise.NumberSlider: sets a value of aNumberPropertybetween the bounds defined by the property. The bounds and the position of the slider are automatically updated with the property.BoundsSetter: displays the upper and lower bounds defined in theNumberProperty. This class is abstract and needs to be used as a specialized subclass, such asIntegerBoundsSetterfor integer values.Container: widget that contains other Mock Framework Widgets. By default, it displays contained widgets vertically.Choice: widget container providing a radio button list for each contained widget. Only the selected widget will be enabled and the other disabled (not clickable).FileChooser: displays a button that opens a standard platform file dialog for selecting a file. Once the file is selected, the property is updated with the corresponding file object.TitledWidget: decorator to add a title to a widget.ImageSwapWidget: stores two images and shows one of them based on a boolean property.JavaFxWidget: abstract class that can be extended to create custom widgets using JavaFX components.
Mock Framework Dashboard
The Mock Framework Dashboard represents the window that is opened at Application startup on Simulator. It holds the Mock widgets.
Mock widgets can be bound to Mock properties by passing the property class as an argument of the Mock widget.
A Dashboard must extend AbstractDashboard and be annotated with @DashBoard annotation.
@DashBoard(title = "My Mock DashBoard")
public class MockDashBoard extends AbstractDashboard {

   public MockDashBoard() {
      addWidget(new CheckBox("Enable RandomService", MyProperty.class));
   }
}
@DashBoard attributes are optional, find below the list of available ones:
title: sets the title of the mock window, default title is VD Control Center.icon: sets the icon of the mock window, the path is relative to thesrc/main/resourcesfolder of the mock project (e.g.icon="images/myIcon.png").width: sets the width of the mock window. The default value is negative. When not specified, the system sets the mock window size automatically.height: sets the height of the mock window. The default value is negative. When not specified, the system sets the mock window size automatically.
Examples
Mock Framework Examples demonstrate the use of the Mock Framework.
Installation
Add the JavaFX dependency to your VEE Port project (see JavaFX for more details):
microejMock("com.microej.tool:javafx:1.2.0")
Add the Mock Framework and JavaFX libraries to your Mock project dependencies:
implementation("com.microej.library.mock:mock-framework:1.0.1")
compileOnly(group="com.microej.tool", name="javafx", version="1.2.0", configuration="provided")
Add the Mock Framework and JavaFX annotation processors libraries to your Mock project dependencies:
annotationProcessor("com.microej.library.mock:mock-framework:1.0.1")
annotationProcessor(group="com.microej.tool", name="javafx", version="1.2.0", configuration="provided")
Add the JavaFX dependency to your VEE Port project if required (see JavaFX for more details):
<dependency org="com.microej.tool" name="javafx" rev="1.2.0" />
Add the Mock Framework and JavaFX libraries to your Mock project dependencies:
<dependency org="com.microej.library.mock" name="mock-framework" rev="1.0.1" />
<dependency org="com.microej.tool" name="javafx" rev="1.2.0" />
Event Tracing
Starting from Architecture 8.4.0, it is possible to record events from the Mock. The Mock API provides the same API (ej.trace.Tracer) as the one used for Application Event Tracing:
Tracer tracer = new Tracer("MyMockGroup", 10);
tracer.recordEvent(1);
tracer.recordEvent(2);
tracer.recordEvent(3);
Events are recorded only if Event Recording is enabled.
By default, the Simulator traces are printed on the standard console.
[TRACE: MyMockGroup] Event 0x1()
[TRACE: MyMockGroup] Event 0x2()
[TRACE: MyMockGroup] Event 0x3()
However, it is also possible to connect other trace recorders as needed.
In particular, you can export traces in the *.SVdat format for analysis with the Segger SystemView tool.
For more information, please contact our support team.