
Setup a KF Testsuite
A KF testsuite can be executed when building a Foundation Library or an Add-On library, and usually extends the tests written for the default library testsuite to verify the behavior of this library when its APIs are exposed by a Kernel.
A KF testsuite is composed of a set of KF tests, each KF test itself is a minimal Multi-Sandbox Executable composed of a Kernel and zero or more Features.
In the following chapters, the KF Testsuite is named test (which is the default Gradle testsuite). You can adapt it at your convenience.
Enable the Testsuite
In an existing library project:
Add a dependency to the VEE Port used for the tests in the
dependenciesblock of thebuild.gradle.ktsfile, for example:testMicroejVee("com.microej.platform.i386:vee-port:2.2.0")
Add the following testsuite configuration block in the same file:
testing {
   suites {
      val test by getting(JvmTestSuite::class) {
         microej.useMicroejTestEngine(this, com.microej.gradle.plugins.TestTarget.EMB, com.microej.gradle.plugins.TestMode.PROJECT)

         dependencies {
            implementation(project())
            implementation("ej.api:edc:1.3.7")
            implementation("ej.api:bon:1.4.4")
            implementation("ej.library.test:junit:1.12.0")
         }

         targets {
            all {
               testTask.configure {
                  doFirst {
                     systemProperties = mapOf(
                           "microej.testsuite.properties.microejtool.deploy.name" to "deployToolBSPRun",

                           // Configure the TCP/IP address and port if the VEE Port Run script does not redirect execution traces.
                           //"microej.testsuite.properties.testsuite.trace.ip" to "localhost",
                           //"microej.testsuite.properties.testsuite.trace.port" to "5555",
                           // Tell the testsuite engine that the VEE Port Run script redirects execution traces.
                           "microej.testsuite.properties.launch.test.trace.file" to "true",

                           "microej.testsuite.timeout" to "300"
                     )
                  }
               }
            }
         }
      }
   }
}
Refer to the Test on Simulator documentation for more details on Testsuite configuration.
Edit the
module.ivyand insert the following line within the<ea:build>XML element:<ea:plugin organisation="com.is2t.easyant.plugins" module="microej-kf-testsuite" revision="+" />
Configure the option
artifacts.resolverto the name of the resolver used to import KF test dependencies. The name must be one of the resolver names defined in your settings file. If you are using the default settings file, set the option toMicroEJChainResolver. This option is usually set as a global MMM option.
Add a KF Test
A KF test is a Multi-Sandbox Executable composed of a Kernel and zero or more Features. Therefore, from SDK perspective, it is a multi-project with a Kernel subproject and one or more Application subprojects.
The creation of a KF is done as follows:
The multi-project must be placed in the resources/projects folder of the testsuite source folder,
so for the test testsuite it should be in src/test/resources/projects.
Create the
src/test/resources/projectsdirectory if it does not exist.In the
src/test/resources/projectsdirectory, create a new directory for the KF test, for examplenewTest.In the
src/test/javafolder, create a new Java Interface class file (calledMyTestfor example) with the following content:
import org.junit.Test;

public interface MyTest {

   @Test
   void newTest();
}
Note
The name of a KF test is free. For each KF test, a method with the same name and annotated with @Test must be defined in the Java Interface.
Within the
newTestdirectory:Create a new Kernel project named
kernel. Refer to the create a Kernel documentation for help.Make sure the kernel depends on the same VEE Port used in the
build.gradle.ktsfile of the Library project (testMicroejVee("com.microej.platform.i386:vee-port:2.2.0")in this example).Add your Library project as a dependency of this Kernel project:
implementation("com.microej:myLibrary")
Note
The Library project is used as an included build when running a KF test. Therefore, it is not mandatory to specify the dependency version here.
Create a new Application project named
app. Refer to the create an Application documentation for help.Add the kernel as project dependency with:
microejVee(project(":kernel"))
Still at the root of the
newTestdirectory, create asettings.gradle.ktsfile and add the following content:include("kernel", "app")
Each KF test must contain a Kernel project named kernel. If the KF Test also contains one or more Feature projects, their names must be prefixed by app.
The KF Testsuite structure shall be similar to the following figure:
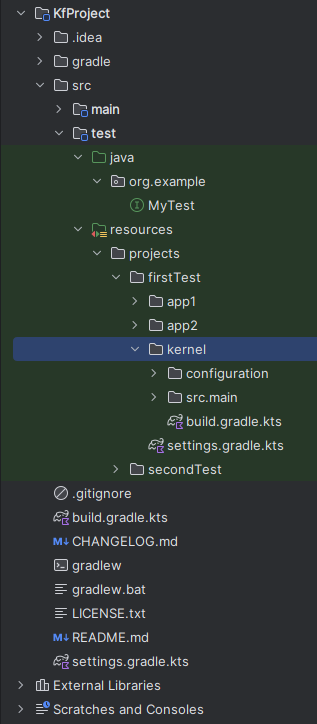
KF Testsuite Overall Structure
The multi-project must be placed in the src/test/projects folder.
Create the
src/test/projectsdirectory if it does not exist.Create a new directory for the KF test.
Within this directory, create the sub-projects:
Create a new directory for the Kernel project and initialize it using the
microej-javalibskeleton,Create a new directory for the Feature project and initialize it using the
applicationskeleton,Create a new directory for the Firmware project and initialize it using the
firmware-multiappskeleton.
The names of the project directories are free, however MicroEJ suggests the following naming convention, assuming the KF test directory is [TestName]:
[TestName]-kernelfor the Kernel project,[TestName]-app[1..N]for Feature projects,[TestName]-firmwarefor the Firmware project.
The KF Testsuite structure shall be similar to the following figure:
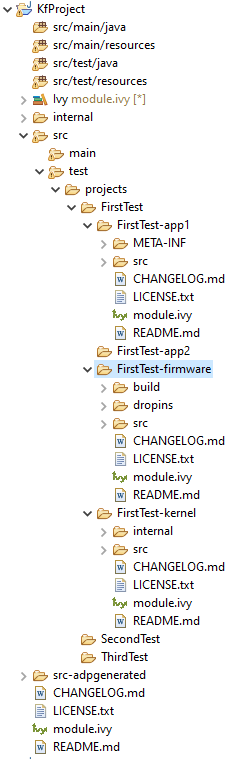
KF Testsuite Overall Structure
All the projects will be built automatically in the right order based on their dependencies.
Write the Kernel Main Class
In a KF Testsuite, the Kernel is responsible for loading the Features explicitly. Therefore, the Kernel Main class of every KF Testsuite must start with the following snippet of code.
String[] featureResources = new String[] { "/app.fo" };
for (int i = 0; i < featureResources.length; i++) {
   try (java.io.InputStream app = Main.class.getResourceAsStream(featureResources[i])) {
      Kernel.install(app);
   } catch (Exception e) {
      System.out.println(e);
   }
}
The featureResources variable must be set to list of all the Applications to install.
Improve Development Experience
At this stage the project newTest can be executed, but it is not loaded in the IDE as a Gradle project.
Therefore, there is no code completion and error detection.
To improve the development experience, add the Library project as a Composite Build of the KF test,
by adding the following line in the settings.gradle.kts file of the newTest project:
includeBuild("../../../../..")
The relative path must locate the Library project root folder.
You can now open the newTest project directly in the IDE to get a better developer experience.
Add Assertions
To check the behavior of the Library, JUnit Assertions can be added in the Kernel and Applications code. You first need to add the JUnit library in your Kernel and Applications dependencies:
dependencies {
   ...

   implementation("ej.library.test:junit:1.12.0")
}
Then use the Assert API in the code. It is important to respect the following pattern for your Main class:
public static void main(String[] args) {
   try {
      // My code with Assertions

      System.out.println("PASSED");
   } catch (Throwable t) {
      t.printStackTrace();
      System.out.println("FAILED");
      throw t;
   }
}
The print of the PASSED / FAILED traces are mandatory to notify the MicroEJ Test Engine if the test has succeeded or failed.
Here is a complete example which installs and starts the Applications, then adds an assertion on the call of the Library API:
import com.mycompany.mylibrary.MyClass;

import java.io.InputStream;

import org.junit.Assert;

import ej.kf.Feature;
import ej.kf.Kernel;

public class Main {

   public static void main(String[] args) {
      try {
         String[] featureResources = new String[] { "/app.fo" };
         for (int i = 0; i < featureResources.length; i++) {
            try (InputStream app = Main.class.getResourceAsStream(featureResources[i])) {
               Kernel.install(app);
            } catch (Exception e) {
               System.out.println(e);
            }
         }

         String kernelName = Kernel.getInstance().getName();
         System.out.println(kernelName + " Hello World!");
         for (Feature feature : Kernel.getAllLoadedFeatures()) {
            System.out.println("=> Starting Feature " + feature.getName());
            feature.start();
         }

         MyClass myClass = new MyClass();

         Assert.assertEquals("Expected Value", myClass.getValue());

         System.out.println("PASSED");
      } catch (Throwable t) {
         t.printStackTrace();
         System.out.println("FAILED");
         throw t;
      } finally {
         for (Feature feature : Kernel.getAllLoadedFeatures()) {
            System.out.println("=> Stopping Feature " + feature.getName());
            feature.stop();
         }
      }
   }
}
Run a KF Testsuite
Before executing the Testsuite, if the execution traces are retrieved from a Serial Port, the Serial to Socket tool must be started with:
./gradlew serialToSocket
This redirects the traces from the first Serial Port found to a socket on localhost:5555.
The socket IP and Port must match with the ones defined by the microej.testsuite.properties.testsuite.trace.ip
and microej.testsuite.properties.testsuite.trace.port properties of the Testsuite configuraiton in the build.gradle.kts file.
If you need to change these settings, refer to the Serial to Socket Transmitter documentation.
When the Serial to Socket is started (or if the traces are not retrieved from a Serial Port )
you can run the KF Testsuite by calling the Gradle task named after the Testsuite name.
For example if the Testsuite is named test, the command is:
./gradlew test --info
You can also execute a subset of a KF Testsuite, thanks to the --tests option.
For example, to execute only the tests from the class MyTestClass, run this command:
./gradlew test --tests MyTestClass --info
Once the testsuite is finished, you can check the JUnit HTML report in build/reports/tests/<testsuite>/index.html.
KF Testsuite Options (SDK 5 only)
It is possible to configure the same options defined by Testsuite Options for the KF testsuite,
by using the prefix microej.kf.testsuite.properties instead of microej.testsuite.properties.