SystemView
Note
In the following explanations, the term task refers to native tasks scheduled by the underlying OS or RTOS, while thread refers to MicroEJ threads scheduled by the Core Engine.
Principle
SystemView is a real-time recording and visualization tool for embedded systems that reveals the actual runtime behavior of an application, going far deeper than the system insights provided by debuggers. This is particularly effective when developing and working with complex embedded systems comprising multiple threads and interrupts.
A specific SystemView extension made by MicroEJ allows to trace the OS tasks and the MicroEJ threads at the same time. This chapter explains how to add the SystemView feature to a VEE Port and set it up.
Note
MicroEJ supports integration with SystemView on FreeRTOS 9 and FreeRTOS 10.
Note
SystemView provides implementations for several combinations of toolchain and CPU architectures. If your target does not match a default configuration, please read the section Non default CPU recommendations in order to know how to implement the required functions.
Here is an example when analyzing the Demo Widget running on the STM32F7508-DK VEE Port.
References
Pre-requisites
SEGGER SystemView: http://segger.com/downloads/systemview/.
Note
This SystemView section has been written for SystemView version V2.52a. Later versions may need modification to the following steps.
Note
This download page also contains links to download the “Target Sources” package. The following sections of this documentation will go through the installation of those. If your BSP project already integrates a specific version, make sure to download & install the matching version of the SystemView program.
Integrate SystemView in your VEE Port
For detailed instructions on the integration of SystemView Target Sources in your BSP, please refer to the “Getting started with SystemView on the target” section of the SystemView User Manual. This documentation focuses on the integration with FreeRTOS. If you are integrating with a different RTOS, make sure to check the samples in the Target Sources package.
Apply FreeRTOS patch
In FreeRTOS v9.x & v10.x, SystemView requires a patch to FreeRTOS source files in order to inject OS event hooks when SystemView profiling is enabled.
Starting from FreeRTOS v11: SystemView integrates with FreeRTOS new built-in mechanism for profiling OS events (Trace Hook Macros). You can skip this step if you use FreeRTOS v11.
Apply SystemView for FreeRTOS patch as described in the documentation (see section 4.7.5).
The patch is available in the Systemview installation folder: <installation_dir>/Src/Sample/FreeRTOSVxx.
Note
For FreeRTOS v10.2.0, the official patch may not work. Here is an unofficial patch
Add source files to your BSP for SystemView with MicroEJ/FreeRTOS integration
Add
<installation_dir>/Src/Config/SEGGER_SYSVIEW_Config_FreeRTOS.cin your BSP.
This file can be modified to fit your system configuration:
Update
SYSVIEW_APP_NAME,SYSVIEW_DEVICE_NAME, andSYSVIEW_RAM_BASEdefines to fit your system information.To add MicroEJ threads management in SystemView tasks initialization:
Add these includes
#include "task.h",#include "LLMJVM_MONITOR_SYSVIEW.h",#include "LLTRACE_SYSVIEW_configuration.h",#include "SEGGER_SYSVIEW_configuration.h"and the include that declares the external variablepvMEJCoreEngineTask.pvMEJCoreEngineTaskmust be the FreeRTOS task handle used to create the Core Engine task. Initializes this variable atNULLbefore the call of the FreeRTOS scheduler.In function
_cbSendSystemDesc(void), add this instruction:SEGGER_SYSVIEW_SendSysDesc("N="SYSVIEW_APP_NAME",D="SYSVIEW_DEVICE_NAME",O=FreeRTOS");beforeSEGGER_SYSVIEW_SendSysDesc("I#15=SysTick");.Replace the
Global functionsection with this code:/********************************************************************* * * Global functions * ********************************************************************** */ SEGGER_SYSVIEW_OS_API SYSVIEW_MICROEJ_X_OS_TraceAPI; static void SYSVIEW_MICROEJ_X_OS_SendTaskList(void){ SYSVIEW_X_OS_TraceAPI.pfSendTaskList(); // The strategy to send tasks info is different in post mortem and live analysis. #if (1 == SEGGER_SYSVIEW_POST_MORTEM_MODE) /** * POST MORTEM analysis * * Using the post mortem analysis, FreeRTOS tasks regularly call the SYSVIEW_MICROEJ_X_OS_SendTaskList() function when * a packet (systemview event) is sent to the SEGGER circular buffer. It is necessary because the information of tasks * must be regularly uploaded in the circular buffer in order to provide a valid analysis at any moment. * Consequently, we only allow to call LLMJVM_MONITOR_SYSTEMVIEW_send_task_list() when the current task is the Core Engine. */ /* Obtain the handle of the current task. */ TaskHandle_t xHandle = xTaskGetCurrentTaskHandle(); configASSERT( xHandle ); // Check the handle is not NULL. // Check if the current task handle is the Core Engine task handle. pvMEJCoreEngineTask is an external variable. if( xHandle == pvMEJCoreEngineTask){ // Launched by the Core Engine, we execute LLMJVM_MONITOR_SYSTEMVIEW_send_task_list() LLMJVM_MONITOR_SYSTEMVIEW_send_task_list(); } #else /** * LIVE analysis * * Using the live analysis, the call of SYSVIEW_MICROEJ_X_OS_SendTaskList() is triggered by * the SystemView Software through the J-Link probe. Consequently, the Core Engine task will never call * the function LLMJVM_MONITOR_SYSTEMVIEW_send_task_list(). However, if the Core Engine task is created, * the function must be called LLMJVM_MONITOR_SYSTEMVIEW_send_task_list(). */ // Check if the Core Engine task handle is not NULL. pvMEJCoreEngineTask is an external variable. if( NULL != pvMEJCoreEngineTask){ // The Core Engine task is running, we execute LLMJVM_MONITOR_SYSTEMVIEW_send_task_list() LLMJVM_MONITOR_SYSTEMVIEW_send_task_list(); } #endif } void SEGGER_SYSVIEW_Conf(void) { SYSVIEW_MICROEJ_X_OS_TraceAPI.pfGetTime = SYSVIEW_X_OS_TraceAPI.pfGetTime; SYSVIEW_MICROEJ_X_OS_TraceAPI.pfSendTaskList = SYSVIEW_MICROEJ_X_OS_SendTaskList; SEGGER_SYSVIEW_Init(SYSVIEW_TIMESTAMP_FREQ, SYSVIEW_CPU_FREQ, &SYSVIEW_MICROEJ_X_OS_TraceAPI, _cbSendSystemDesc); SEGGER_SYSVIEW_SetRAMBase(SYSVIEW_RAM_BASE); }
Add in your BSP the MicroEJ C module files for SystemView: com.microej.clibrary.thirdparty#systemview. These files correspond to the sources provided in the installation folder of Systemview (
<installation_dir>/Src/SEGGER) with a patch for MicroEJ (including recommended configuration and prefixes for task names).Add in your BSP the MicroEJ C module files for SystemView FreeRTOS support. These files correspond to the sources provided in the installation folder of Systemview (
<installation_dir>/Src/Sample/FreeRTOSVXXand<installation_dir>/Src/Sample/FreeRTOSVXX/Config) with a patch for MicroEJ.FreeRTOS 10: com.microej.clibrary.thirdparty#systemview-freertos10
For other versions of FreeRTOS, please contact our support team.
Not all OS events are useful to the profiling analysis. It can be useful to filter out events from systick/queue/… in order to reduce the load and improve the stability of the analysis. To disable these traces on FreeRTOS, modify
SEGGER_SYSVIEW_FreeRTOS.h:Comment the defines beginning by
traceISR.Comment the defines beginning by
traceQUEUE.
Add in your BSP the Abstraction Layer implementation of the Java Trace API for SystemView by adding C module files in your BSP: com.microej.clibrary.llimpl#trace-systemview
Configure FreeRTOS for SystemView
Open FreeRTOSConfig.h and make these changes:
add
#define INCLUDE_xTaskGetIdleTaskHandle 1add
#define INCLUDE_pxTaskGetStackStart 1add
#define INCLUDE_uxTaskPriorityGet 1comment the line
#define traceTASK_SWITCHED_OUT()if definedcomment the line
#define traceTASK_SWITCHED_IN()if definedadd
#include "SEGGER_SYSVIEW_FreeRTOS.h"at the end of the file
Modify startup code of your BSP
Enable SystemView on startup (before creating the first OS task): call
SEGGER_SYSVIEW_Conf();. The following include directive is required:#include "SEGGER_SYSVIEW.h".Print the RTT block address to the serial port on startup:
printf("SEGGER_RTT block address: %p\n", &(_SEGGER_RTT));. The following include directive is required:#include "SEGGER_RTT.h".Note
This is useful if SystemView does not automatically find the RTT block address. See section RTT Control Block Not Found for more details. You may also find the RTT block address in RAM by searching
_SEGGER_RTTin the .map file generated with the firmware binary.Add a call to
SYSVIEW_setMicroJVMTask(pvCreatedTask);just after creating the OS task. The handler to give is the parameter of type TaskHandle_t passed to thexTaskCreatefunction. This will register the Core Engine OS task.
Add description files to Systemview installation folder
Copy the file SYSVIEW_MicroEJ.txt of the C module com.microej.clibrary.llimpl#trace-systemview to the SystemView installation path, such as SEGGER/SystemView_V252a/Description/. If your VEE Port integrates MicroUI, also add the trace descriptions files from Debug Traces.
Non default CPU recommendations
As mentioned in the SEGGER documentation, SystemView can be used on any CPU. In the case of a CPU not supported by default, the following macros that redirect to 4 functions must be implemented:
SEGGER_SYSVIEW_GET_TIMESTAMP()SEGGER_SYSVIEW_GET_INTERRUPT_ID()SEGGER_SYSVIEW_LOCK()SEGGER_SYSVIEW_UNLOCK()
These 4 macros are defined by default in the file SEGGER_SYSVIEW_ConfDefaults.h and should be re-defined in the
file SEGGER_SYSVIEW_configuration.h when it is necessary.
The function macro SEGGER_SYSVIEW_GET_TIMESTAMP() retrieves the system timestamp for SystemView events. On most
devices the system timestamp must be generated by a timer. With the default configuration, the system timestamp is
retrieved from the user-provided function SEGGER_SYSVIEW_X_GetTimestamp(). The recommended minimum accuracy for
this is on the order of magnitude of microseconds.
The function macro SEGGER_SYSVIEW_GET_INTERRUPT_ID() returns the currently active interrupt. On Cortex-M devices the
active vector can be read from the ICSR register. On other devices, the active interrupt can either be retrieved from the
interrupt controller directly, can be saved in a variable in the generic interrupt handler, or has to be assigned
manually in each interrupt routine.
The function macro SEGGER_SYSVIEW_LOCK() recursively locks SystemView transfers from being interrupted, by disabling the
interrupts. Recording a SystemView event must not be interrupted by recording another event. By default, this
function is implemented with the function macro SEGGER_RTT_LOCK(). However, this definition may be empty for your system.
In this case, implement the function to disable interrupt and context switching.
The function macro SEGGER_SYSVIEW_UNLOCK() recursively unlocks SystemView transfers from being interrupted, by retoring
the previous interrupt state. Follow the same recommendations as for the function macro SEGGER_SYSVIEW_LOCK().
Warning
Empty implementations of SEGGER_RTT_LOCK() and SEGGER_RTT_LOCK() will not cause
an error at link time, so check the implementation of these two function macros carefully.
Note
If the target is not connected to a J-Link probe, post mortem analysis is still possible.
Post Mortem analysis data extraction
First of all, in the file SEGGER_SYSVIEW_configuration.h, be sure that the macro SEGGER_SYSVIEW_POST_MORTEM_MODE is set to 1 and increase the size of the
SEGGER_SYSVIEW_RTT_BUFFER_SIZE. Then, start manually the SystemView recording by calling
SEGGER_SYSVIEW_Start() at runtime.
When the system crashed or all tests are done, attach with a debugger to the system and halt it.
Get the SystemView RTT buffer (Usually
_SEGGER_RTT.aUp[1].pBuffer).
When using a debugger, the SEGGER_RTT buffer can be located using the Expressions tab by adding the tracking of the expression _SEGGER_RTT symbol.
Save the data from pBuffer + WrOff until the end of the buffer to a file.
Append the data from pBuffer until pBuffer + RdOff - 1 to the file.
Save the file as *.SVdat or *.bin.
The append step and the step 5 can be done in one cat instruction as shown below:
cat sysview_dump_1_wroff.bin sysview_dump_1_rdoff.bin > concat_dump_1.bin
The file generated can now be read by the SystemView software.
Note
Instructions on how to retrieve the right SEGGER RTT buffer are also available on the SEGGER website.
Usage
Trace application events
To enable events recording, refer to the Event Recording section to configure the required Application Options.
Add custom events to the SystemView analysis
MicroEJ Architecture can generate specific events that allow monitoring of current thread, Java exceptions, Java allocations, … as well as custom application events. Please refer to the Event Tracing section.
For custom application events, the first step is to add logs to the Java application using a dedicated Tracer. Please read the documentation page Code Instrumentation for Logging. Below is an example of Tracer usage:
Tracer tracer = new Tracer("MyGroup", 10);

if (Constants.getBoolean(Tracer.TRACE_ENABLED_CONSTANT_PROPERTY)) {
   // This code is not embedded if TRACE_ENABLED_CONSTANT_PROPERTY is set to false.
   tracer.recordEvent(0);
}

// Do some actions HERE...

if (Constants.getBoolean(Tracer.TRACE_ENABLED_CONSTANT_PROPERTY)) {
   // This code is not embedded if TRACE_ENABLED_CONSTANT_PROPERTY is set to false.
   tracer.recordEventEnd(0);
}
Run this application on the target with traces enabled and record the SystemView analysis. Then, search for the event
in the SystemView logs with the timeline. In this example, the new event type is function #512, see the screenshot below:
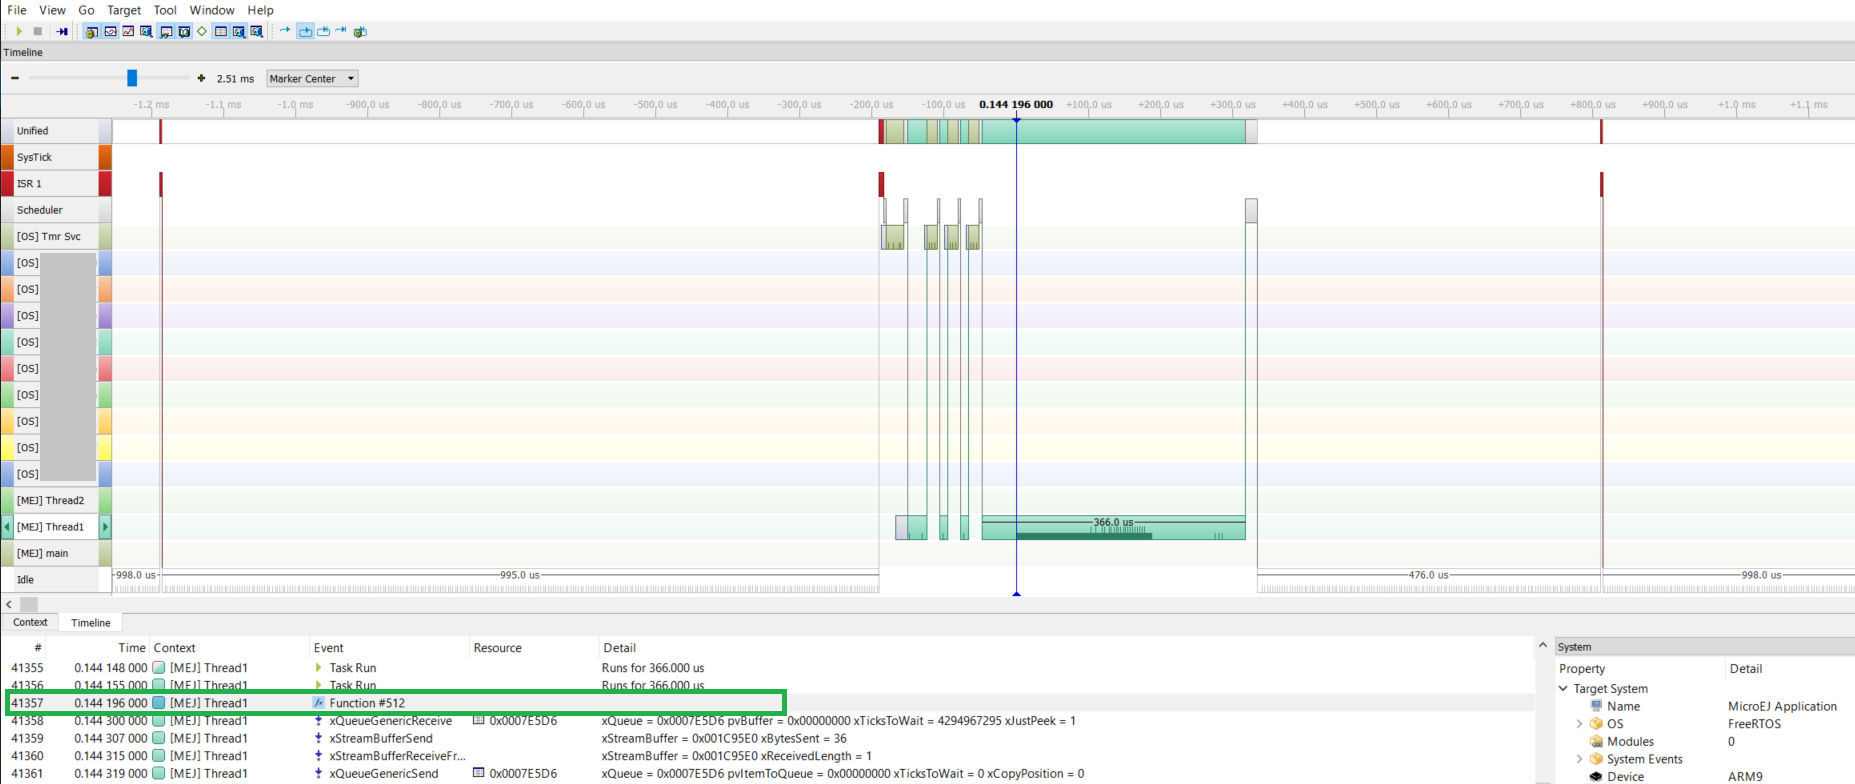
Now, it is necessary to indicate to SystemView how to decode this new event. To do that, you can either edit the file
SYSVIEW_MicroEJ.txt or add a new text file in the SystemView install folder SEGGER/SystemView_VXXX/Description.
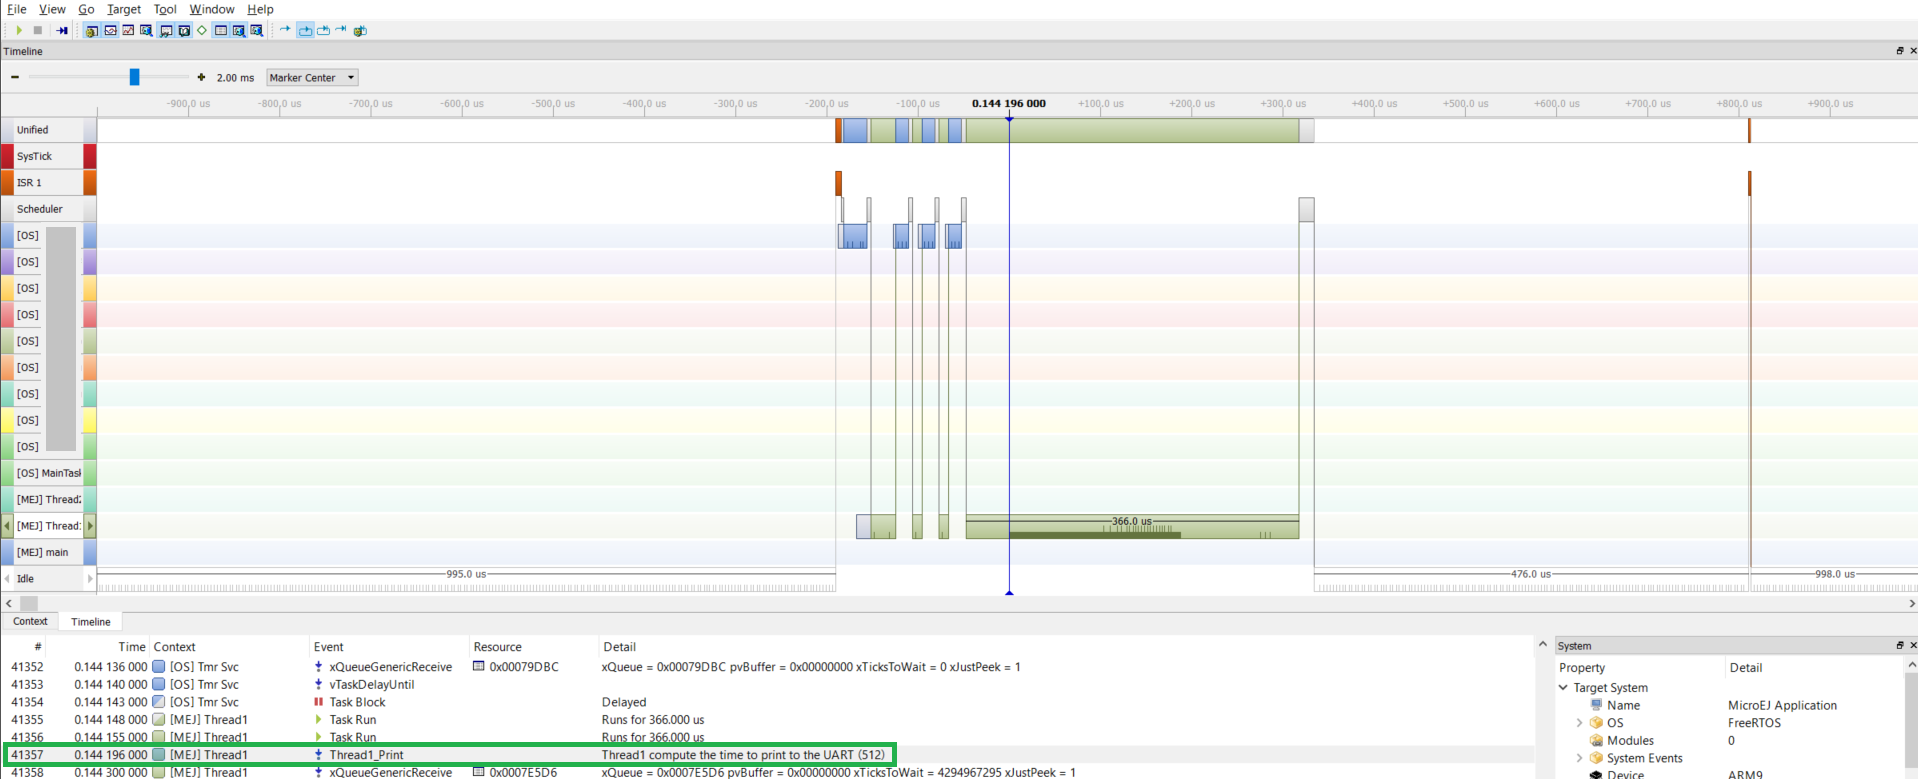
In the chosen file, add the line as shown below:
512 Thread1_Print Thread1 compute the time to print to the UART (512)
Finally, reload your analysis with SystemView and this time the new event should be decoded.
You can add more information if you use the versions of the Tracer API with more parameters. Then, if you want these parameters to appear in the SystemView timeline view, use the modifiers below:
%b- Display parameter as binary.%B- Display parameter as hexadecimal string (e.g. 00 AA FF …).%d- Display parameter as signed decimal integer.%D- Display parameter as time value.%I- Display parameter as a resource name if the resource id is known to SystemView.%p- Display parameter as 4 byte hexadecimal integer (e.g. 0xAABBCCDD).%s- Display parameter as string.%t- Display parameter as a task name if the task id is known to SystemView.%u- Display parameter as unsigned decimal integer.%x- Display parameter as hexadecimal integer.
Check the other text files provided by SEGGER for more examples in the install directory SEGGER/SystemView_VXXX/Description.
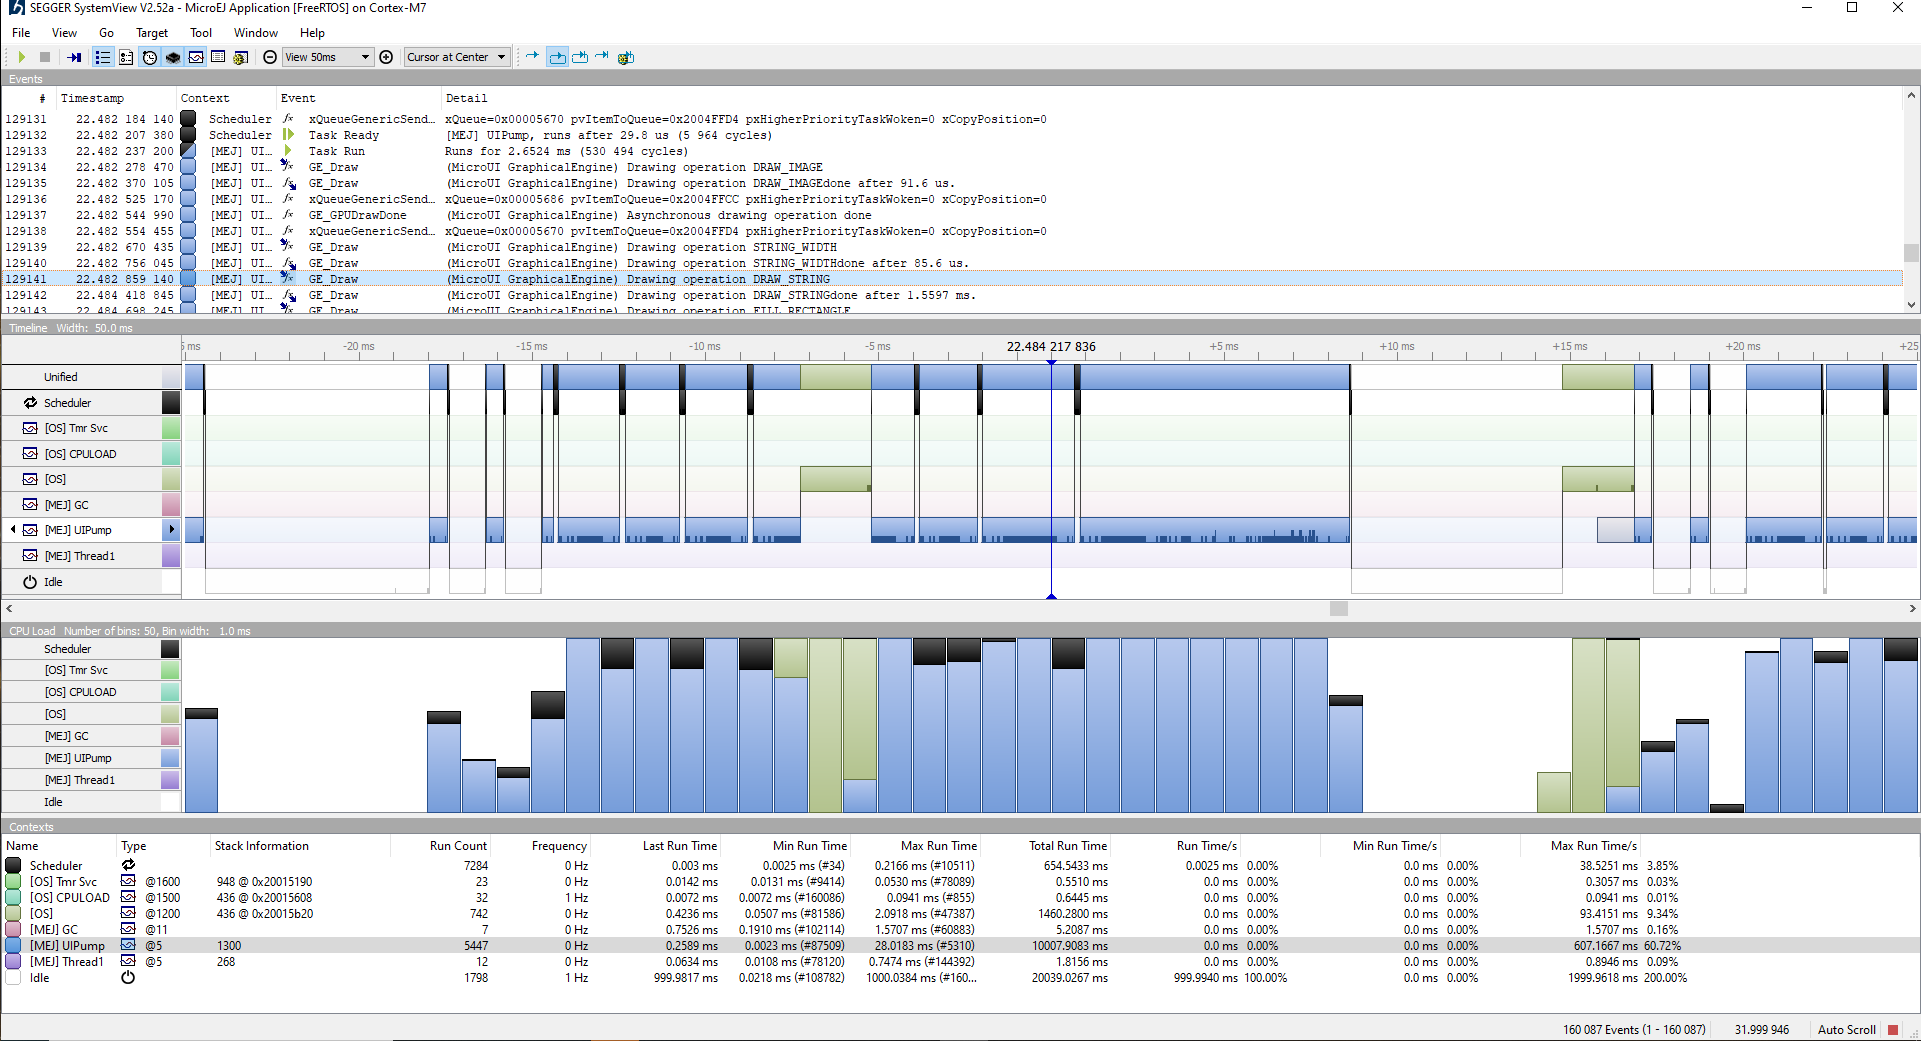
Core Engine OS Task
The Core Engine task is the native OS task that executes the Core Engine internals & the Application threads. The provided SystemView configuration replaces (splits) the execution segments of this OS task with (into) the different components that are actually executed. This simplifies profiling analysis by exposing the execution segments of the Scheduler, Garbage Collector & the different Application threads (with their names, see the section below) directly into SystemView’s timeline, along with the other native OS tasks.
OS Tasks and Threads Names
To make a distinction between the OS tasks and the MicroEJ threads, a prefix is added to the OS tasks names ([OS]) and the threads names ([MEJ]).
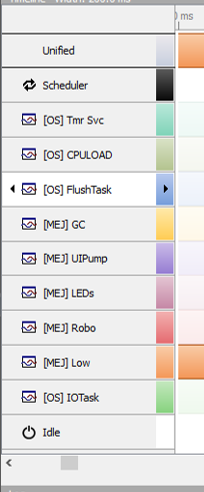
OS Tasks and Threads Names
Note
SystemView limits the number of characters to 32. The prefix length is included in these 32 characters; consequently, the end of the original OS task or thread name can be cropped.
OS Tasks and Threads Priorities
SystemView lists the OS tasks and threads according to their priorities. However, the priority notion does not have the same signification when talking about OS tasks or threads: a thread priority depends on the Core Engine OS task priority.
As a consequence, a thread with the priority 5 may not appear between an OS task with the priority 4 and another OS task with priority 6:
if the Core Engine OS task priority is
3, the thread must appear below an OS task with priority4.if the Core Engine OS task priority is
7, the thread must appear above an OS task with priority6.
To keep a consistent line ordering in SystemView, the priorities sent to the SystemView client respect the following rules:
OS task:
priority_sent = task_priority * 100.MicroEJ thread:
priority_sent = MicroJvm_task_priority * 100 + thread_priority.
Troubleshooting
SystemView doesn’t see any activity in MicroEJ Tasks
You have to enable runtime traces of your Java application.
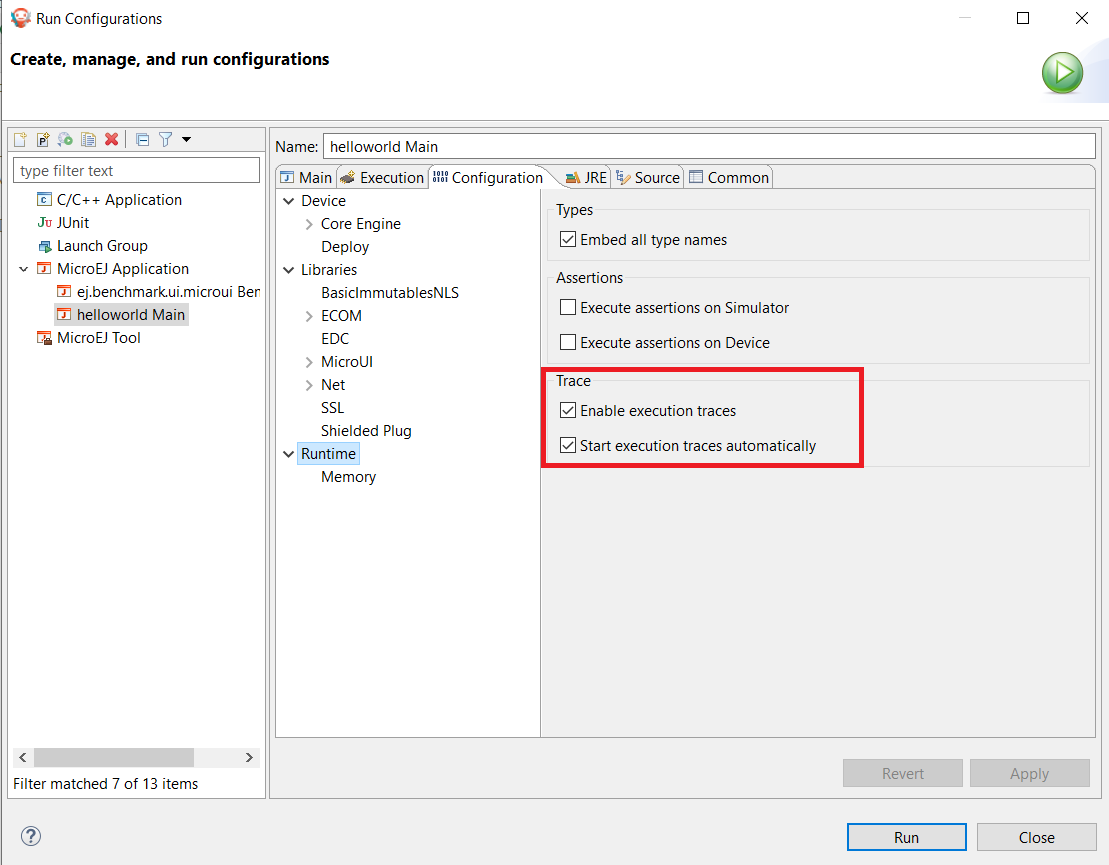
In Run > Run configuration, select your Java application launcher.
Then, go to Configuration tab > Runtime > Trace.
Finally, check checkboxes Enable execution traces and Start execution traces automatically as shown in the picture below.
Rebuild your firmware with the new Java application version, which should fix the issue.
You may only check the first checkbox when you know when you want to start the trace recording. For more information, please refer to the Event Recording section to configure the required Application Options.
OVERFLOW Events in SystemView
Depending on the application, OVERFLOW events can be seen in System View. To mitigate this problem, the default SEGGER_SYSVIEW_RTT_BUFFER_SIZE can be increased
from the default 1kB to a more appropriate size of 4kB. Still, if OVERFLOW events are still visible, the user can further increase this configuration found in
/YourPlatformProject-bsp/projects/microej/thirdparty/systemview/inc/SEGGER_SYSVIEW_configuration.h.
RTT Control Block Not Found
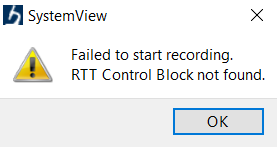
Get the RTT block address from the standard output by resetting the board (it is printed at the beginning of the firmware program),
In SystemView, select Target > Start recording,
In RTT Control Block Detection, select Address and put the address retrieved. You can also try with Search Range option.
RTT block found by SystemView but no traces displayed
Be sure that your MCU is running. The BSP may use semi-hosting traces that block the MCU execution if the application is running out of a Debug session.
You can check the state of the MCU using J-Link tools such as
J-Link CommanderandOzoneto start a Debug session.
Bus hardfault when running SystemView without Core Engine
The function LLMJVM_MONITOR_SYSTEMVIEW_send_task_list(); triggers a Bus Hardfault when no Core Engine is launched.
To solve this issue, comment this function call out in SEGGER_SYSVIEW_Config_FreeRTOS.c when you run SystemView without launching the Core Engine.
Partial or wrong analysis with warning messages in the logs
It may happen that logs are not recorded well, with the following messages displayed in the log window:
Warning: Decoding 32-bit value failed. Bit 5 has continuation set
Warning: Error during file analysis.
The cause of this issue can be a wrong implementation of the locking function macros SEGGER_SYSVIEW_LOCK() and SEGGER_SYSVIEW_UNLOCK().
This problem may occur on a system target that is not supported by default in SystemView sources.
This issue has been discussed in the SEGGER forum topic here: https://forum.segger.com/index.php/Thread/8336-SOLVED-SystemView-stops-working-with-Error-140-and-141/
SystemView for STM32 ST-Link Probe
SystemView software requires a J-Link probe. If your target board uses an ST-Link probe, it is possible to re-flash the ST-LINK on board with a J-Link firmware. See instructions provided by SEGGER Microcontroller https://www.segger.com/products/debug-probes/j-link/models/other-j-links/st-link-on-board/ for more details.
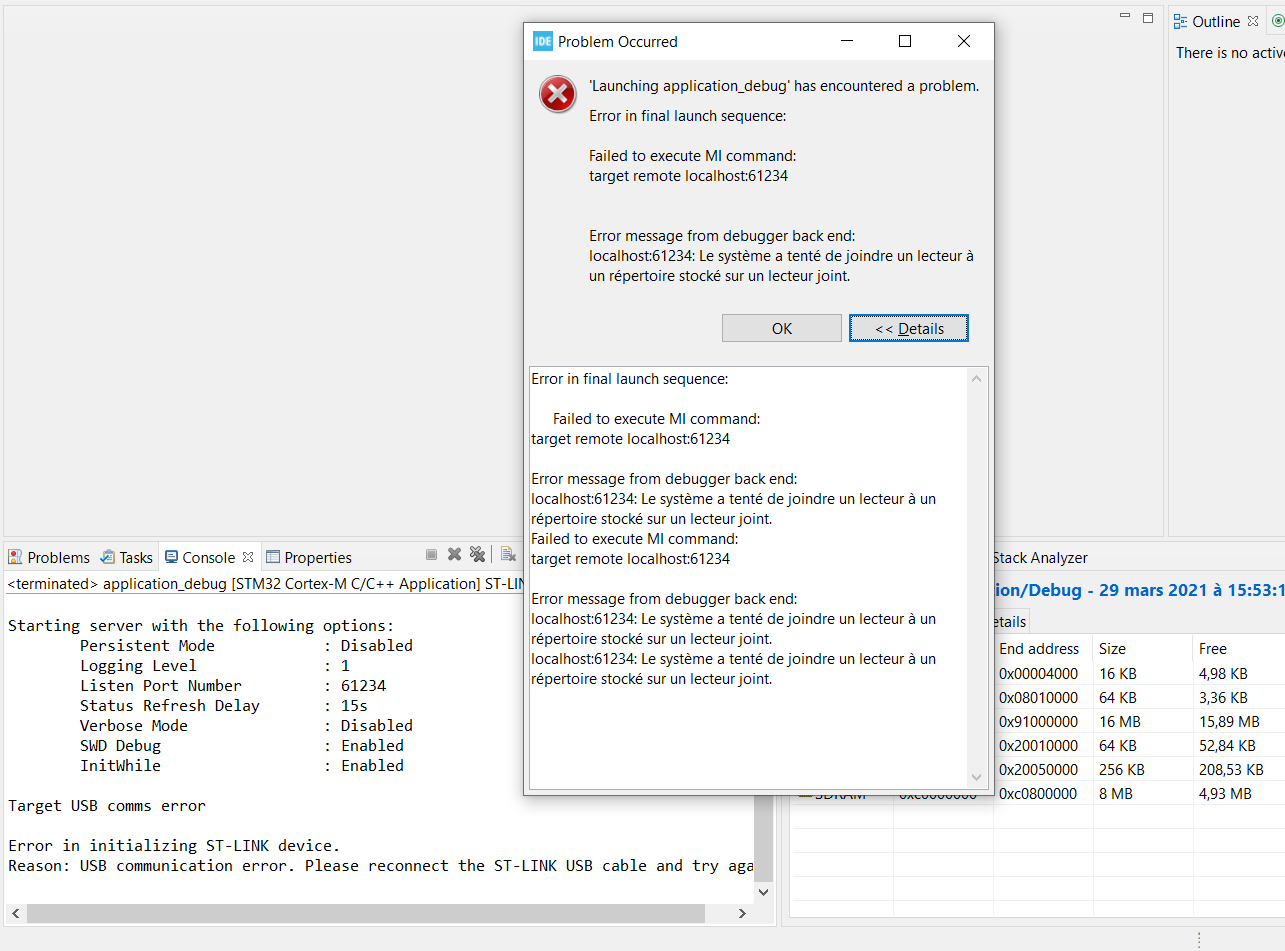
If you cannot flash a firmware for an STM32 device after replacing the J-Link firmware with the ST-Link original one:
Use ST_Link utility program to update the ST_Link firmware, go to ST-LINK > Firmware update.
Then, try to flash again.