
Simulation
Principle
The graphical user interface uses the Front Panel mock (see Front Panel Mock) and some extensions (widgets) to simulate the user interactions. It is the equivalent of the three embedded modules (Display, Input and LED) of the VEE Port (see MicroUI).
The Front Panel enhances the development environment by allowing User Interface applications to be designed and tested on the computer rather than on the target device (which may not yet be built). The mock interacts with the user’s computer in two ways:
output: LEDs, graphical displays
input: buttons, joystick, touch, haptic sensors
Note
This chapter completes the notions described in Front Panel Mock chapter.
Module Dependencies
The Front Panel project is a regular MicroEJ Module project. By default, the project depends on the Front Panel Framework which only contains the Front Panel core classes and which does not provide any Front Panel Widgets (see Module Dependencies). To add interactive Front Panel Widgets (typically a simulated display and input devices), add the library that provides compatible Front Panel Widgets with the Graphics Engine:
The Front Panel project is a regular Gradle project. Its dependencies in build.gradle.kts file should look like this example:
dependencies {
   implementation("ej.tool.frontpanel:widget:[Front Panel Widgets version]")
}
The Front Panel project is a regular MicroEJ Module project. Its dependencies in module.ivy file should look like this example:
<dependencies>
   <dependency org="ej.tool.frontpanel" name="widget" rev="[Front Panel Widgets version]"/>
</dependencies>
Note
The life cycle of this library is different than the UI pack’s one, see Front Panel API. The latest version of the Front Panel Widgets is 5.3.2.
To implement UI Pack extensions for the simulator (custom widgets compatible with the Graphics Engine, custom drawings, etc.), add the Front Panel extension API from the UI Pack (set the version used by the VEE Port):
The Front Panel project is a regular Gradle project. Its dependencies in build.gradle.kts file should look like this example:
dependencies {
   implementation("com.microej.pack.ui:ui-pack:[UI Pack version]") {
      artifact {
            name = "frontpanel"
            extension = "jar"
      }
   }
}
The Front Panel project is a regular MicroEJ Module project. Its dependencies in module.ivy file should look like this example:
<dependency org="com.microej.pack.ui" name="ui-pack" rev="[UI Pack version]">
   <artifact name="frontpanel" type="jar"/>
</dependency>
Warning
This extension is built for each UI Pack version. By consequence, a Front Panel project is done for a VEE Port built with the same UI Pack. When the UI Pack mismatch, some errors may occur during the Front Panel project export step, during the VEE Port build, and/or during the application runtime. The latest version of the UI Pack is 14.5.2.
MicroUI Implementation
As described here, the Front Panel uses an equivalent of embedded side’s header files that implement MicroUI native methods.
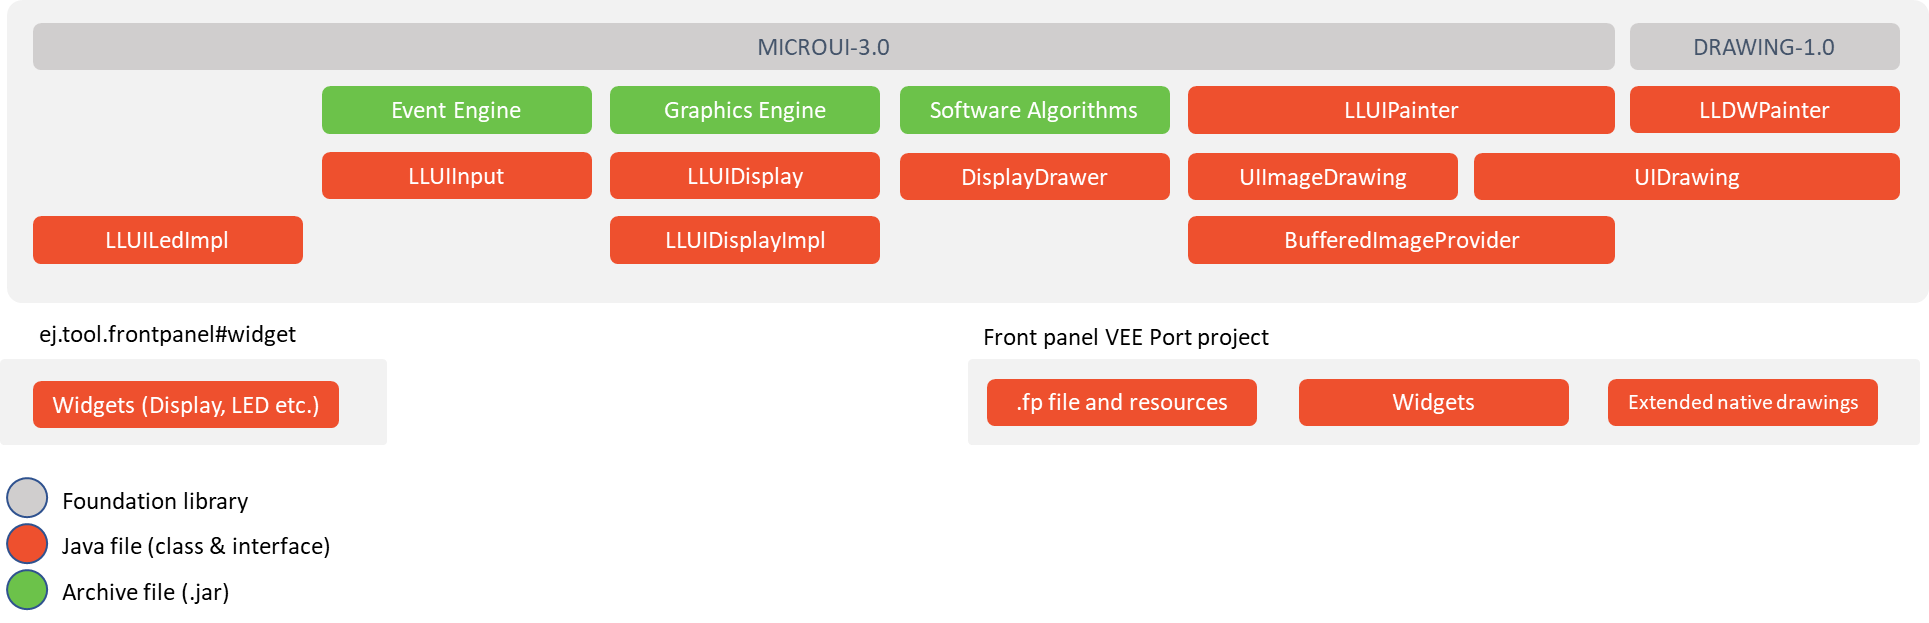
This set of classes and interfaces is available in the module com.microej.pack.ui#ui-pack. It offers the same capacity to override some built-in drawing algorithms (internal Graphics Engine drawing algorithms), to add some custom drawing algorithms, to manipulate the MicroUI concepts (GraphicsContext, Image, etc.) in the Front Panel project, etc.
The interface
ej.microui.display.LLUIDisplayrepresents the MicroUI Graphics Engine (MicroUI framework). It provides methods to map MicroUI byte arrays in MicroUI Graphics Context objects, manipulate MicroUI colors, clip, etc. An instance of this framework is available via the fieldInstance.The interface
ej.microui.display.LLUIDisplayImplall methods required by MicroUI implementation to be compatible with the MicroUI Display class implementation. See Display Widget.The class
ej.microui.display.LLUIPainterimplements all MicroUI drawing natives. It defines some interfaces and classes to manipulate the MicroUI concepts (GraphicsContext, Image, etc.) in the Front Panel project. Like the embedded side, this class manages the synchronization with the Graphics Engine and delegates the drawing to the interfaceej.microui.display.UIDrawing.The interface
ej.microui.display.UIDrawingdefines all the drawing methods available in MicroUI. The default implementation of the methods involving images calls the matching method inej.microui.display.UIImageDrawing. The default implementation of the other methods reports the error that the drawing is not done.The interface
ej.microui.display.UIImageDrawingdefines all the methods that draw an image. The default implementation of the methods reports the error that the drawing is not done.The class
ej.microui.display.DisplayDrawerimplementsej.microui.display.UIDrawingthat draws using the Graphics Engine software algorithms.The classes in the package
ej.drawingimplement the native of the MicroUI extended library: DrawingThe classes in the package
ej.microui.eventmanage the input events, see Inputs Extensions.The classes in the package
ej.microui.ledmanage the LEDs.
Display Widget
The Display widget implements the interface ej.microui.display.LLUIDisplayImpl to be compatible with the implementation of the MicroUI class Display.
Features
Display buffer policy and buffer refresh strategy: simulates the display buffer policy and the buffer refresh strategy.
LCD refresh rate: simulates the time between two visible frames on the hardware device.
LCD flush time: simulates the time to flush the frame content to the hardware device.
Backlight (enabled by default):
backlightFeature=true|false.Non-rectangular displays:
filter="xxx.png". Some displays can have another appearance (for instance: circular).Standard pixel formats.
Driver-specific pixel formats:
extensionClass="xxx". This class must be added in the Front Panel project and implement the interfaceej.fp.widget.Display.DisplayExtension.
Refresh Rate
Usually a LCD is cadenced around 50-60Hz. That means the LCD can display a new frame every 16-20ms. By default this widget displays a new frame as soon as possible. It can be configured to reduce this time to simulate the hardware device.
In the widget declaration, set the attribute refreshRate="xxx" with a value in Hertz.
A zero or negative value disables the feature.
The application can substitute the VEE Port’s value by setting the property -Dej.fp.widget.display.refreshRate=xxx in the application launcher.
Flush Time
On a hardware device, the time to flush the frame data from the back buffer memory to the LCD is not null. According to the hardware device technology, this time varies between 3-4 ms to 10-15ms. In SPI mode, this time may be higher, around 50ms, even more. By default this widget copies the content of back buffer as faster as possible. It can be configured to reduce this time to simulate the hardware device.
In the widget declaration, set the attribute flushTime="xxx" with a value in milliseconds.
A zero or negative value disables the feature.
The application can substitute the VEE Port’s value by setting the property -Dej.fp.widget.display.flushTime=xxx in the application launcher.
Non-rectangular Display
The Front Panel can simulate using a filter (see Widget). This filter defines the pixels inside and outside the whole display area. The filter image must have the same size as the rectangular display area. A display pixel at a given position will not be rendered if the pixel at the same position in the mask is fully transparent.
Note
Usually the touch panel over the display uses the same filter to reduce the touch panel area.
Example of non-rectangular display and touch:
<ej.fp.widget.Display x="41" y="33" width="392" height="392" filter="mask_392.png" />
<ej.fp.widget.Pointer x="41" y="33" width="392" height="392" filter="mask_392.png" touch="true"/>
Inputs Extensions
The input device widgets (button, joystick, touch, etc.) require a listener to know how to react on input events (press, release, move, etc.).The aim of this listener is to generate an event compatible with MicroUI Event Generator. Thereby, a button press action can become a MicroUI Buttons press event or a Command event or anything else.
A MicroUI Event Generator is known by its name. This name is fixed during the MicroUI static initialization (see Static Initialization). To generate an event to a specific event generator, the widget has to use the event generator name as identifier.
A Front Panel widget can:
Force the behavior of an input action: the associated MicroUI Event Generator type is hardcoded (Buttons, Pointer, etc.), the event is hardcoded (for instance: widget button press action may be hardcoded on event generator Buttons and on the event pressed). Only the event generator name (identifier) should be editable by the Front Panel extension project.
Propose a default behavior of an input action: contrary to first point, the Front Panel extension project is able to change the default behavior. For instance a joystick can simulate a MicroUI Pointer.
Do nothing: the widget requires the Front Panel extension project to give a listener. This listener will receive all widgets action (press, release, etc.) and will have to react on it. The action should be converted on a MicroUI Event Generator event or might be dropped.
This choice of behavior is widget dependant. Please refer to the widget documentation to have more information about the chosen behavior.
Heap Simulation
Graphics Engine is using two dedicated heaps: for the images (see Images Heap ) and the external fonts (see External Resources). Front Panel partly simulates the heaps usage.
Images heap: Front Panel simulates the heap usage when the application is creating a BufferedImage, when it loads and decodes an image (PNG, BMP, etc.) which is not a raw resource and when it converts an image in MicroEJ format in another MicroEJ format. However it does not simulate the external image copy in heap (see External Resource).
External fonts heap: Front Panel does not simulate this heap (see External Resources). There is no rendering limitation when application is using a font which is located outside CPU addresses ranges.
Image Decoders
Front Panel uses its own internal image decoders when the associated modules have been selected (see internal image decoders). Some additional decoders can be added like the C-side for the embedded VEE Port (see external image decoders).Front Panel uses the Java AWT ImageIO API to load the encoded images.
Generic Image Decoders
The Java AWT ImageIO class holds a limited list of additional decoders.
To be compliant with the embedded side, these decoders are disabled by default.
To add an additional decoder, specify the property hardwareImageDecoders.list in Front Panel configuration properties file (see Installation) with one or several property values:
Type |
Property value |
|---|---|
Graphics Interchange Format (GIF) |
gif |
Joint Photographic Experts Group (JPEG) |
jpeg or jpg |
Portable Network Graphics (PNG) |
png |
Windows bitmap (BMP) |
bmp |
The decoders list is comma (,) separated. Example:
hardwareImageDecoders.list=jpg,bmp
Custom Image Decoders
Additionally, the Java AWT ImageIO class offers the possibility to add some custom image decoders by using the service javax.imageio.spi.ImageReaderSpi.
Since UI Pack 13.2.0, Front Panel automatically includes new image decoders (new ImageIO services, see the method LLUIDisplayImpl.decode()), compiled in JAR files that follow this convention:
The JAR contains the service declaration
/META-INF/services/javax.imageio.spi.ImageReaderSpi,The JAR filename’s prefix is imageio-,
The JAR location is the VEE Port configuration project’s
dropins/tools/directory.
Note
The same JAR is used by the Front Panel and by the Image Generator.
Drawings
Front Panel is designed to modify the default behavior for performing drawings.
Image Rendering
Front Panel is designed to add the support of custom images.
Buffered Image
Front Panel is designed to add the support of MicroUI BufferedImage with a format different from the display format.
Classpath
A standard mock is running on the same JVM than the HIL Engine (see Mock chapter). It shares the same classpath. When the application is not using the MicroUI library (i.e., it is not an UI application, whether the VEE Port holds the MicroEJ Graphics Engine or not), the Front Panel mock runs a standard mock. When the application is using the MicroUI library, the Front Panel UI mock runs on the same JVM than the Simulator. In this case, the other mocks don’t share the same classpath than the Front Panel mock. As a consequence, an other mock than the Front Panel mock can not send input events to MicroUI, the object created in the standard mocks’s class loader are not available in the Front Panel UI’s class loader (and vice versa), etc.
Since the UI Pack 13.2.0, it is possible to force to run the Front Panel UI mock in the same classpath than the HIL Engine by adding the property -Dej.fp.hil=true in the application JRE tab.
Note that this option only works when the version of the MicroEJ Architecture used to build the VEE Port is 7.17.0 or higher.
Dependencies
Installation
Front Panel is an additional module for MicroUI library. When the MicroUI module is installed, install this module in order to be able to simulate UI drawings on the Simulator. See Installation to install the module.
The properties file can additional properties:
hardwareImageDecoders.list[optional, default value is “” (empty)]: Defines the available list of additional image decoders provided by the hardware (see Image Decoders). Use comma (‘,’) to specify several decoders among this list: bmp, jpg, jpeg, gif, png. If empty or unspecified, no image decoder is added.In SDK 6, the configuration is done in the properties file
vee-port/configuration.propertiesof the VEE Port project.Define the property using the
com.microej.pack.frontpanelprefix:com.microej.pack.frontpanel.hardwareImageDecoders.list=jpg,bmp,pngIn SDK 5, set the
hardwareImageDecoders.listproperty in the properties filefrontpanel/frontpanel.properties.
Use
Launch a MicroUI application on the Simulator to run the Front Panel.