Create a VEE Port
This section describes the steps to create a new VEE Port with the SDK, and options to connect it to an external Board Support Package (BSP) as well as a third-party C toolchain.
Note
If you own a legacy VEE Port, you can either create your VEE Port again from scratch, or follow the Former Platform Migration chapter.
VEE Port Project Creation
The first step is to create a VEE Port configuration project:
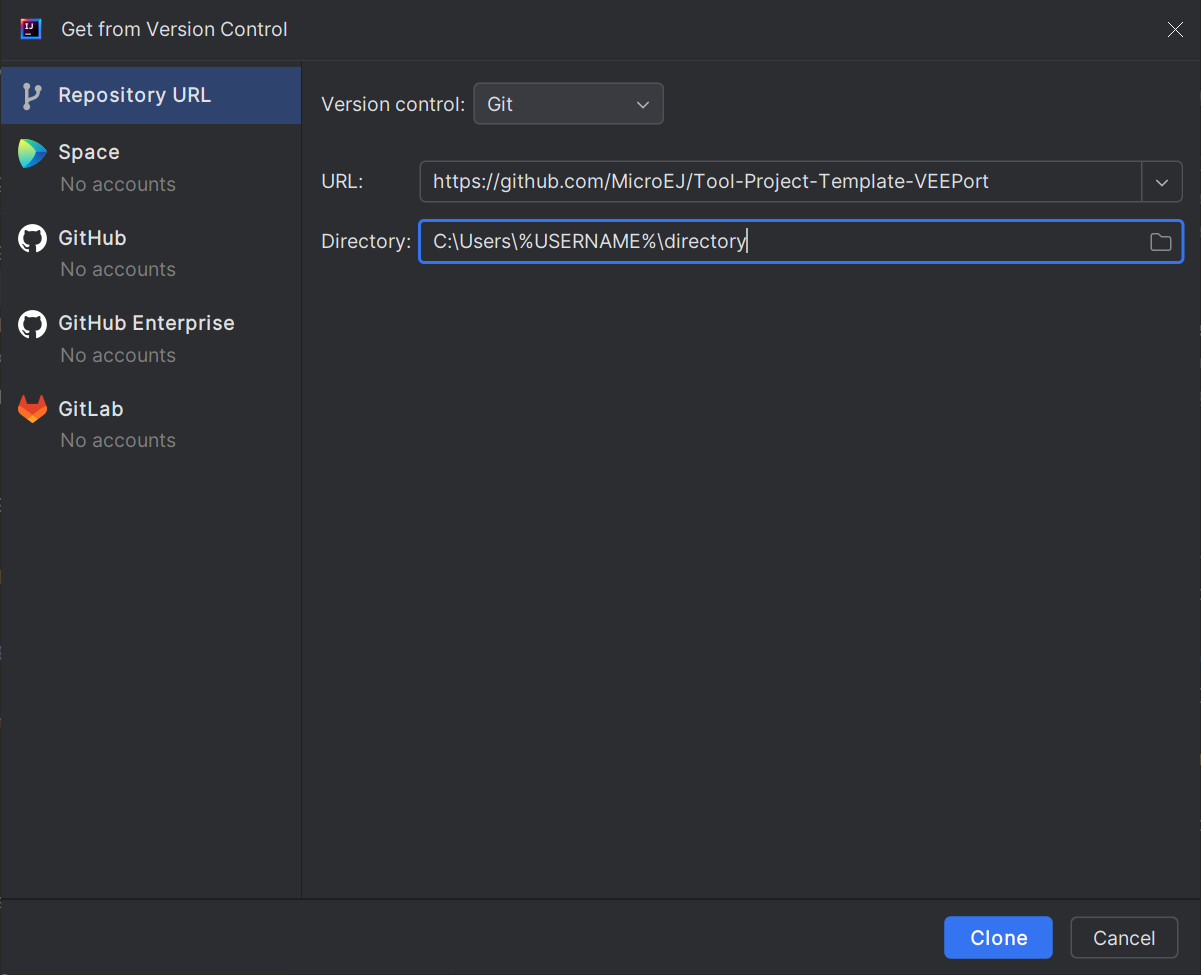
Click File > New > Project from Version Control….
Select Repository URL.
Select Git as Version control.
Fill the URL of the VEE Port Project Template Github Repository.
Fill the Directory in which the Project Template must be cloned.
Click on Clone button.

Version Control Window in IntelliJ IDEA
When the Gradle project is loaded, rename the project and change its group and version in the
build.gradle.ktsbuild script.Select View > Tool Windows > Terminal.
In the integrated terminal, run the following command at the root of the project to remove the Git Repository:
rm -r -Force .git*
rm -rf .git*
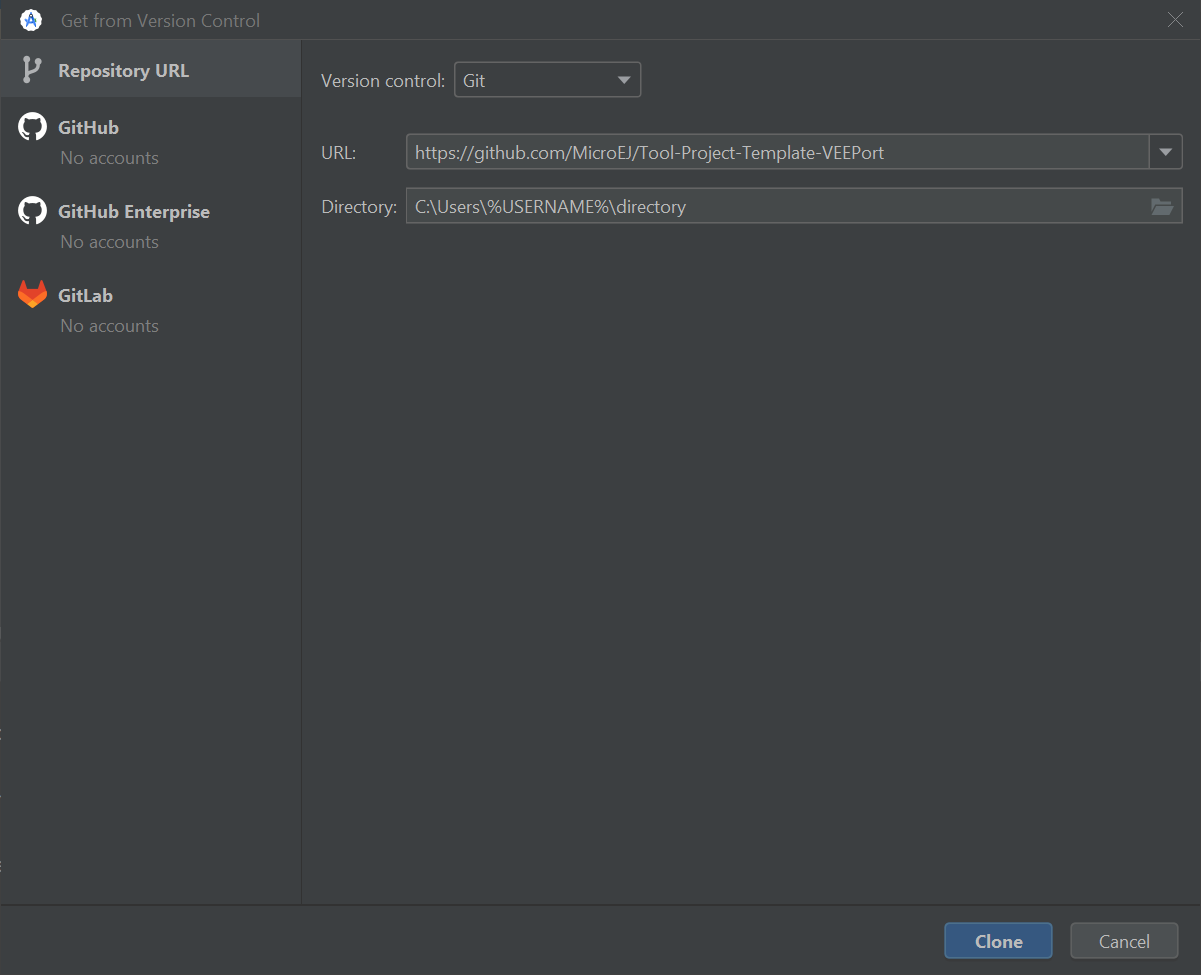
Click File > New > Project from Version Control….
Select Repository URL.
Select Git as Version control.
Fill the URL of the VEE Port Project Template Github Repository.
Fill the Directory in which the Project Template must be cloned.
Click on Clone button.

Version Control Window in Android Studio
When the Gradle project is loaded, rename the project and change its group and version in the
build.gradle.ktsbuild script.Select View > Tool Windows > Terminal.
In the integrated terminal, run the following command at the root of the project to remove the Git Repository:
rm -r -Force .git*
rm -rf .git*
Open a new terminal.
Clone the VEE Port Project Template Github Repository:
git clone https://github.com/MicroEJ/Tool-Project-Template-VEEPort.git
Remove the Git Repository from the project:
rm -r -Force .git*
rm -rf .git*
Rename the project and change its group and version in the
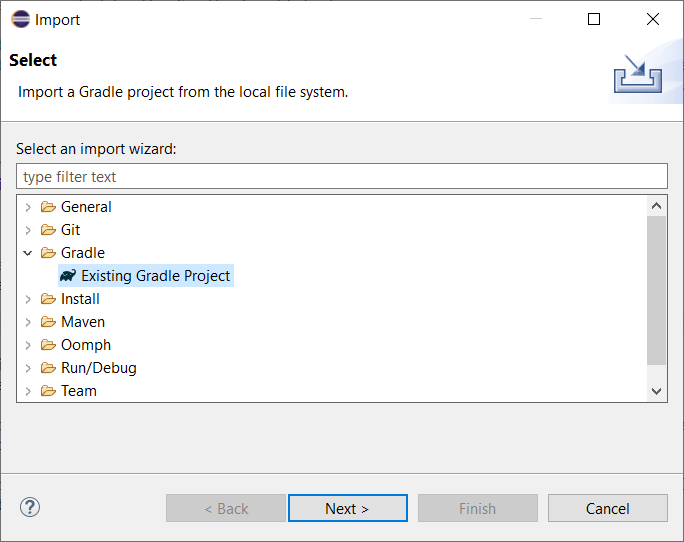
build.gradle.ktsbuild script.In Eclipse, click on File > Import….
Select the project type Gradle > Existing Gradle Project and click on the Next button.

Project Type Selection in Eclipse
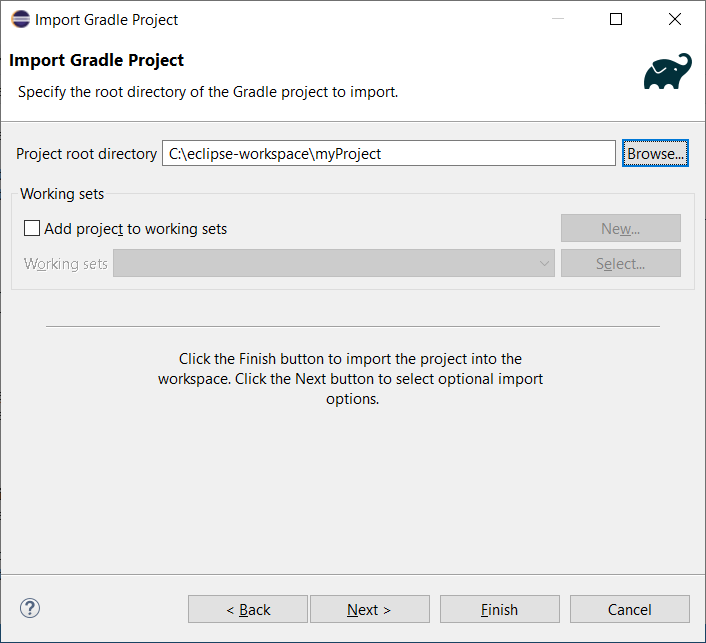
Select the root directory of the project.

Project root folder in Eclipse
Click on the Next button and finally on the Finish button.
Select View > Command Palette….
Run the
Git: Clonecommand in the Command Palette.

Command Palette in VS Code
Fill the URI of the VEE Port Project Template Github Repository in the Search Bar.
Click on Clone from URL.

Search Bar in VS Code
In the upcoming popup, choose a folder and click on the
Select as Repository Destinationbutton.When the Gradle project is loaded, rename the project and change its group and version in the
build.gradle.ktsbuild script.Select Terminal > New Terminal.
In the integrated terminal, run the following command at the root of the project to remove the Git Repository:
rm -r -Force .git*
rm -rf .git*
Clone the VEE Port Project Template Github Repository:
git clone https://github.com/MicroEJ/Tool-Project-Template-VEEPort.git
Remove the Git Repository from the project:
rm -r -Force .git*
rm -rf .git*
Rename the project and change its group and version in the
build.gradle.ktsbuild script.
Architecture Selection
The next step is to select an Architecture compatible with your device instructions set and C compiler. A VEE Port requires exactly one Architecture. MicroEJ Corp. provides MicroEJ Evaluation Architectures for most common instructions sets and compilers at https://repository.microej.com/modules/com/microej/architecture. Refer to the chapter Architectures MCU / Compiler for the details of ABI and compiler options.
If the requested MicroEJ Architecture is not available for evaluation or to get a MicroEJ Production Architecture, please contact your MicroEJ sales representative or our support team.
The VEE Port project template comes with a default Architecture, defined in the Version Catalog file located at gradle/libs.versions.toml:
architecture = { group = "com.microej.architecture.CM4.CM4hardfp_GCC48", name = "flopi4G25", version = "8.2.0" }
and referenced in the vee-port/build.gradle.kts file:
dependencies {

    microejArchitecture(libs.architecture)

}
If you want to use another Architecture, update the Version Catalog file accordingly.
The name of the Architecture dependency module needed for your VEE Port can be found in the chapter Architectures MCU / Compiler. Check the table of your corresponding Architecture and follow the link in the Module column.
Warning
We recommend to use an Architecture 8.1 minimum to have full support on the SDK features.
For example, to declare the Architecture version 8.3.0 for Arm® Cortex®-M7 microcontrollers compiled with IAR toolchain:
architecture = { group = "com.microej.architecture.CM7.CM7hardfp_IAR83", name = "flopi7I36", version = "8.3.0" }
Runtime Capability
Depending on the selected Architecture, several Runtime Capabilities are available: mono, multi or tiny.
The Capability used for the VEE Port can be defined thanks to the com.microej.runtime.capability property
in the vee-port/configuration.properties file of the VEE Port Configuration project:
com.microej.runtime.capability=multi
Pack Import
MicroEJ Pack provides additional features on top of the MicroEJ Architecture such as Graphical User Interface or Networking. This is the primary mechanism for augmenting the capabilities of a VEE Port.
A MicroEJ Pack is a group of related files (Foundation Libraries, scripts, link files, C libraries, Simulator Mock, tools, etc.) that together provide all or part of a VEE Port capability.
A Pack can extend an Architecture with additional capabilities such as:
Runtime Capability (e.g. Multi-Sandbox, External Resources Loader) ,
Simulator (e.g. Front Panel Mock),
Tool (e.g. MicroEJ Java H).
Note
MicroEJ Packs are optional. You can skip this section if you intend to integrate MicroEJ runtime only with custom libraries.
To add a MicroEJ Pack, add it as a dependency of the VEE Port configuration project in the build.gradle.kts file:
dependencies {

    // MicroEJ Architecture Specific Pack
    microejPack("com.microej.architecture.[ISA].[TOOLCHAIN]:[UID]-[NAME]-pack:[VERSION]")

    // MicroEJ Generic Pack
    microejPack("com.microej.pack.[NAME]:[NAME]-pack:[VERSION]")

    // Legacy MicroEJ Generic Pack
    microejPack("com.microej.pack:[NAME]:[VERSION]")

}
For example, to declare the MicroEJ Architecture Specific Pack UI version 14.0.1 for MicroEJ Architecture flopi4G25 on Arm®
Cortex®-M4 microcontrollers compiled with GNU CC toolchain:
dependencies {

    // MicroEJ Architecture Specific Pack
    microejPack("com.microej.architecture.CM4.CM4hardfp_GCC48:flopi4G25-ui-pack:14.0.1")

}
To declare the MicroEJ Generic Pack Bluetooth version 2.1.0:
dependencies {

    // MicroEJ Generic Pack
    microejPack("com.microej.pack.bluetooth:bluetooth-pack:2.1.0")

}
And to declare the Legacy MicroEJ Generic Pack Net version 9.2.3:
dependencies {

    // Legacy MicroEJ Generic Pack
    microejPack("com.microej.pack:net:9.2.3")

}
Enabling/Disabling modules of Legacy and Architecture Specific Packs
Architecture Specific Packs and Legacy Packs may contain multiple modules. They are all automatically installed during the VEE Port build, but can de disabled individually by configuration. This is not the case for the Generic Packs, which always contain only one module. Therefore, if you want to disable the module of a Generic Pack, simply remove the Pack dependency.
The modules of the Architecture Specific Packs and Legacy Packs can be enabled/disabled in the vee-port/configuration.properties
file of the VEE Port Configuration project by adding the property com.microej.runtime.<module>.<feature>.enabled=true|false
for each module that must be enabled/disabled.
The <feature> is optional. When no feature is defined, the whole module is enabled/disabled.
Here are some examples:
# Disable the "display_decoder_bmpm" feature of the "ui" module of the Pack UI
com.microej.runtime.ui.display_decoder_bmpm.enabled=false

# Disable the whole "ssl" module of the Pack Net
com.microej.runtime.ssl.enabled=false
For a complete list of the properties allowing to enable/disable modules, refer to the VEE Port Project Template.
Packs Configuration
Packs can be configured in the vee-port/configuration.properties file of the VEE Port Configuration project.
Each Pack provides a set of option which follows the pattern name com.microej.pack.<module>.<option>=<value>.
Here are some examples:
# Defines the number of bits per pixels the display device is using to render a pixel
com.microej.pack.display.bpp=argb8888

# Defines the native file system user directory
com.microej.pack.fs.user.dir=/home/microej

# Defines the native stack you want to use
com.microej.pack.net.stack=bsd
VEE Port Usage
Depending on your use case, there are different ways to use the VEE Port from an Application or a Library. All of them are described in the Select a VEE Port page.
In a nutshell,
When the VEE Port is intended to be used by developers not having the VEE Port project locally, it must be published in a remote repository and fetched in dependencies by the developers. Refer to the VEE Port Publication section to learn how to publish a VEE Port.
When the VEE Port project is available locally on the developers’ machine, it can be integrated in the build flow of the Application or the Library. Depending on your project structure, refer to VEE Port project inside a multi-project or Local VEE Port project outside a multi-project section.
VEE Port Customization
The VEE Port Configuration project can contain an optional vee-port/dropins folder.
The full content of this folder will be copied in the VEE Port during the build.
Files in the dropins folder have the highest priority.
If one file has the same path and name as a file already installed in the VEE Port,
the file from the dropins folder will be used in the built VEE Port.
This feature allows to add or overwrite libraries, tools, etc. into the VEE Port.
The dropins folder organization should respect the VEE Port files and folders organization.
For instance, the tools are located in the sub-folder tools.
In order to see how the VEE Port files and folders are organized,
launch a VEE Port build without the dropins folder by executing the Gradle task buildVeePort.
The built VEE Port is located in the folder vee-port/build/vee.
Then fill the dropins folder with additional features and build again the VEE Port to get a customized VEE Port.
BSP Connection
In order to build the Executable of an Application, the BSP Connection must be configured. Refer to the BSP Connection section for more details.
VEE Port Publication
Publishing a VEE Port in a repository allows to make it easily available to any project.
To be able to publish a VEE Port, you have to make sure that the group and version properties are defined for the VEE Port subproject.
If you have created your VEE Port project from the template, they are defined in main build.gradle.kts file:
allprojects {
  group = "com.mycompany.myboard"
  version = "0.1.0-RC"
}
You can adapt them to your need, or define them directly in the VEE Port subproject, in the vee-port/build.gradle.kts file:
group = "com.mycompany.myboard"
version = "1.0.0"
Changing the group and version properties in the main build.gradle.kts file will affect all the subprojects,
whereas defining them in the vee-port/build.gradle.kts file will only affect the VEE Port subproject.
The name of the artifact can be defined in the settings.gradle.kts file with the rootProject.name property.
It is set by default to the folder name of the project.
Once these properties are defined, the publication of a VEE Port is done, as any other Gradle project,
by executing the publish task.
An important point to notice is that publishing a VEE Port does not publish the built VEE Port, it publishes all the configuration and dropins of the project, as well as the BSP when it is configured in Full Connection mode. The VEE Port is then built on the fly when it is required (when building the Executable of an Application for example).
Aggregated Javadoc
Starting from SDK 6 1.4.0, a Javadoc Jar file is automatically built and published when publishing the VEE Port. This file contains the aggregated javadoc of
all Libraries provided to the VEE Port with the api configuration.
BSP Publication Filtering
If the VEE Port is configured in Full BSP Connection, the BSP is included in the VEE Port when it is published.
Since the BSP can be big and all the files are not necessary to build an Executable,
the SDK allows to define properties in the configuration.properties of the VEE Port project to filter the BSP files in publish:
bsp.publication.includes.pattern: comma-separated list of Ant-style files and folders patterns to include in the published VEE Port. By default all the files and folders are included.bsp.publication.excludes.pattern: comma-separated list of Ant-style files and folders patterns to exclude from the published VEE Port. By default no files or folders are excluded.
The paths are relative to the BSP root folder (defined by the bsp.root.dir properties of the configuration.properties file).
Here is an example which excludes 3 folders:
bsp.publication.includes.pattern=**/*
bsp.publication.excludes.pattern=**/VEE_PORT_EVAL/,**/WIN32/,**/Utilities/Media/
Refer to the Javadoc of the Gradle PatternFilterable class to have more details on the Ant-style patterns.
Filtering the VEE Runtime Library
The SDK forbids the publication of the VEE Runtime Library when publishing a VEE Port. The following error is raised in such a case:
SDK EULA does not allow to share MicroEJ Core IP in BSP source files: 'C:\Users\johndoe\my-project\vee-port\build\tmp\publishVeePort\bsp\vee\lib\microejruntime.a'.
The BSP Publication Filtering feature allows to filter this file before the publication
by defining this property in the configuration.properties file:
bsp.publication.excludes.pattern=**/microejruntime.a
Link-Time Option
It is possible to define custom Application options that can be passed to the BSP through an ELF symbol defined at link-time, hence the term link-time option. This allows to provide configuration options to the Application developer without the need to rebuild the BSP source code.
To define a link-time option, first choose an option name with only alphanumeric characters ([a-zA-Z][a-zA-Z0-9]* without spaces).
Proceed with the following steps by replacing [my_option] with your option name everywhere:
Create a folder inside your VEE Port Customization part (e.g:
vee-port/dropins/scripts/init-[my_option])Create an Ant init script file and put it inside (e.g:
vee-port/dropins/scripts/init-[my_option]/init-[my_option].xmlfile). Here is the Ant init script file template content:<project name="[my_option]-init"> <target name="init/execution/[my_option]" extensionOf="init/execution" if="onBoard"> <!-- Set option default value --> <property name="[my_option]" value="0"/> <!-- Create tmp dir --> <local name="link.files.dir"/> <microejtempfile deleteonexit="true" prefix="link[my_option]" property="link.files.dir"/> <mkdir dir="${link.files.dir}"/> <!-- Get tmp link file name --> <local name="link.[my_option]"/> <property name="link.[my_option]" value="${link.files.dir}/[my_option].lscf" /> <echoxml file="${link.[my_option]}" append="false"> <lscFragment> <defSymbol name="[my_option]" value="${[my_option]}" rootSymbol="true"/> </lscFragment> </echoxml> <!-- Add link file in linker's link files path --> <augment id="partialLink.lscf.path"> <path location="${link.files.dir}"/> <path location="${jpf.dir}/link"/> </augment> </target> </project>
In your BSP source code, define an ELF symbol
[my_option]can then be used inside C files in your BSP with:// Declare the symbol as an extern global extern int [my_option]; void my_func(void){ // Get the symbol value int [my_option]_value = ((int)(&[my_option])); // Get the symbol value if([my_option]_value == 1){ ... } else{ ... } }
Warning
A Link-time option should avoid to be set to 0.
Some third-party linkers consider such symbols as undefined, even if they are declared.
