
Warning
This documentation is for SDK 5. The latest major version is SDK 6. SDK 5 is in maintenance mode since the release of SDK 5.8.0. Consequently, as stated in the SDK End User License Agreement (EULA), the SDK will reach the end of its life by July 2028. Contact our support team for assistance with migrating to the new SDK, or your sales representative if you require an extension of SDK maintenance as a service.
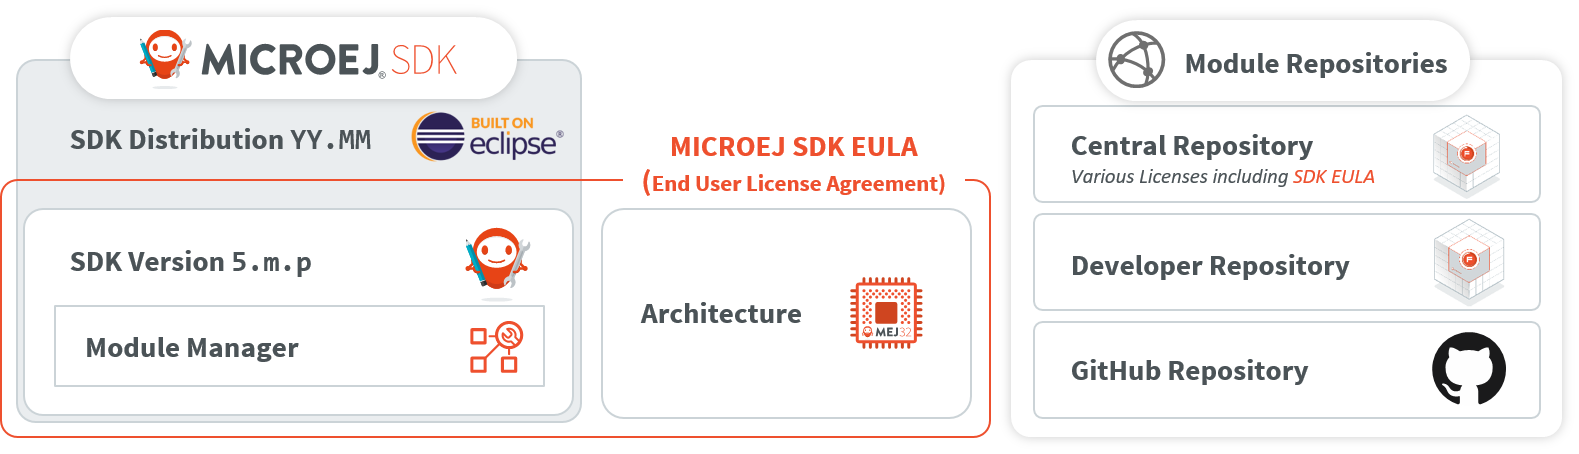
Licenses
SDK EULA
MICROEJ SDK is licensed under the SDK End User License Agreement (EULA), which covers the following elements:
SDK Tools & Plugins packaged in the SDK 5.x Version,
Architectures,
Modules published to the Central Repository with the SDK EULA license, such as GUI or Networking Pack (see Central Repository Licensing for more details).
SDK EULA Coverage
License Manager Overview
Architectures are distributed in two different versions:
Evaluation Architectures, associated with a software license key. They can be downloaded at https://repository.microej.com/modules/com/microej/architecture/.
Production Architectures, associated with a hardware license key stored on a USB dongle. They can be requested to our support team.
The license manager is provided with Architectures and then integrated into VEE Ports, consequently:
Evaluation licenses will be shown only if at least one Evaluation Architecture or VEE Port built from an Evaluation Architecture has been imported in the SDK.
Production licenses will be shown only if at least one Production Architecture or VEE Port built from a Production Architecture has been imported in the SDK.
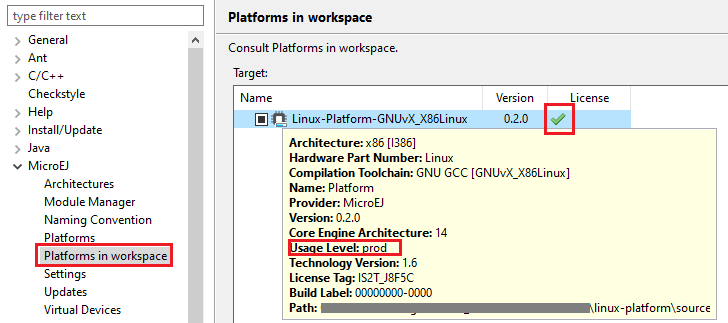
The list of installed licenses is available in the SDK preferences dialog page in Window > Preferences > MicroEJ:
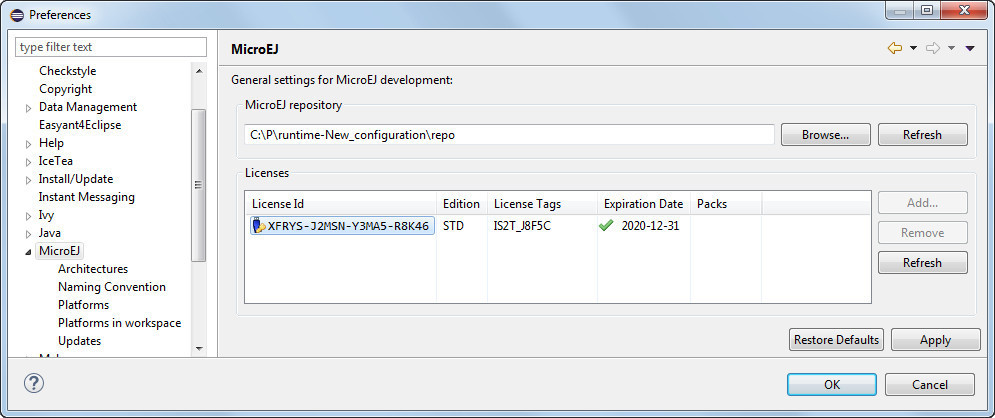
License Manager View
License Check
The table below summarizes where the license is checked.
Application |
Run on Simulator (Virtual Device) |
Build on Device |
Documentation Link |
Standalone Application or Kernel Application |
NO |
YES |
|
Sandboxed Application |
NO |
NO |
Evaluation Licenses
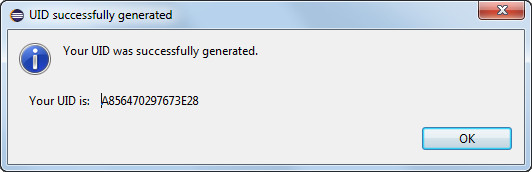
This section should be considered when using Evaluation Architectures, which use software license keys. A machine UID needs to be provided to activate an Evaluation license on the MicroEJ Licenses Server. The machine UID is a 16 hexadecimal digits number.
Get your Machine UID
Retrieving the machine UID depends on the kind of VEE Port being evaluated.
If your VEE Port is already imported in Package Explorer and built with MicroEJ Module Manager, the Architecture has been automatically imported. The machine UID will be displayed when building a Standalone Application on device.
[INFO ] Launching in Evaluation mode. Your UID is XXXXXXXXXXXXXXXX.
[ERROR] Invalid license check (No license found).
Otherwise, an Architecture or VEE Port should have been manually imported from the SDK preferences page. The machine UID can be retrieved as follows:
Go to Window > Preferences > MicroEJ,
Select either Architectures, Platforms in workspace or Platforms,
Click on one of the available items,
Press the Get UID button to get the machine UID.
Note
To access this Get UID option, at least one Evaluation Architecture or VEE Port must have been imported before (see License Manager Overview).
Copy the UID. It will be needed when requesting a license.
Machine UID for Evaluation License
Request your Activation Key
Go to MicroEJ Licenses Server https://license.microej.com.
Click on Create a new account link.
Create your account with a valid email address. You will receive a confirmation email a few minutes after. Click on the confirmation link in the email and log in with your new account.
Click on Activate a License.
Set Product P/N: to
9PEVNLDBU6IJ.Set UID: to the machine UID you copied before.
Click on Activate.
The license is being activated. You should receive your activation by email in less than 5 minutes. If not, please contact our support team.
Once received by email, save the attached zip file that contains your activation key.
Install the License Key
If your VEE Port is already imported in Package Explorer and built with MicroEJ Module Manager,
the license key zip file must be simply dropped to the ~/.microej/licenses/ directory (create it if it doesn’t exist).

MicroEJ Shared Licenses Directory
Note
The SDK Preferences page will be automatically refreshed when building a Standalone Application on device.
Otherwise, the license key must be installed as follows:
Go back to the SDK.
Select the Window > Preferences > MicroEJ menu.
Press Add….
Browse the previously downloaded activation key archive file.
Press OK. A new license is successfully installed.
Go to Architectures sub-menu and check that all Architectures are now activated (green check).
Your SDK is successfully activated.
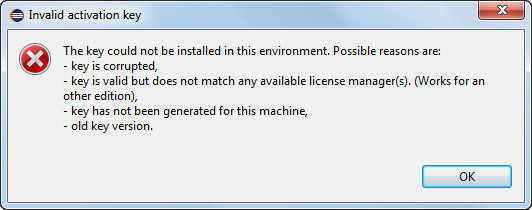
If an error message appears, the license key could not be installed. (see section Troubleshooting). A license key can be removed from the key-store by selecting it and by clicking on Remove button.
Troubleshooting
Unable to add an Evaluation license key in the SDK
Consider this section when an error message appears while adding the Evaluation license key. Before contacting our support team, please check the following conditions:
Key is corrupted (wrong copy/paste, missing characters, or extra characters)
Key has not been generated for the installed environment
Key has not been generated with the machine UID
Machine UID has changed since submitting license request and no longer matches license key
Key has not been generated for one of the installed Architectures (no license manager able to load this license)
Invalid License Key Error Message
Machine UID has changed
This can occur when the hardware configuration of the machine is changed (especially when the network interfaces have changed).
In this case, you can either request a new activation key for this new UID or go back to the previous hardware configuration.
Production Licenses
This section should be considered when using Production Architectures, which use hardware license keys stored on a USB dongle.
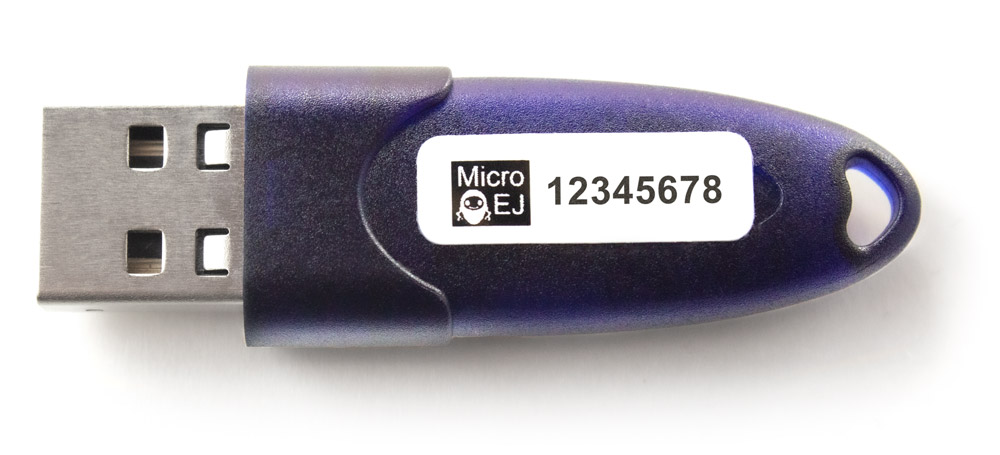
MicroEJ USB Dongle
Note
If your USB dongle has been provided to you by your sales representative and you don’t have received an activation certificate by email, it may be a pre-activated dongle. Then you can skip the activation steps and directly jump to the Check Activation section.
Request your Activation Key
Go to license.microej.com.
Click on Create a new account link.
Create your account with a valid email address. You will receive a confirmation email a few minutes after. Click on the confirmation link in the email and login with your new account.
Click on Activate a License.
Set Product P/N: to The P/N on the activation certificate.
Enter your UID: serial number printed on the USB dongle label (8 alphanumeric char.).
Click on Activate and check the confirmation message.
Click on Confirm your registration.
Enter the Registration Code provided on the activation certificate.
Click on Submit.
Your Activation Key will be sent to you by email as soon as it is available (12 business hours max.).
Note
You can check the My Products page to verify your product registration status, the Activation Key availability, and download the Activation Key when available.
Once the Activation Key is available, download and save the Activation Key ZIP file to a local directory.
Activate your USB Dongle
This section contains instructions that will allow you to flash your USB dongle with the proper activation key.
You shall ensure that the following prerequisites are met :
Your operating system is Windows
The USB dongle is plugged and recognized by your operating system (see Troubleshooting section)
No more than one USB dongle is plugged into the computer while running the update tool
The update tool is not launched from a network drive or a USB key
The activation key you downloaded is the one for the dongle UID on the sticker attached to the dongle (each activation key is tied to the unique hardware ID of the dongle).
You can then proceed to the USB dongle update:
Unzip the
Activation Keyfile to a local directoryEnter the directory just created by your ZIP extraction tool.
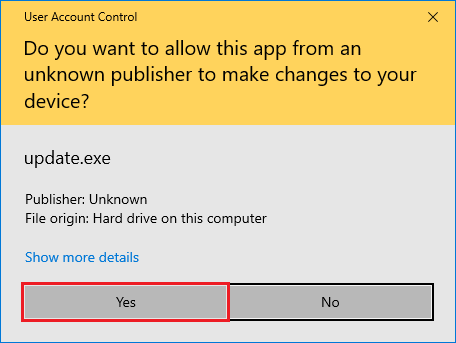
Launch the executable program.
Accept running the unsigned software if requested (Windows 10/11)
Click on the Update button (no password needed)
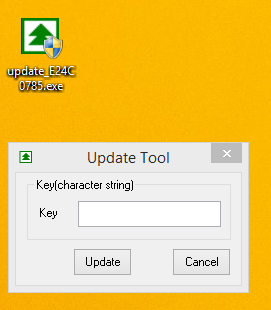
Dongle Update Tool
On success, an
Update successfullymessage shall appear. On failure, anError key or no proper rockeymessage may appear.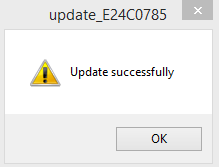
Successful Dongle Update
Check Activation
This section contains instructions that will allow you to verify that your USB dongle has been properly activated.
Check Activation in the SDK
Note
Production licenses will be shown only if at least one Production Architecture or VEE Port has been imported before (see License Manager Overview).
In the SDK,
Go to Window > Preferences > MicroEJ,
Go to Architectures, Platforms in workspace or Platforms sub-menu and check that all items are now activated (green check).
License Status OK
If the license is still not recognized (red cross), check with the following command line tool to get more information.
Check Activation with the Command Line Tool
To get more details on connected USB dongle(s), run the debug tool as following:
Open a terminal.
Change directory to a Production VEE Port.
Execute the command:
java -Djava.library.path=resources/os/[OS_NAME] -jar licenseManager/licenseManagerProduct.jar
java -Djava.library.path=resources/os/[OS_NAME] -jar licenseManager/licenseManagerUsbDongle.jar
with OS_NAME set to Windows64 for Windows OS, Linux64 for Linux OS, Mac for macOS x86_64 (Intel chip) or MacA64 for macOS aarch64 (Apple Silicon chip).
If your USB dongle has been properly activated, you should get the following output:
[DEBUG] ===== MicroEJ Dongle Debug Tool =====
[DEBUG] => Detected dongle UID: XXXXXXXX.
[DEBUG] => Dongle UID has valid MicroEJ data: XXXXXXXX (only the first one is listed).
[DEBUG] => Detected MicroEJ License XXXXX-XXXXX-XXXXX-XXXXX - valid until YYYY-MM-DD.
[DEBUG] ===== SUCCESS =====
USB Dongle on GNU/Linux
For GNU/Linux Users (Ubuntu at least), by default, the dongle access has not been granted to the user, you have to modify udev rules.
Please create a /etc/udev/rules.d/91-usbdongle.rules file with the following contents:
ACTION!="add", GOTO="usbdongle_end"
    SUBSYSTEM=="usb", GOTO="usbdongle_start"
    SUBSYSTEMS=="usb", GOTO="usbdongle_start"
    GOTO="usbdongle_end"

    LABEL="usbdongle_start"

    ATTRS{idVendor}=="096e" , ATTRS{idProduct}=="0006" , MODE="0666"

    LABEL="usbdongle_end"
Then, restart udev: sudo /etc/init.d/udev restart
You can check that the device is recognized by running the lsusb command.
The output of the command should contain a line similar to the one below for each dongle:
Bus 002 Device 003: ID 096e:0006 Feitian Technologies, Inc.
USB Dongle with Docker on Linux
If you use the SDK Docker image on a Linux host to build an Executable,
the dongle must be mapped to the Docker container.
First, it requires to add a symlink on the dongle by following the instructions of the USB Dongle on GNU/Linux section but
with this /etc/udev/rules.d/91-usbdongle.rules file:
ACTION!="add", GOTO="usbdongle_end"
    SUBSYSTEM=="usb", GOTO="usbdongle_start"
    SUBSYSTEMS=="usb", GOTO="usbdongle_start"
    GOTO="usbdongle_end"

    LABEL="usbdongle_start"

    ATTRS{idVendor}=="096e" , ATTRS{idProduct}=="0006" , MODE="0666" , SYMLINK+="microej_dongle"

    LABEL="usbdongle_end"
Then the symlink has to be mapped in the Docker container by adding the following option in the Docker container creation command line:
--device /dev/microej_dongle:/dev/bus/usb/999/microej_dongle
The /dev/microej_dongle symlink can be mapped to any device path as long as it is in /dev/bus/usb.
USB Dongle with WSL
Note
The following steps have been tested on WSL2 with Ubuntu 22.04.2 LTS.
To use a USB dongle with WSL, you first need to install usbipd following the steps described in Microsoft WSL documentation:
First, check that WSL2 is installed on your system. If not, install it or update it following Microsoft Documentation
Then, you need install usbipd-win v4.0.0 or higher on Windows from usbipd-win Github repository.
And then, install usbipd and update hardware database inside you WSL installation:
sudo apt install linux-tools-generic hwdata
sudo update-alternatives --install /usr/local/bin/usbip usbip /usr/lib/linux-tools/*-generic/usbip 20
Add the udev rule described in USB Dongle on GNU/Linux, and restart udev:
sudo /etc/init.d/udev restart
Ensure your USB dongle is plugged, then start a PowerShell terminal in administrator mode.
List the connected devices with the following command:
usbipd.exe list
You should see your USB dongle connected with VID:PID==096e:0006:
   PS C:\Users\user> usbipd list
   Connected:
   BUSID  VID:PID    DEVICE                                                        STATE
   2-6    0c45:674c  Integrated Webcam, Integrated IR Webcam, USB DFU              Not shared
   2-8    0a5c:5843  Dell ControlVault w/ Fingerprint Touch Sensor, Microsoft ...  Not shared
   2-10   8087:0033  Intel(R) Wireless Bluetooth(R)                                Not shared
   3-1    0bda:8153  Realtek USB GbE Family Controller                             Not shared
   4-6    413c:c010  Dell DA310                                                    Not shared
   6-4    096e:0006  USB Input Device                                              Not shared
   6-6    046d:0819  USB Video Device, USB Audio Device                            Not shared
   7-1    045e:0084  USB Input Device                                              Not shared
   7-2    04d9:1400  USB Input Device                                              Not shared
   7-3    10d5:55a2  USB Input Device                                              Not shared
Here the BUSID is 6-4.
Bind and attach the dongle to WSL:
usbipd.exe bind --busid <BUSID>
usbipd.exe attach --wsl  --busid <BUSID>
Open a bash terminal in your WSL instance, and check the USB dongle is successfully mounted with the following command:
lsusb
You should see your USB dongle connected with ID 096e:0006:
   Bus 002 Device 001: ID 1d6b:0003 Linux Foundation 3.0 root hub
   Bus 001 Device 002: ID 096e:0006 Feitian Technologies, Inc. HID Dongle (for OEMs - manufacturer string is "OEM")
   Bus 001 Device 001: ID 1d6b:0002 Linux Foundation 2.0 root hub
Note
You’ll need to follow these steps each time you system is rebooted or the dongle is plugged/unplugged.
Troubleshooting
This section contains instructions to check that your operating system correctly recognizes your USB dongle.
Windows Troubleshooting
If the dongle activation failed with
No rockeymessage, check there is one and only one dongle recognized with the following hardware ID :HID\VID_096E&PID_0006&REV_0201
Go to the Device Manager > Human Interface Devices and check among the USB Input Device entries that the Details > Hardware Ids property match the ID mentioned before.
If the dongle activation was successful with
Update successfullymessage but the license does not appear in the SDK or is not updated, try to activate again by starting the executable with administrator privileges: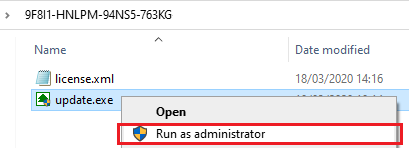
If the following error message is thrown when building an Executable, either the dongle plugged is a verbatim dongle or it has not been successfully activated:
Invalid license check (Dongle found is not compatible).
VirtualBox Troubleshooting
In a VirtualBox virtual machine, USB drives must be enabled to be recognized correctly. Make sure to enable the USB dongle by clicking on it in the VirtualBox menu Devices > USB.
To make this setting persistent, go to Devices > USB > USB Settings… and add the USB dongle in the USB Devices Filters list.
WSL Troubleshooting
Check that your dongle is attached to WSL from PowerShell:
usbipd.exe list
You should have a line saying Attached - Ubuntu:
PS C:\Users\sdkuser> usbipd.exe list
BUSID  VID:PID    DEVICE                                                        STATE
2-1    096e:0006  USB Input Device                                              Attached - Ubuntu
2-6    0c45:6a10  Integrated Webcam                                             Not attached
2-10   8087:0026  Intel(R) Wireless Bluetooth(R)                                Not attached
3-1    045e:0823  USB Input Device                                              Not attached
3-4    046d:c31c  USB Input Device                                              Not attached
In you WSL console, the dongle must also be recognized. Ckeck by using lsusb:
skduser@host:~/workspaces/docs$ lsusb
Bus 002 Device 001: ID 1d6b:0003 Linux Foundation 3.0 root hub
Bus 001 Device 003: ID 096e:0006 Feitian Technologies, Inc. HID Dongle (for OEMs - manufacturer string is "OEM")
Bus 001 Device 001: ID 1d6b:0002 Linux Foundation 2.0 root hub
This might not be sufficient. If you’re still facing license issues, restart udev, abd attach your dongle to WSL once again.
Note
Hibernation may have unattached your dongle. Reload udev, unplug/plug your dongle and attach it from PowerShell.
Dongle not detected in the licenses screen
If the USB dongle is plugged and activated but not visible in the menu Window > Preferences > MicroEJ, please check that you have an active VEE Port in Window > Preferences > MicroEJ > Platforms in workspace.
Then, ensure that the VEE Port has been built in prod configuration, this can be checked with the architecture dependency inside the file module.ivy.
If no VEE Ports are visible in your current workspace, please build a VEE Port configured to the prod mode and this should fix the issue.
Remote USB Dongle Connection
When the dongle cannot be physically plugged to the machine running the SDK (cloud builds, virtualization, missing permissions, …), it can be configured using USB redirection over IP network.
There are many hardware and software solutions available on the market. Among others, this has been tested with https://www.net-usb.com/ and https://www.virtualhere.com/. Please contact our support team for more details.