
Test a VEE Port
The SDK provides the capability to test a VEE Port.
While you can create your own tests,
MicroEJ provides a set of tools and pre-defined projects aimed at simplifying the steps for validating VEE Ports
in the form of the VEE Port Qualification Tools.
This page guides you through the steps to add, configure and execute a testsuite on an existing VEE Port project. It takes the example of the testsuite for the FS Foundation Library.
To learn more on Foundation Libraries and their Qualification, refer to VEE Port Qualification.
Import the Testsuite
It is assumed here that the VEE Port project already exists, with the same structure as the VEE Port Project Template, especially these folders and files:
|- vee-port/
|   |- validation/
|   |- build.gradle.kts
|   |- configuration.properties
|- settings.gradle.kts
The first step is to import the testsuite in the VEE Port project:
Clone or download the VEE Port Project Template.
Copy the
vee-port/validation/fsfolder into thevee-port/validationfolder of the VEE Port project.Add the following line in the
settings.gradle.ktsroot file:include("vee-port:validation:fs")
At this stage, the VEE Port project structure should look like this:
|- vee-port/
|   |- validation/
|   |   |- fs/
|   |       |- validation/
|   |           |- microej-testsuite-common.properties
|   |       |- build.gradle.kts
|   |       |- config.properties.tpl
|   |- build.gradle.kts
|   |- configuration.properties
|- settings.gradle.kts
Configure a Testsuite
Select the Testsuite Target
A Testsuite can be executed on the Simulator or on the Device.
The target can be configured in the build.gradle.kts file of the Testsuite project
(so in the vee-port/validation/fs/build.gradle.kts file for our example), in the testing > suites > test block,
thanks to the microej.useMicroejTestEngine function.
The second argument of this function can be either TestTarget.SIM (on the Simulator) or TestTarget.EMB (on the Device).
For example, to execute the tests on the Device, the configuration is:
testing {
   suites {
      val test by getting(JvmTestSuite::class) {
         microej.useMicroejTestEngine(this, TestTarget.EMB)

         ...
      }
   }
}
Select the Testsuite Version
For a given Foundation Library version, a specific Testsuite version should be used to validate the Abstraction Layer implementation. Refer to Testsuite Versioning to determine the correct Testsuite version to use.
The Testsuite version must be set in the build.gradle.kts file of the Testsuite project
(so in the vee-port/validation/fs/build.gradle.kts file for our example), in the testing > suites > test > dependencies block.
For example, to use the FS Testsuite 3.0.8:
testing {
   suites {
      val test by getting(JvmTestSuite::class) {
         dependencies {
            implementation("com.microej.pack.fs:fs-testsuite:3.0.8")

            ...
         }
      }
   }
}
Adjust the Testsuite Configuration
The SDK provides several properties to adjust the Testsuite behavior, as well as the Tests being executed.
These configuration properties can be defined in the config.properties file located at the root of the Testsuite project.
A configuration properties file template is provided, named config.properties.tpl, which contains all the available properties.
This file must be renamed to config.properties. Then it can be updated, for example to change the timeout and the number of retries:
# The testsuite timeout (in seconds)
microej.testsuite.timeout=600

# The number of times we'll retry a test if it fails
microej.testsuite.retry.count=1
Also, the Application options used for each test can be defined in the
vee-port/validation/fs/validation/microej-testsuite-common.properties file located.
For example:
# Java memory settings
core.memory.immortal.memory=RAM
core.memory.immortal.size=64000
Configure the VEE Port BSP Connection
Several configuration properties must be defined depending on the type of BSP Connection used by the VEE Port.
These properties are defined in the config.properties file located at the root folder of the Testsuite, as described in the section above.
They all start by the prefix microej.testsuite.properties.deploy.*.
See the comments in the config.properties file for a description of each property, or refer to BSP Connection for a detailed explanation.
Configure the Execution Trace Redirection
When the Testsuite is executed, the Testsuite Engine must read the trace to determine the result of the execution. The SDK provides 2 ways to read these traces: either from a socket, or from a file.
If the VEE Port does not support the redirection of the traces to a file,
the
microej.testsuite.properties.testsuite.trace.ipandmicroej.testsuite.properties.testsuite.trace.portproperties must be configured to listen to the socket, for example:microej.testsuite.properties.testsuite.trace.ip=localhost microej.testsuite.properties.testsuite.trace.port=5555
the Serial to Socket tool must be started to redirect from the Serial Port to a socket configured above. Refer to Serial to Socket Transmitter to learn how to configure and start it.
If it does,
the
microej.testsuite.properties.launch.test.trace.fileproperty must be set totrue.
Run the Testsuite
To run the Testsuite, launch the test Gradle task of the Testsuite project:

Or from the command line, you must execute the following command at the root folder of the VEE Port project:
./gradlew :vee-port:validation:fs:test
Examine the Testsuite Report
Once the Testsuite is completed, open the HTML Testsuite Report stored at vee-port/validation/fs/build/reports/tests/test/index.html.
The first page displays a summary of the test results: number of tests executed, number of tests failed, … Then you can click on the tests links to check the details and the logs of each test.
If necessary, the binaries produced and ran on the device by the Testsuite Engine are available at vee-port/validation/fs/build/testsuite/output/<timestamp>/bin/<testClassName>/application.out.
The following image shows the testsuite report fully passed:

If at least one test fails, the build fails and the report displays the list of failed tests:
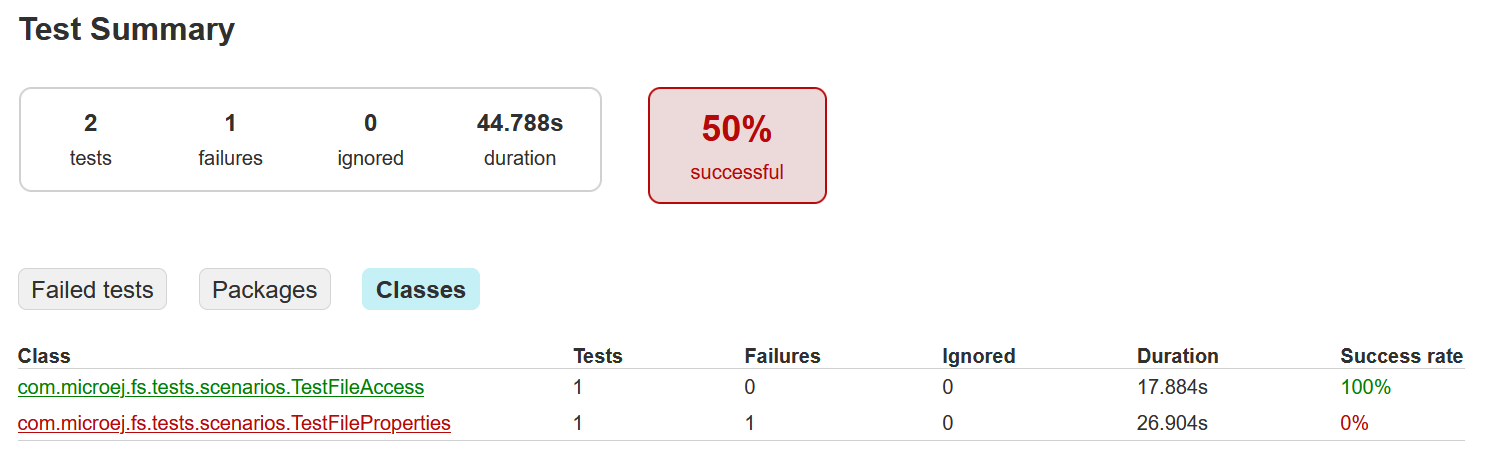
You can click on a failing test, then on the Standard Output tab to get its full logs:
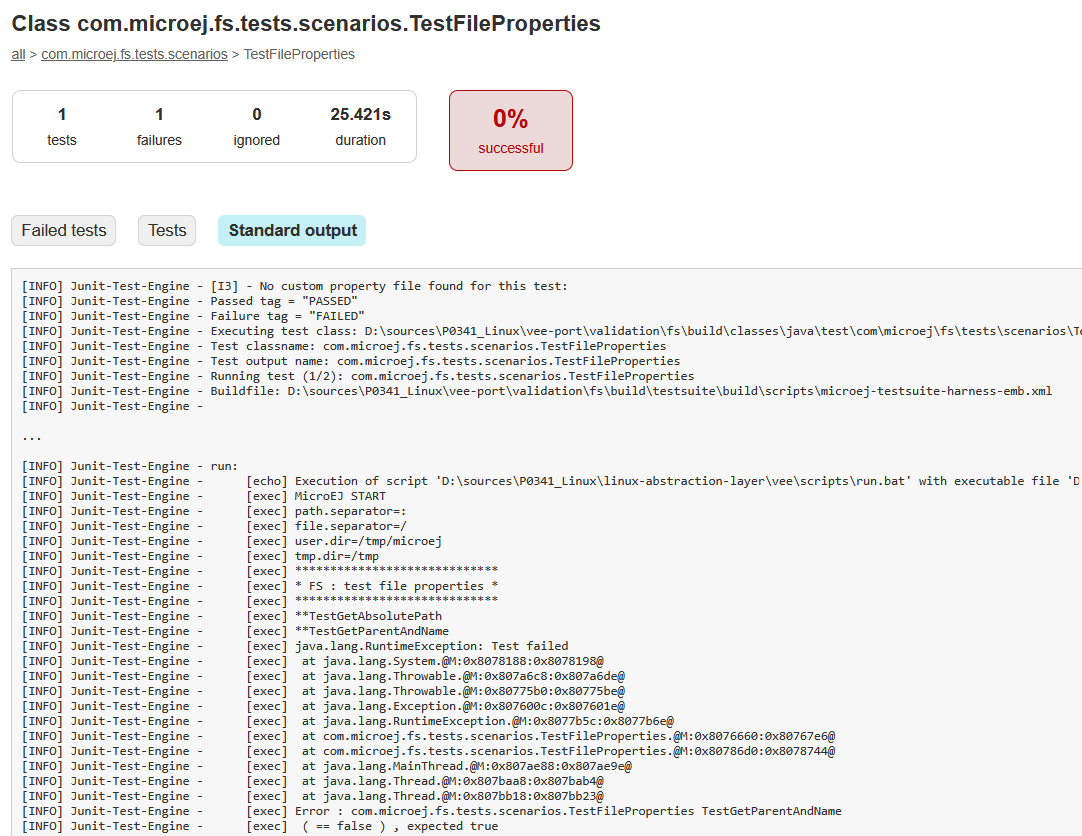
Refer to this chapter to decrypt the stack traces.
Rerun Tests
When nothing has changed in the VEE Port or Testsuite project,
running again the test task does not have any effect since the task is considered UP-TO-DATE by Gradle.
If you want to force a new execution of the tests in this case, you can use the option --rerun-tasks:
./gradlew :vee-port:validation:fs:test --rerun-tasks
You can also filter the tests to execute, either in the build.gradle.kts file or
with the --tests options, as described in Filter the Tests.
Debug Tests on Simulator
Warning
The properties documented in this section (debug.mode and debug.port) are available only from version 1.4.0 of the SDK 6,
so make sure to use this version at least.
Tests can be debugged when running on the Simulator by following these steps:
Make sure the Testsuite is configured to run on the Simulator by checking that the call to the
microej.useMicroejTestEnginefunction in the testsuite configured in thebuild.gradle.kts. The second argument must be set toTestTarget.SIM, for example:microej.useMicroejTestEngine(this, TestTarget.SIM, TestMode.MAIN)
Copy the Implementation JAR of the Library you want to debug from the VEE Port located in
build/testVee(the Testsuite must be executed once before to have this folder) into the root of the Testsuite project. For example, to debug the FS Library, copy the JAR filevee-port/validation/fs/build/testVee/javaLibs/fs-X.Y.jarinto the foldervee-port/validation/fs.Add this JAR as a dependency of the Testsuite in the
build.gradle.ktsfile. For example, add this line in thetesting > suites > test > dependenciesblock:implementation(files(layout.projectDirectory.file("fs-X.Y.jar")))
Run the Testsuite by executing the
testwith the debug options:./gradlew :vee-port:validation:fs:test -P"debug.mode"=true -P"debug.port"=8000
Configure your favorite IDE as described in Debug on Simulator.
The debugger should connect to the Simulator and you should be able to debug your Testsuite.
Update Test Class of the Testsuite on Device
To help troubleshooting a problem in a Testsuite, it can be convenient to update a Test class. This can be done by extracting the Testsuite sources in the validation project (each step will mention how to apply it for the FS Testsuite):
In the validation project (
vee-port/validation/fs), create thesrc/test/javaand thesrc/test/resourcesfolders if they do not exist.Get the Testsuite RIP file. It is available in the MicroEJ Central Repository. For example, for the FS Testsuite
com.microej.pack.fs:fs-testsuite:3.0.8, the RIP file is located here.Extract the RIP file in the temporary folder of your choice.
Locate the Testsuite JAR from the
javaLibsfolder to this RIP file. It is namedfs-testsuite-x.y.jarfor the FS Testsuite.Extract the Java sources files into the
src/test/javafolder (do not copy the.classfiles) and all other files in thesrc/test/resourcesfolder.Add the missing dependency to make everything compile successfully:
Copy all the other JAR files from the
javaLibsRIP folder into the validation project folder and add them as file dependencies in the dependencies. The FS Testsuite contains only thecheckHelper.jarfile. It must be copied into the foldervee-port/validation/fsand the following line must be added:implementation(files(layout.projectDirectory.file("checkHelper.jar")).Add the following snippet of code in the
build.gradle.ktsfile:tasks.withType<com.microej.gradle.tasks.LoadVeeTask> { testsuitesClasspath.setFrom(configurations.create(name + "EmptyClasspath")) }
Then follow the steps related to the testsuite type:
Remove all classes starting by
_AllTests_and_SingleTest_, as well as the class_AllTestClasses.In the
build.gradle.ktsfile, make sure that the call tomicroej.useMicroejTestEngineuses the following arguments:microej.useMicroejTestEngine(this, TestTarget.EMB, TestMode.JUNIT)
In the
build.gradle.ktsfile, make sure that the call tomicroej.useMicroejTestEngineuses the following arguments:microej.useMicroejTestEngine(this, TestTarget.EMB, TestMode.MAIN)
For the FS testsuite, copy the JAR
vee-port/validation/fs/build/testVee/javaLibs/resourcemanager-1.0.jarinto the foldervee-port/validation/fs, then add the dependencyimplementation(files(layout.projectDirectory.file("resourcemanager-1.0.jar")).
Update the Test class according to your need.
Launch the test again with:
./gradlew test
Decrypt a Stack Trace in a Test
When a stack trace is displayed in the tests logs, it can be decrypted with the Stack Trace Reader tool.
This task must be launched with the System Property set to the path of the Executable of the test.
The Executable of the tests are located in the build/testsuite/output/<timestamp>/bin/<test-class-fullname>/application.out folder.
For example, if a stack trace is displayed when executing the test com.microej.fs.tests.scenarios.TestFileProperties,
the Executable is located at build/testsuite/output/20251110-1655-36/bin/com.microej.fs.tests.scenarios.TestFileProperties/application.out,
so the stack trace can be decrypted by executing the following command:
./gradlew :vee-port:validation:fs:stackTraceReader -D"application.file"="build/testsuite/output/20251110-1655-36/bin/com.microej.fs.tests.scenarios.TestFileProperties/application.out"
Then pasting the encrypted stack trace when the [INFO] Paste the MicroEJ core engine stack trace here appears.