
Foundation Libraries
Foundation Libraries are MicroEJ Core libraries that provide core runtime APIs or hardware-dependent functionalities. They allow Managed code to call native code.
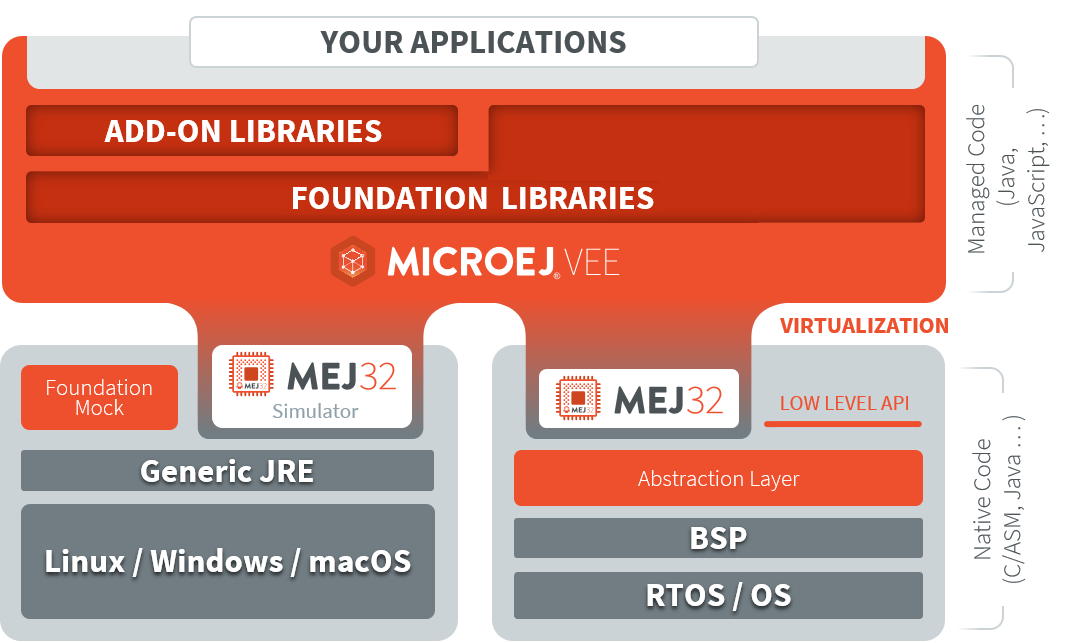
MicroEJ Foundation Libraries and Add-On Libraries
Note
In SDK 5, A Foundation library is divided into 2 JARs: an API and an implementation.
A Foundation library API is composed of a name and a 2 digits version (e.g. EDC-1.3)
and follows the semantic versioning (http://semver.org) specification.
A Foundation Library API only contains prototypes without code.
Foundation Library implementations are provided by VEE Ports.
From a MicroEJ Classpath, Foundation Library APIs dependencies are automatically mapped
to the associated implementations provided by the VEE Port or the Virtual Device on which
the application is being executed.
In SDK 6, a Foundation Library is a single JAR, containing the implementation. The API is composed of all the public classes and methods of the Library.
Foundation Libraries can be consumed by Applications and other Libraries. They are automatically mapped to the capabilities provided by the VEE Port or the Virtual Device used to run the Application.
MicroEJ provides a large set of Foundation Libraries, such as UI, Network, Audio, … You can also create your own Foundation Library by going through the following steps described in the next sections:
Create the Library project
Create a Java class
Define C Header Files
Implement native code
Create the mock
Install the Library in the VEE Port
Create the Library Project
To create a Foundation Library, follow the instructions of the Create a Project page.
Choose the Library type in the Project Wizards or the Library Project Template with the Command Line.
Create a Java Class
Once the Library project is created, you can now create a Java class which calls native code.
Create the Java class Sensor in the src/main/java/com/mycompany folder of the Library project, with the following content:
package com.mycompany;

import java.io.IOException;

/**
 * Class providing a native method to access sensor value.
 * This method will be executed out of the Core Engine.
 */
public class Sensor {

    public static final int ERROR = -1;

    public static int getValue() throws IOException {
        int value = getSensorValue();
        if (value == ERROR) {
            throw new IOException("Unsupported sensor");
        }
        return value;
    }

    public static native int getSensorValue();
}
This class contains a native method getSensorValue which will be implemented by native code.
Define C Header Files
The header files define the prototype of the C functions.
They must be added in the src/main/include folder of the Library project.
The C function name must respect the following pattern to be mapped to the Java method: Java_<FQN>_<methodName>,
where <FQN> is the fully qualified name of the Java class with all . are replaced by _, and methodName is name of the Java method.
Therefore, for the getSensorValue Java method of the com.mycompany.Sensor class, the C function must be called Java_com_mycompany_Sensor_getSensorValue.
Here is the content of the header file LLMYLIB_impl.h to create in the src/main/include folder of the Library project:
#ifndef LLMYLIB_IMPL
#define LLMYLIB_IMPL

/**
* @file
* @brief MicroEJ Sensor Low Level API
* @author @MODULE_AUTHOR@
* @version @MODULE_VERSION@
* @date @MODULE_DATE@
*/

#include <stdint.h>

#ifdef __cplusplus
extern "C" {
#endif

#define LLMYLIB_IMPL_getSensorValue Java_com_mycompany_Sensor_getSensorValue

/*
* Returns the Sensor value
*/
uint32_t LLMYLIB_IMPL_getSensorValue();

#ifdef __cplusplus
}
#endif
#endif
The #define statement allows to separate the Java part and the C part.
This is called the Low Level API of the Foundation Library.
If the fully qualified name of the Java native method is updated, the C implementation code do not need to be updated.
Refer to the Low Level API Pattern section for more information on Low Level APIs.
At this stage, the Library project structure should look like:
|- src/
|    |- main/
|    |    |- java/
|    |    |    |- com/
|    |    |    |    |- mycompany/
|    |    |    |    |    |- Sensor.java
|    |    |- include/
|    |    |    |- LLMYLIB_impl.h
|- build.gradle.kts
The placeholders @MODULE_AUTHOR@, @MODULE_VERSION@ and @MODULE_DATE@ are automatically substituted at build time with default values:
@MODULE_AUTHOR@:MicroEJ Developer Team@MODULE_VERSION@: the version declared for the project publication@MODULE_DATE@: the current build date, formatted asd MMMM yyyy(e.g.26 May 2026)
These default values can be overridden using the lowLevelApi block in the build.gradle.kts file:
microej {
    lowLevelApi {
        author = "My Company"
        version = "1.0.0"
        date = "1 January 2026"
    }
}
For backward compatibility, the @CCO_AUTHOR@, @CCO_VERSION@ and @CCO_DATE@ tokens are supported as aliases for respectively @MODULE_AUTHOR@, @MODULE_VERSION@ and @MODULE_DATE@ tokens. It is recommended to use the latter since the former are deprecated and will be removed in an upcoming version.
Implement Native Code
In the C project, create a new File called
LLMYLIB_impl.c.Add the C file to the compilation objects by adding it to the C Project configuration.
Copy and paste the following code to the file:
#include "LLMYLIB_impl.h"
#include "sni.h"

/**
* @file
* @brief MicroEJ Sensor low level API
* @author My Company
* @version 1.0.0
*/
uint32_t LLMYLIB_IMPL_getSensorValue()
{
    return 42;
}
This file defines a basic C implementation of the getSensorValue function.
Create the Mock
If you need to use the Library in the Simulator, a Mock must be implemented.
A Mock is a component that implements the native method in Java to use the Library in the Simulator.
Refer to the Mock page to create the Mock for Sensor Library.
Once the Mock is created, it must be declared as a dependency of the Library, in the build.gradle.kts file:
dependencies {
    microejMock("com.mycompany:my-mock:1.0.0")
}
Install the Library in the VEE Port
Once the Library project is done, it must be installed in the VEE Port by adding it as a dependency in the build.gradle.kts file of the VEE Port project:
dependencies {
    api("com.mycompany:my-library:1.0.0")
}
When declaring the dependency with the api configuration, if the VEE Port transitive resolution is enabled,
it is exposed transitively to the project depending on the VEE Port.
If you do not want to expose the Library transitively, use the implementaion configuration instead:
dependencies {
    implementation("com.mycompany:my-library:1.0.0")
}
Test in an Application
In order to test the Library, it is recommended to create an Application that uses the VEE Port and calls the Sensor Library.
The Application project must declare the VEE Port and the Library as dependencies in its build.gradle.kts file:
dependencies {
    implementation("com.mycompany:my-library:1.0.0")
    microejVee("com.mycompany:my-vee-port:1.0.0")
}
Then the main method of the Application must call the Sensor API:
package com.mycompany;

public class Main {

    public static void main(String[] args) {
        System.out.println("Sensor value: " + Sensor.getValue());
    }

}
You can now run the Application with the Simulator thanks to the ruOnSimulator Gradle task:
./gradlew runOnSimulator
The following trace shall appear on the standard output:
=============== [ Initialization Stage ] ===============
=============== [ Launching on Simulator ] ===============
Sensor value: 42
=============== [ Completed Successfully ] ===============
You can also build and deploy the Application on your device. The following trace shall appear on the standard output:
VM START
Sensor value: 42
VM END (exit code = 0)
Implement a Validation Testsuite
To validate the Foundation Library against the VEE Ports they will be used with, it is recommended to provide a validation Testsuite. It contains a bunch of Java tests that validate the Abstraction Layer implementing the Low Level APIs of the Foundation Library.
You can find examples of validation Testsuites in the VEE Port project template.
Extend the Link Process
Libraries can extend the Linking process using LSC files. Refer to the MicroEJ Linker page for more information.
These files must be added in the src/main/lscf folder of the Library project:
|- src/
|    |- main/
|    |    |- java/
|    |    |    |- com/
|    |    |    |    |- mycompany/
|    |    |    |    |    |- Sensor.java
|    |    |- include/
|    |    |    |- LLMYLIB_impl.h
|    |    |- lscf/
|    |    |    |- mylib.lscf
|- build.gradle.kts
Define Configurable Properties in LSC Files
The LSC files can use properties to define configurable values. For example, you may want to define a configurable heap size for your library:
<lscFragment>
    <defSymbol name="_mylibrary_heap_size" value="${mylibrary.heap.size}" rootSymbol="true"/>
    <defSection name=".bss.mylibrary.heap" size="_mylibrary_heap_size" align="4"/>
    <defSymbol name="_mylibrary_heap_start" value="START(.bss.mylibrary.heap)" rootSymbol="true"/>
    <defSymbol name="_mylibrary_heap_end" value="END(.bss.mylibrary.heap)" rootSymbol="true"/>
</lscFragment>
The property can be set by the Application which uses the Library, by defining the Application Option mylibrary.heap.size.
Set Default Values for the Configurable Properties
The LSC format allows to define a default value for the properties, by suffixing the property name with :, followed by the default value.
For example, the following line defines the property mylibrary.heap.size with the default value 1024:
<defSymbol name="_mylibrary_heap_size" value="${mylibrary.heap.size:1024}" rootSymbol="true"/>
Configure Required Types
Libraries can define Required Types by listing them in a *.types.list file
in the src/main/resources folder of the project:
# The following types are marked as MicroEJ Required Types
com.mycompany.MyImplementation
java.util.Vector
When the Library is used, these types are always included and cannot be removed by the Application.
To let the Application enable or disable individual types (for example, to save footprint
when a type is not needed), create a file named required-types.properties in the
src/main/resources/META-INF folder of the Library project.
This file lists one type per line with its default enabled value:
com.mycompany.MyImplementation=true
java.util.Vector=false
The Application can override the default state of each type using the
Application Option com.microej.type.<type>.enabled,
where <type> is the fully qualified name of the type.
When set to
true, the type is enabled by default. The Application can disable it by setting the Application Option tofalse.When set to
false, the type is disabled by default. The Application can enable it by setting the Application Option totrue.
This is convenient when you want all types enabled out of the box (no configuration needed to use the Library), while still allowing the Application to exclude unused types for optimization purposes.