
Setup an Automated Build using Jenkins and Artifactory
Description
Such environment setup facilitates continuous integration (CI) and continuous delivery (CD), which improves productivity across your development ecosystem, by automatically:
building modules when source code changes
saving build results
reproducing builds
archiving binary modules
This guide should take 1 hour to complete.
Intended Audience
The audience for this document is engineers who are in charge of integrating MICROEJ SDK 6 to their continuous integration environment.
In addition, this document should be of interest to all developers wishing to understand how MicroEJ works with headless module builds.
Prerequisites
An internet connection.
Docker and Docker Compose V2 on Linux, Windows or Mac
Git
2.xinstalled, with Git executable in path. We recommend installing Git Bash if your operating system is Windows (https://gitforwindows.org/).
This training was tested with Jenkins 2.462.3, Artifactory 7.71.5 and Gitea 1.23.4.
Note
For SDK 5, please refer to this MicroEJ Documentation Archive, section 9.6 Setup an Automated Build using Jenkins and Artifactory.
Introduction
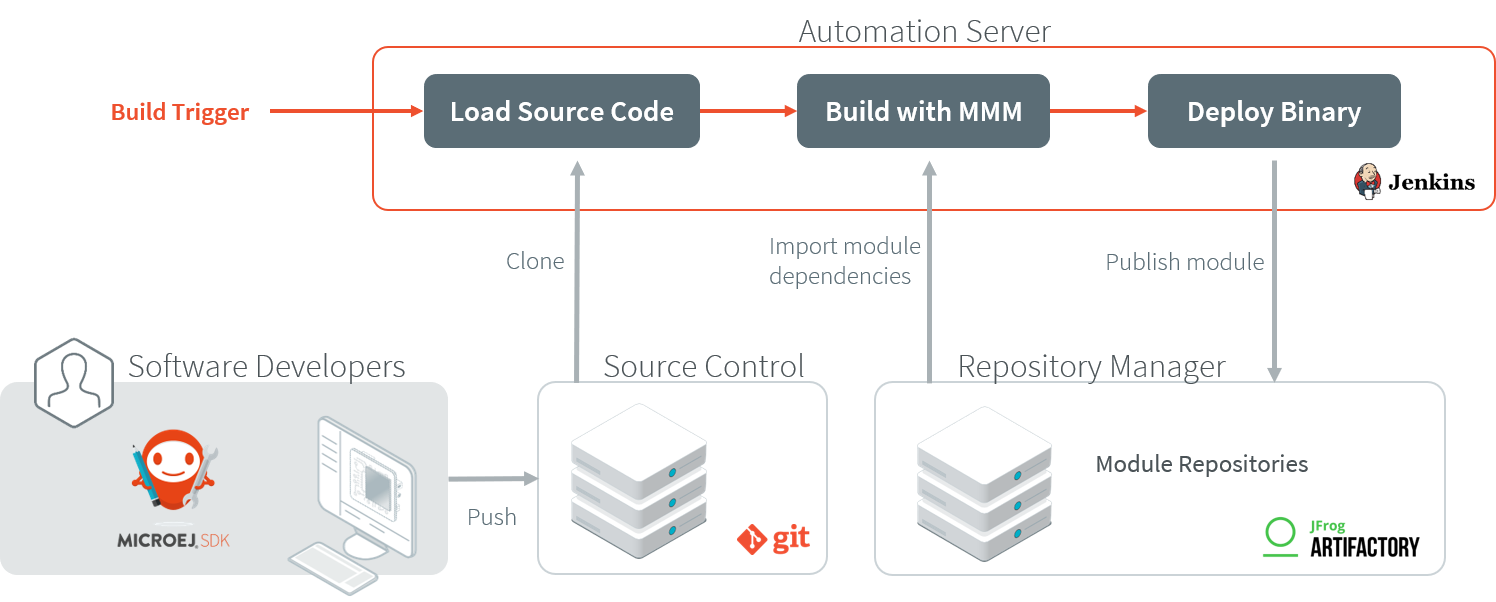
The overall build and deployment flow of a module can be summarized as follows:
Some event triggers the build process (i.e module source changed, user action, scheduled routine, etc.)
The module source code is retrieved from the Source Control System
The module dependencies are imported from the Repository Manager
The Automation Server then proceeds to building the module
If the build is successful, the module binary is deployed to the Repository Manager
Overview
The next sections describe step by step how to setup the build environment and build your first MicroEJ module.
The steps to follow are:
Run and setup Jenkins, Artifactory and Gitea
Create a simple MicroEJ module (Hello World)
Create a new Jenkins job for the Hello World module
Build the module
In order to simplify the steps, this training will be performed locally on a single machine.
Artifactory will host MicroEJ modules in 3 repositories:
microej-module-repository: repository initialized with pre-built MicroEJ modules, a mirror of the Central Repositorycustom-modules-snapshot: repository where custom snapshot modules will be publishedcustom-modules-release: repository where custom release modules will be published
Prepare your Docker environment
This section assumes the prerequisites have been properly installed.
Create a new directory, inside create a file named
docker-compose.yamland copy this content:version: '3' services: artifactory: image: releases-docker.jfrog.io/jfrog/artifactory-oss:7.71.5 container_name: artifactory environment: - JF_ROUTER_ENTRYPOINTS_EXTERNALPORT=8082 ports: - 8082:8082 # for router communication - 8081:8081 # for artifactory communication - 8085:8085 # for artifactory federation communication volumes: - artifactory:/var/opt/jfrog/artifactory - /etc/localtime:/etc/localtime:ro restart: always logging: driver: json-file options: max-size: "50m" max-file: "10" ulimits: nproc: 65535 nofile: soft: 32000 hard: 40000 gitea: image: gitea/gitea:1.23.4 container_name: gitea environment: - USER_UID=1000 - USER_GID=1000 restart: always volumes: - gitea:/data - /etc/timezone:/etc/timezone:ro - /etc/localtime:/etc/localtime:ro ports: - "3000:3000" - "222:22" jenkins: image: jenkins_master container_name: jenkins build: dockerfile: Dockerfile restart: always ports: - 50000:50000 - 8080:8080 volumes: - jenkins:/var/jenkins_home - /var/run/docker.sock:/var/run/docker.sock links: - gitea - artifactory volumes: gitea: artifactory: jenkins:
Create another file named
Dockerfileand copy this content:FROM jenkins/jenkins:2.462.3 USER root RUN apt-get update -qq \ && apt-get install -qqy apt-transport-https ca-certificates curl gnupg2 software-properties-common RUN curl -fsSL https://download.docker.com/linux/debian/gpg | apt-key add - RUN add-apt-repository \ "deb [arch=amd64] https://download.docker.com/linux/debian \ $(lsb_release -cs) \ stable" RUN apt-get update -qq \ && apt-get -y install docker-ce RUN usermod -aG docker jenkins
In this directory, launch the command
docker compose up -d. After a few moments you should have three running containers (named jenkins, gitea and artifactory).
Using docker compose ps will show if containers started properly. Logs can be viewed with docker compose logs.
Get a Module Repository
A Module Repository is a portable ZIP file that bundles a set of modules for extending the MicroEJ development environment. Please consult the Module Repository section for more information.
This training uses the MicroEJ Central Repository, which is the Module Repository used by MICROEJ SDK to fetch dependencies when starting an empty workspace. It bundles Foundation Library APIs and numerous Add-On Libraries.
Next step is to download a local copy of this repository:
Visit the Central Repository on the MicroEJ Developer website.
Navigate to the Production Setup section.
Click on the offline repository link. This will download the Central Repository as a ZIP file.
Setup Artifactory
Configure Artifactory
For demonstration purposes we will allow anonymous users to deploy modules in the repositories:
Once Artifactory container is started, go to
http://localhost:8082/.Login to Artifactory for the first time using the default
adminaccount (Username:admin, Password:password).Skip the installation wizard if it appears.
Go to Administration > User Management > Settings.
In the User Security Configuration section, check Allow Anonymous Access.
Click on Save.
Go to Administration > User Management > Permissions.
Click on Anything entry (do not check the line), then go to Users tab
Click on anonymous and check Deploy/Cache permission in the Selected Users Repositories category.
Click on Save.
Next steps will involve uploading large files, so we have to increase the file upload maximum size accordingly:
Go to Administration > Artifactory > General > Settings.
In the General Settings section, change the value of File Upload In UI Max Size (MB) to
1024then click on Save.
Create Repositories
We will now create and configure the repositories. Let’s start with the repository for the future built snapshot modules:
Go to Administration > Repositories > Repositories in the left menu.
Click on Add Repositories > Local Repository
Select Maven.
Set Repository Key field to
custom-modules-snapshotand click on Create Local Repository.
Repeat the same steps for the other repositories with the Repository Key field set to custom-modules-release and microej-module-repository.
Import MicroEJ Repositories
In this section, we will import MicroEJ repositories into Artifactory repositories to make them available to the build server.
Go to Administration > Artifactory > Import & Export > Repositories.
Scroll to the Import Repository from Zip section.
As Target Local Repository, select
microej-module-repositoryin the list.Click on Select file and select the MicroEJ module repository zip file (
central-repository-[version].zip) that you downloaded earlier (please refer to section Get a Module Repository).Click Upload. At the end of upload, click on Import. Upload and import may take some time.
Artifactory is now hosting all required MicroEJ modules.
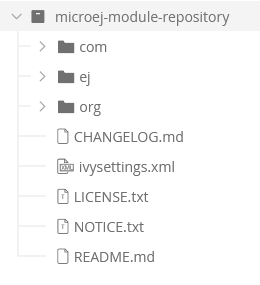
Go to Application > Artifactory > Artifacts and check that the repository microej-module-repository does contain modules as shown in the figure below.
Setup Gitea
Install Gitea
Once the Gitea container is started, go to
http://localhost:3000/.Don’t change anything on the
Initial Configuration, click on Install GiteaClick on Register account and create one. The first created user become the administrator.
Configure Gitea
At the top right click on the arrow then New Repository
As Repository Name set
helloworld, leave the other options as default.Click Create Repository.
Setup Jenkins
Install Jenkins
Once Jenkins container is started, go to
http://localhost:8080/.To unlock Jenkins, copy/paste the generated password that has been written in the container log. Click on Continue.
Select option Install suggested plugins and wait for plugins installation.
Fill in the Create First Admin User form. Click Save and continue.
Click on Save and finish, then on Start using Jenkins.
Configure Jenkins
Go to Manage Jenkins > Plugins.
- Add Docker Pipeline plugin:
Go to Available plugins section.
Search Docker Pipeline.
Install it and restart Jenkins
Build a new Module using Jenkins
Since your environment is now setup, it is time to build your first module from Jenkins and check it has been published to Artifactory. Let’s build an “Hello World” Sandboxed Application project.
Create a new MicroEJ Module
Now we will create an Application project that we’ll push to a Git repository. In this example, we will use a public template but you can create an application project from scratch with the SDK 6 User Guide.
Note
For demonstration purposes, we’ll create a new project and share it on a local Git bare repository. You can adapt the following sections to use an existing MicroEJ project and your own Git repository.
Clone https://github.com/MicroEJ/Tool-Project-Template-Application repository.
Go to the repository directory and type the following commands (replace
<admin_user>by Gitea user)git remote rename origin old-origin git remote add origin http://localhost:3000/<admin_user>/helloworld.git git push --set-upstream origin --all
Note
We need the IP address of the Docker Bridge Network, here we consider that it’s 172.17.0.1 but you can check with the command ip addr show docker0 on the Docker host.
On the project directory, create a file named
Jenkinsfileand copy this content inside:pipeline { agent { docker { image 'eclipse-temurin:11-jdk' args '-e ACCEPT_MICROEJ_SDK_EULA_V4_1A=YES' } } stages { stage('Build and publish') { steps { sh './gradlew build publish -Penable.ivy.descriptor.default=false --init-script init.gradle.kts' } } } }
Update
build.gradle.ktsfile and set line 20 with this text. Building or running an Application with the SDK requires a VEE Port, so we use RT1170 Vee Port for this example:microejVee("com.nxp.vee.mimxrt1170:evk_platform:2.2.0")
Create a file named
init.gradle.ktsand copy this content inside:settingsEvaluated { val artifactorRepositoryUrl = "http://172.17.0.1:8082/artifactory" dependencyResolutionManagement { repositories { /* MicroEJ Central repository for Maven/Gradle modules */ maven { name = "microEJForgeCentral" url = uri("${artifactorRepositoryUrl}/microej-module-repository") isAllowInsecureProtocol = true } /* MicroEJ Developer repository for Maven/Gradle modules */ maven { name = "microEJForgeDeveloper" url = uri("https://forge.microej.com/artifactory/microej-developer-repository-release") } /* MicroEJ SDK 6 repository for Maven/Gradle modules */ maven { name = "microEJForgeSDK6" url = uri("https://forge.microej.com/artifactory/microej-sdk6-repository-release/") } /* MicroEJ Central repository for Ivy modules */ ivy { name = "microEJForgeCentralIvy" url = uri("${artifactorRepositoryUrl}/microej-module-repository") patternLayout { artifact("[organisation]/[module]/[revision]/[artifact]-[revision](-[classifier])(.[ext])") ivy("[organisation]/[module]/[revision]/ivy-[revision].xml") setM2compatible(true) } isAllowInsecureProtocol = true } /* MicroEJ Developer repository for Ivy modules */ ivy { name = "microEJForgeDeveloperIvy" url = uri("https://forge.microej.com/artifactory/microej-developer-repository-release") patternLayout { artifact("[organisation]/[module]/[revision]/[artifact]-[revision](-[classifier])(.[ext])") ivy("[organisation]/[module]/[revision]/ivy-[revision].xml") setM2compatible(true) } } /* MicroEJ SDK 6 repository for Ivy modules */ ivy { name = "microEJForgeSDK6Ivy" url = uri("https://forge.microej.com/artifactory/microej-sdk6-repository-release/") patternLayout { artifact("[organisation]/[module]/[revision]/[artifact]-[revision](-[classifier])(.[ext])") ivy("[organisation]/[module]/[revision]/ivy-[revision].xml") setM2compatible(true) } } } /** * Publish repositories */ pluginManager.withPlugin("maven-publish") { configure<PublishingExtension> { repositories { maven { name = "artifactoryRepository" url = uri("${artifactorRepositoryUrl}/custom-modules-snapshot") isAllowInsecureProtocol = true } } } } } /** * Plugins repositories */ pluginManagement { repositories { /* MicroEJ Central repository for Maven/Gradle modules */ maven { name = "microEJForgeCentral" url = uri("${artifactorRepositoryUrl}/microej-module-repository") isAllowInsecureProtocol = true } /* MicroEJ Developer repository for Maven/Gradle modules */ maven { name = "microEJForgeDeveloper" url = uri("https://forge.microej.com/artifactory/microej-developer-repository-release") } /* MicroEJ SDK 6 repository for Maven/Gradle modules */ maven { name = "microEJForgeSDK6" url = uri("https://forge.microej.com/artifactory/microej-sdk6-repository-release/") } /* MicroEJ Central repository for Ivy modules */ ivy { name = "microEJForgeCentralIvy" url = uri("${artifactorRepositoryUrl}/microej-module-repository") patternLayout { artifact("[organisation]/[module]/[revision]/[artifact]-[revision](-[classifier])(.[ext])") ivy("[organisation]/[module]/[revision]/ivy-[revision].xml") setM2compatible(true) } isAllowInsecureProtocol = true } /* MicroEJ Developer repository for Ivy modules */ ivy { name = "microEJForgeDeveloperIvy" url = uri("https://forge.microej.com/artifactory/microej-developer-repository-release") patternLayout { artifact("[organisation]/[module]/[revision]/[artifact]-[revision](-[classifier])(.[ext])") ivy("[organisation]/[module]/[revision]/ivy-[revision].xml") setM2compatible(true) } } /* MicroEJ SDK 6 repository for Ivy modules */ ivy { name = "microEJForgeSDK6Ivy" url = uri("https://forge.microej.com/artifactory/microej-sdk6-repository-release/") patternLayout { artifact("[organisation]/[module]/[revision]/[artifact]-[revision](-[classifier])(.[ext])") ivy("[organisation]/[module]/[revision]/ivy-[revision].xml") setM2compatible(true) } } } } }
This file configures the MicroEJ Module Manager to import and publish modules from the Artifactory repositories described in this training. Please refer to the Settings File section for more details.
Note
At this point, the content of the directory
Tool-Project-Template-Applicationshould look like the following:├── build.gradle.kts ├── CHANGELOG.md ├── configuration │ └── common.properties ├── gradle │ └── wrapper │ ├── gradle-wrapper.jar │ └── gradle-wrapper.properties ├── gradlew ├── gradlew.bat ├── init.gradle.kts ├── Jenkinsfile ├── LICENSE.txt ├── README.md ├── settings.gradle.kts └── src ├── main │ ├── java │ │ └── com │ │ └── mycompany │ │ └── myapplication │ │ └── Main.java │ └── resources └── test ├── java └── resources
Push these modifications to Gitea repository
Create a New Jenkins Job
Start by creating a new job for building our application.
Go to Jenkins dashboard.
Click on New Item.
Set item name to
Hello World.Select Multibranch Pipeline.
Validate with Ok button.
In General tab set Display Name to
Hello WorldIn Branch Sources, click on Add Source > Git.
Add Project Repository http://172.17.0.1:3000/<admin_user>/helloworld.git
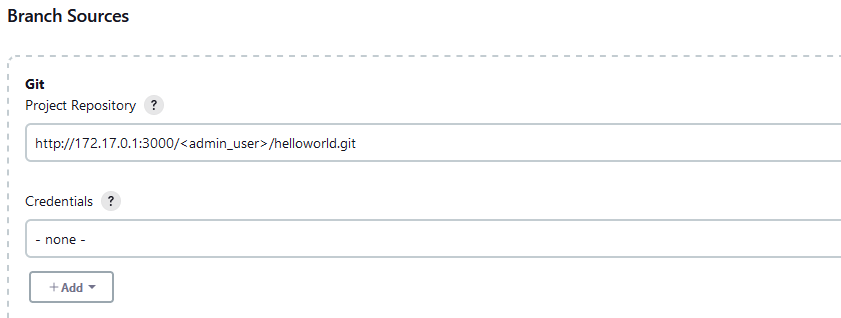
Click on Save.
Build the “Hello World” Application
Let’s run the job!
In Jenkins Hello World dashboard, click on master branch, then click on Build Now.
Note
You can check the build progress by clicking on the build progress bar and showing the Console Output.
At the end of the build, the module is published to http://localhost:8082/artifactory/list/custom-modules-snapshot/com/mycompany/my-application/.
Congratulations!
At this point of the training:
Artifactory is hosting your module builds and MicroEJ modules.
Jenkins automates the build process using SDK6.
The next recommended step is to adapt Gradle/Jenkins/Artifactory configuration to your ecosystem and development flow.
Appendix
This section discusses some of the customization options.
Customize Jenkins
Jenkins jobs are highly configurable, following options and values are recommended by MicroEJ, but they can be customized at your convenience.
In General tab:
Check Discard old builds and set Max # of builds to keep value to
15.Click on Advanced button, and check Block build when upstream project is building.
In Build triggers tab:
Check Poll SCM, and set a CRON-like value (for example
H/30 * * * *to poll SCM for changes every 30 minutes).
In Post-build actions tab:
Add post-build action Publish JUnit test result report:
Set Test report XMLs to
**/target~/test/xml/**/test-report.xml, **/target~/test/xml/**/*Test.xml.
Note
The error message ‘**/target~/test/xml/**/test-report.xml’ doesn’t match anything: ‘**’ exists but not ‘**/target~/test/xml/**/test-report.xml’
will be displayed since no build has been executed yet. These folders will be generated during the build.
Check Retain long standard output/error.
Check Do not fail the build on empty test results