
Warning
This documentation is for SDK 5. The latest major version is SDK 6. SDK 5 is in maintenance mode since the release of SDK 5.8.0. Consequently, as stated in the SDK End User License Agreement (EULA), the SDK will reach the end of its life by July 2028. Contact our support team for assistance with migrating to the new SDK, or your sales representative if you require an extension of SDK maintenance as a service.
Testsuite with JUnit
The SDK allows to run unit tests using the standard JUnit API during the build process of a Library or an Application. The MicroEJ Testsuite Engine runs tests on a VEE Port and outputs a JUnit XML report.
Principle
JUnit testing can be enabled when using the microej-javalib (MicroEJ
Add-On Library) or the microej-application (MicroEJ Applications)
build type. JUnit test cases processing is automatically enabled when
the following dependency is declared in the module.ivy file of the
project.
<dependency conf="test->*" org="ej.library.test" name="junit" rev="1.6.2"/>
When a new JUnit test case class is created in the src/test/java
folder, a JUnit processor generates MicroEJ compliant classes into a
specific source folder named src-adpgenerated/junit/java. These
files are automatically managed and must not be edited manually.
JUnit Compliance
MicroEJ is compliant with a subset of JUnit version 4. MicroEJ JUnit
processor supports the following annotations: @After,
@AfterClass, @Before, @BeforeClass, @Ignore, @Test.
Each test case entry point must be declared using the org.junit.Test
annotation (@Test before a method declaration). Please refer to
JUnit documentation to get details on usage of other annotations.
Setup a Platform for Tests
Before running tests, a target platform must be configured.
Execution in SDK
In order to execute the Testsuite in the SDK, a target platform must be configured in the MicroEJ workspace. The following steps assume that a platform has been previously imported into the MicroEJ Platform repository (or available in the Workspace):
Go to Window > Preferences > MicroEJ > Platforms (or Platforms in workspace).
Select the desired platform on which to run the tests.
Press F2 to expand the details.
Select the the platform path and copy it to the clipboard.
Go to Window > Preferences > Ant > Runtime and select the Properties tab.
Click on Add Property… button and set a new property named
target.platform.dirwith the platform path pasted from the clipboard.
Execution during module build
In order to execute the Testsuite during the build of the module, a target platform must be configured in the module project as described in the section Select a VEE Port.
Setup a Project with a JUnit Test Case
This section describes how to create a new JUnit Test Case starting from a new MicroEJ library project.
First create a new module project using the
microej-javalibskeleton. A new project namedmylibraryis created in the workspace.Right-click on the
src/test/javafolder and select New > Other… menu item.Select the Java > JUnit > New JUnit Test Case wizard.
Enter a test name and press Finish. A new JUnit test case class is created with a default failing test case.
Build and Run a JUnit Testsuite
Right-click on the
mylibraryproject and select Build Module. After the library is built, the testsuite engine launches available test cases and the build process fails in the console view.On the
mylibraryproject, right-click and select Refresh. Atarget~folder appears with intermediate build files. The JUnit report is available attarget~\test\xml\TEST-test-report.xml.Double-click on the file to open the JUnit testsuite report.
Modify the test case by replacing
fail("Not yet implemented");
with
Assert.assertTrue(true);
Right-click again on the
mylibraryproject and select Build Module. The test is now successfully executed on the target platform so the MicroEJ Add-On Library is fully built and published without errors.Double-click on the JUnit testsuite report to see the test has been successfully executed.
Testsuite Reports
Once a testsuite is completed, the following testsuite reports are generated:
JUnit HTML report in the module project location
target~/test/html/test/junit-noframes.html. This report contains a summary and the execution trace of every executed test.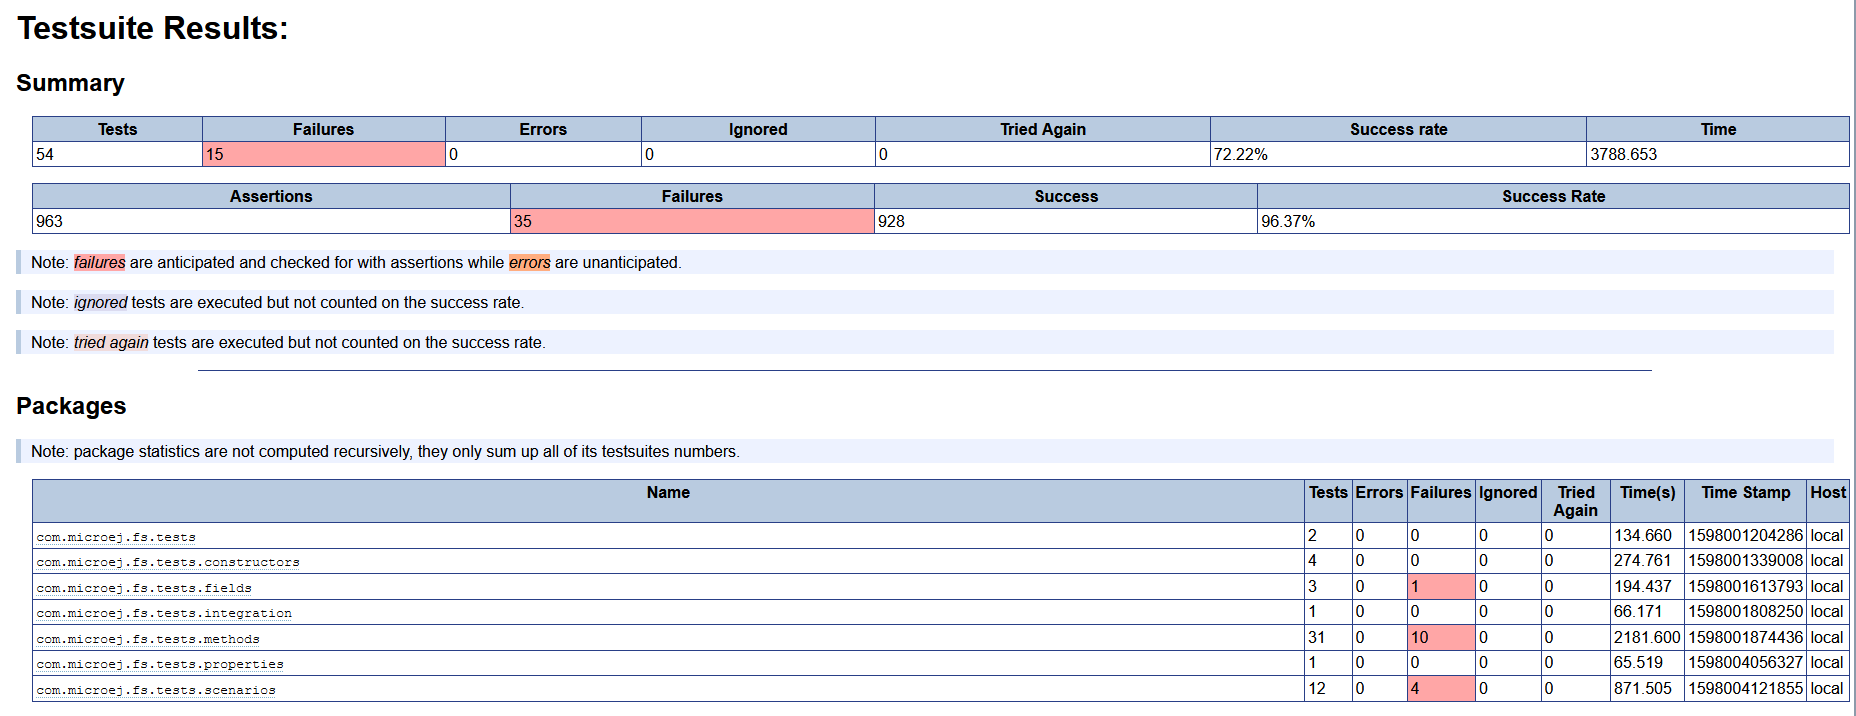
Example of MicroEJ Testsuite HTML Report
JUnit XML report in the module project location
target~/test/xml/TEST-test-report.xml.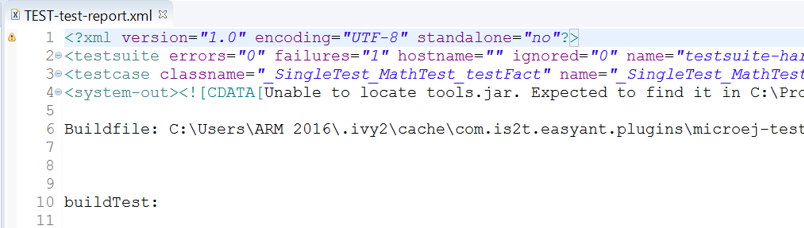
Example of MicroEJ Testsuite XML Report
XML report file can also be opened in the JUnit View. Right-click on the file > Open With > JUnit View:

Example of MicroEJ Testsuite XML Report in JUnit View
If executed on device, the Firmware binary produced for each test
is available in module project location target~/test/xml/<TIMESTAMP>/bin/<FULLY-QUALIFIED-CLASSNAME>/application.out.
Configure the Execution on your Device
By default, the Testsuite is configured to execute tests on the Simulator using Mocks declared by the VEE Port. You can switch the default configuration to execute tests on your Device. For that, your VEE Port must implement the BSP Connection.
Also, a device must be connected to your workstation both for programming the Executable and getting output traces. Consult your VEE Port specific documentation for setup.
Here is a summary of the options to add (see Testsuite Options and BSP Connection Options for more details).
<!-- Execute tests on Device -->
<ea:property name="target.vm.name" value="MICROJVM"/>

<!-- Enable Executable built using the SDK -->
<ea:property name="microej.testsuite.properties.deploy.bsp.microejscript" value="true"/>
<ea:property name="microej.testsuite.properties.microejtool.deploy.name" value="deployToolBSPRun"/>

<!-- Tell the testsuite engine that your VEE Port Run script redirects execution traces -->
<ea:property name="microej.testsuite.properties.launch.test.trace.file" value="true"/>
<!-- Configure TCP/IP address and port if your VEE Port Run script does not redirect execution traces -->
<ea:property name="microej.testsuite.properties.testsuite.trace.ip" value="127.0.0.1"/>
<ea:property name="microej.testsuite.properties.testsuite.trace.port" value="5555"/>
Warning
If your VEE Port Run script does not redirect execution traces, the Serial to Socket Transmitter tool must have been started before running the Testsuite.
Advanced Configurations
Autogenerated Test Classes
The JUnit processor generates test classes into the
src-adpgenerated/junit/java folder. This folder contains:
_AllTestClasses.javafileA single class with a main entry point that sequentially calls all declared test methods of all JUnit test case classes.
_AllTests_[TestCase].javafilesFor each JUnit test case class, a class with a main entry point that sequentially calls all declared test methods.
_SingleTest_[TestCase]_[TestMethod].javafilesFor each test method of each JUnit test case class, a class with a main entry point that calls the test method.
JUnit Test Case to MicroEJ Test Case
The MicroEJ Testsuite Engine allows to select the classes that will be executed, by adding the following configuration in the project build file:
<ea:property name="test.run.includes.pattern" value="[MicroEJ Test Case Include Pattern]"/>
tasks.test {
   filter {
      includeTestsMatching([MicroEJ Test Case Include Pattern])
   }
}
The following configuration considers all JUnit test methods of the same class as a single MicroEJ test case (default behavior). If at least one JUnit test method fails, the whole test case fails in the JUnit report.
<ea:property name="test.run.includes.pattern" value="**/_AllTests_*.class"/>
tasks.test {
   filter {
      includeTestsMatching("*._AllTests_*")
   }
}
The following configuration considers each JUnit test method as a dedicated MicroEJ test case. Each test method is viewed independently in the JUnit report, but this may slow down the testsuite execution because a new deployment is done for each test method.
<ea:property name="test.run.includes.pattern" value="**/_SingleTest_*.class"/>
tasks.test {
   filter {
      includeTestsMatching("*._SingleTest_*")
   }
}
Testsuite Options (SDK 5 only)
The MicroEJ Testsuite Engine can be configured with specific options
which can be added to the module.ivy file of the project running the testsuite,
within the <ea:build> XML element.
Testsuite options are described in the Testsuite Module Nature section.
Test Specific Options
The MicroEJ Testsuite Engine allows to define Standalone Application Options
specific to each test case. This can be done by defining a file with the
same name as the generated test case file with the .properties
extension instead of the .java extension. The file must be put in
the src/test/resources folder and within the same package than the
test case file.