
Front Panel Mock
Principle
A major strength of the MicroEJ environment is that it allows applications to be developed and tested in a Simulator rather than on the target device, which might not yet be built. To make this possible for devices that controls operated by the user, the Simulator must connect to a “mock” of the control panel (the “Front Panel”) of the device. The Front Panel generates a graphical representation of the device, and is displayed in a window on the user’s development machine when the application is executed in the Simulator.
The Front Panel has been designed to be an implementation of MicroUI library (see Simulation). However it can be use to show a hardware device, blink a LED, interact with user without using MicroUI library.
Functional Description
Creates a new Front Panel project.
Creates an image of the required Front Panel. This could be a photograph or a drawing.
Defines the contents and layout of the Front Panel by editing an XML file (called an fp file). Full details about the structure and contents of fp files can be found in chapter Front Panel.
Creates images to animate the operation of the controls (for example button down image).
Creates Front Panel Widgets that make the link between the application and the user interactions.
Previews the Front Panel to check the layout of controls and the events they create, etc.
Exports the Front Panel project into a MicroEJ VEE Port project.
The Front Panel Project
Creating a Front Panel Project
A Front Panel project template is available as part of the VEE Port project template. Clone this template to create a Front Panel project.
A Front Panel project is created using the New Front Panel Project wizard. Select:
New > Project… > MicroEJ > Front Panel Project
The wizard will appear:
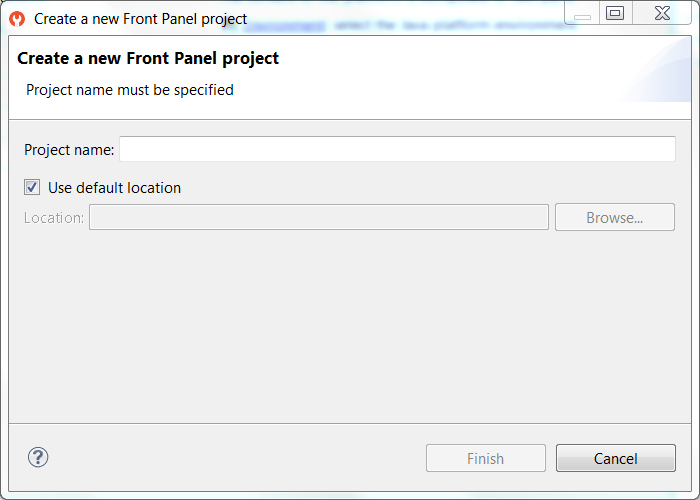
New Front Panel Project Wizard
Enter the name for the new project.
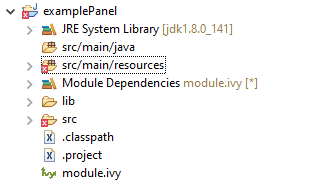
Project Contents
A Front Panel project has the following structure and contents:
The
src/main/javafolder is provided for the definition of Front PanelWidgets. It is initially empty. The creation of these classes will be explained later.The
src/main/resourcesfolder holds the file or files that define the contents and layout of the Front Panel, with a.fpextension (the fp file or files), plus images used to create the Front Panel. A newly created project will have a single fp file with the same name as the project, as shown above. The contents of fp files are detailed later in this document.The
build.gradle.ktsfile is the project build descriptor.
Project Contents
A Front Panel project has the following structure and contents:
The
src/main/javafolder is provided for the definition of Front PanelWidgets. It is initially empty. The creation of these classes will be explained later.The
src/main/resourcesfolder holds the file or files that define the contents and layout of the Front Panel, with a.fpextension (the fp file or files), plus images used to create the Front Panel. A newly created project will have a single fp file with the same name as the project, as shown above. The contents of fp files are detailed later in this document.The
JRE System Libraryis referenced, because a Front Panel project needs to support the writing of Java for theListeners(andDisplayExtensions).The
Modules Dependenciescontains the libraries for the Front Panel simulation, the widgets it supports and the types needed to implementListeners(andDisplayExtensions).The
libcontains a local copy ofModules Dependencies.
Module Dependencies
The Front Panel project is a regular Gradle project. Its build.gradle.kts file should look like this example:
plugins {
   id("com.microej.gradle.mock-frontpanel")
}

group = "com.mycompany"
version = "0.1.0-RC"

dependencies {
   implementation("ej.tool.frontpanel:framework:1.1.1")
}
The Front Panel project is a regular MicroEJ Module project. Its module.ivy file should look like this example:
<ivy-module version="2.0" xmlns:ea="http://www.easyant.org" xmlns:ej="https://developer.microej.com" ej:version="2.0.0">
   <info organisation="com.mycompany" module="examplePanel" status="integration" revision="1.0.0"/>

   <configurations defaultconfmapping="default->default;provided->provided">
      <conf name="default" visibility="public" description="Runtime dependencies to other artifacts"/>
      <conf name="provided" visibility="public" description="Compile-time dependencies to APIs provided by the platform"/>
   </configurations>

   <dependencies>
      <dependency org="ej.tool.frontpanel" name="framework" rev="1.1.1"/>
   </dependencies>
</ivy-module>
The Front Panel Framework contains the Front Panel core classes, mainly the ability to create your own Front Panel Widget to simulate user interactions.
Note
Some Front Panel Widgets are available to interact with the MicroUI devices (display, input devices, etc.), see Simulation.
Front Panel File
File Content
The Front Panel engine takes an XML file (the .fp file) as input. It describes
the panel using widgets: they simulate the drivers, sensors and
actuators of the real device. The Front Panel engine generates the graphical
representation of the real device, and is displayed in a window on the
user’s development machine when the application is executed in the
Simulator.
The following example file describes a simple board with one LED:
<?xml version="1.0"?>
<frontpanel
   xmlns:xsi="http://www.w3.org/2001/XMLSchema-instance"
   xmlns="https://developer.microej.com"
   xsi:schemaLocation="https://developer.microej.com .widget.xsd">

   <device name="MyBoard" skin="myboard.png">
      <ej.fp.widget.LED x="131" y="127" skin="box_led.png"/>
   </device>
</frontpanel>
The device skin must refer to a png file in the
src/main/resources folder. This image is used to render the background of the
Front Panel. The widgets are drawn on top of this background.
The device contains the elements that define the widgets that
make up the Front Panel. The name of the widget element defines the type
of widget. The set of valid types is determined by the Front Panel
Designer. Every widget element defines a label, which must be unique
for widgets of this type (optional or not), and the x and y coordinates of the
position of the widget within the Front Panel (0,0 is top left). There
may be other attributes depending on the type of the widget.
The file and tags specifications are available in chapter Front Panel.
Note
The .fp file grammar has changed since the UI Pack version 12.0.0 (Front Panel core has been moved to MicroEJ Architecture starting from version 7.11.0). A quick migration guide is available: open VEE Port configuration file .Platform, go to Content tab, click on module Front Panel. The migration guide is available in Details box.
Editing Front Panel Files
The .fp file is a standard XML file, so it can be edited with any XML Editor.
For example in Eclipse, you can open it using the Eclipse XML editor (right-click on
the .fp file, select Open With > XML Editor). This editor features
syntax highlighting and checking, and content-assist based on the schema
(XSD file) referenced in the fp file. This schema is a hidden file
within the project’s definitions folder. An incremental builder checks
the contents of the fp file each time it is saved and highlights
problems in the Eclipse Problems view, and with markers on the fp file
itself.
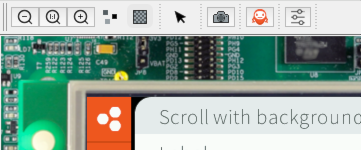
A preview of the Front Panel can be obtained by opening the Front Panel Preview. This tool is available in Eclipse only:
in SDK 5, it is installed by default.
in SDK 6, it must be installed by following the instructions on the Development Tools page.
Once installed, open it in Window > Show View > Other… > MicroEJ > Front Panel Preview.
The preview is updated each time the .fp file is saved.
A typical working layout is shown below.
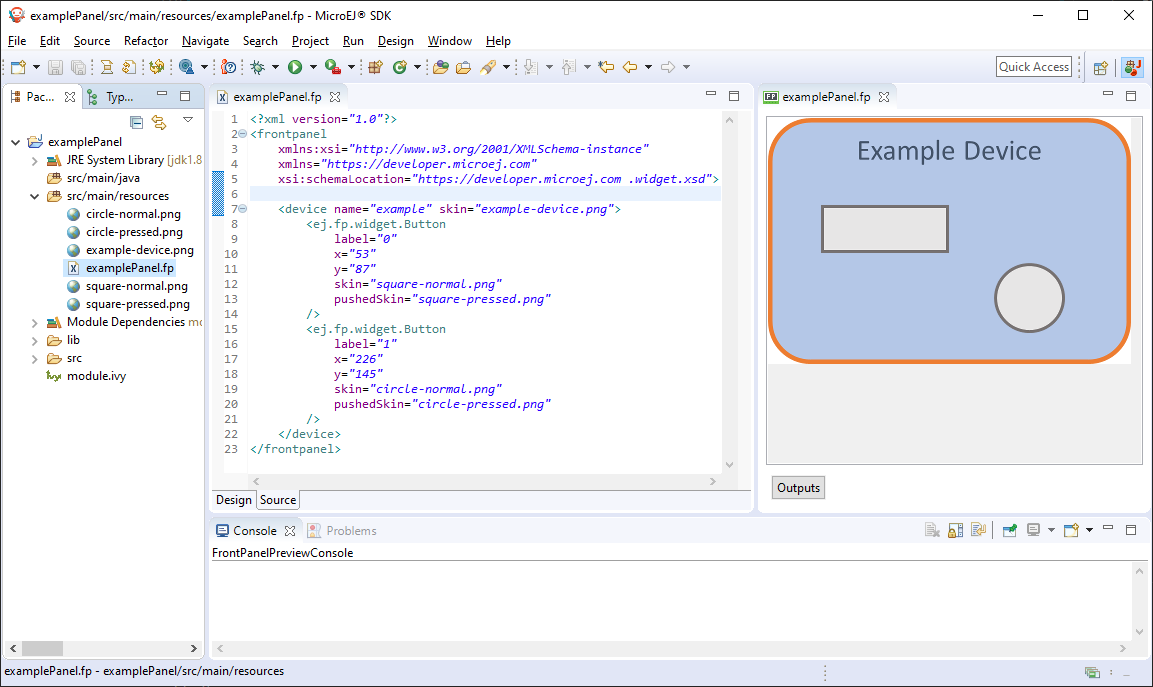
Working Layout Example
Within the XML editor, content-assist is obtained by pressing
CTRL + SPACE keys. The editor will list all the elements valid at the cursor
position, and insert a template for the selected element.
Multiple Front Panel Files
A Front Panel project can contain multiple .fp files. All those files are compiled when exporting the Front Panel project to a
VEE Port (or during VEE Port build). It may be useful to have two or more representations of a board (skin, device layout, display
size, etc…). When running the simulator, by default, the .fp file declared by the VEE Port configuration,
is used (or a random one if no default is configured). To pick a specific one, set the Application Option
frontpanel.file to a Front Panel simple file name included in the VEE Port (e.g. myproduct.fp).
Widget
Description
A widget is a subclass of Front Panel Framework class ej.fp.Widget. The library ej.tool.frontpanel#widget provides a set of widgets which are Graphics Engine compatible (see Simulation). To create a new widget (or a subclass of an existing widget), have a look on available widgets in this library.
Front Panel Widgets
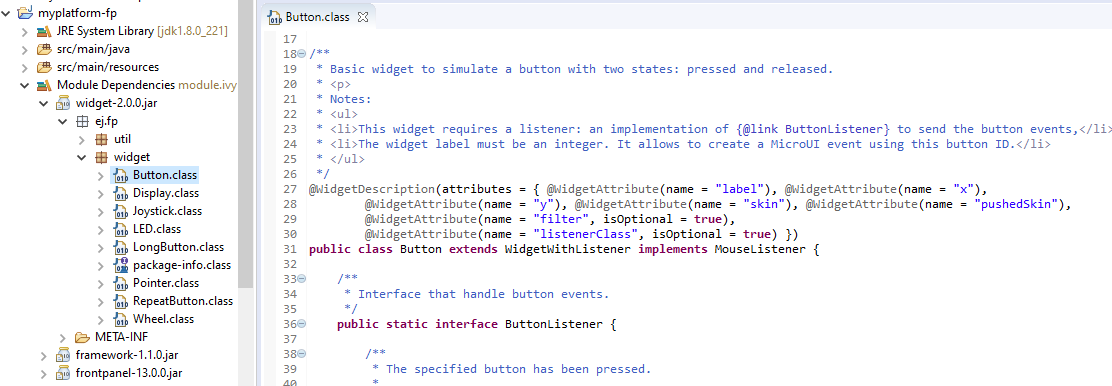
A widget is recognized by the fp file as soon as its class contains a @WidgetDescription annotation. The annotation contains several @WidgetAttribute. An attribute has got a name and tells if it is an optional attribute of widget (by default an attribute is mandatory).
This is the description of the widget LED:
@WidgetDescription(attributes = { @WidgetAttribute(name = "x"),
      @WidgetAttribute(name = "y"), @WidgetAttribute(name = "skin")})
As soon as a widget is created (with its description) in Front Panel project, the fp file can use it. Close and reopen fp file after creating a new widget. In device group, press CTRL + SPACE keys to visualize the available widgets: the new widget can be added.
<ej.fp.widget.LED x="170" y="753" skin="box_led.png" />
Each attribute requires the set methods in the widget source code. For instance, the widget LED (or its hierarchy) contains the following methods for sure:
setX(int),setY(int),setskin(Image).
The set method parameter’s type fixes the expected value in fp file. If the attribute cannot match the expected type, an error is throw when editing fp file. Widget master class already provides a set of standard attributes:
setFilter(Image): apply a filtering image which allows to crop input area (Input Device Filters).setWidth(int)andsetHeight(int): limits the widget size.setLabel(String): specifies an identifier to the widget.setOverlay(boolean): draws widget skin with transparency or not.setSkin(Image): specifies the widget skin.setX(int)andsetY(int): specifies widget position.
Notes:
Widget class does not specify if an attribute is optional or not. It it the responsability to the subclass.
The label is often used as identifier. It also allows to retrieve a widget calling
Device.getDevice().getWidget(Class<T>, String). Some widgets are using this identifier as an integer label. It is the responsability to the widget to fix the signification of the label.The widget size is often fixed by the its skin (which is an image). See
Widget.finalizeConfiguration(): it sets the widget size according the skin if the skin has been set; even if methodssetWidth()andsetHeight()have been called before.
Runtime
The Front Panel engine parsing the fp file at application runtime. The widget methods are called in two times. First, engine creates widget by widget:
widget’s constructor: Widget should initialize its own fields which not depend on widget attributes (not valorized yet).
setXXX(): Widget should check if given attribute value matches the expected behavior (the type has been already checked by caller). For instance if a width is not negative. On error, implementation can throw anIllegalArgumentException. These checks must not depend on other attributes because they may have not already valorized.finalizeConfiguration(): Widget should check the coherence between all attributes: they are now valorized.
During these three calls, all widgets are not created yet. And so, by definition, the main device (which is a widget) not more. By consequence, the implementation must not try to get the instance of device by calling Device.getDevice(). Furthermore, a widget cannot try to get another widget by calling Device.getDevice().getWidget(s). If a widget depend on another widget for any reason, the last checks can be performed in start() method. This method is called when all widgets and main device are created. Call to Device.getDevice() is allowed.
The method showYourself() is only useful when visualizing the fp file during its editing (use Eclipse view Front Panel Preview). This method is called when clicking on button Outputs.
Example
The following code is a simple widget LED. MicroEJ Application can interact with it using native methods on() and off() of class ej.fp.widget.LED:
package ej.fp.widget;

import ej.fp.Device;
import ej.fp.Image;
import ej.fp.Widget;
import ej.fp.Widget.WidgetAttribute;
import ej.fp.Widget.WidgetDescription;

/**
* Widget LED declaration. This class must have the same package than
* <code>LED</code> in MicroEJ application. This is required by the simulator to
* retrieve the implementation of native methods.
*/
@WidgetDescription(attributes = { @WidgetAttribute(name = "x"), @WidgetAttribute(name = "y"),
      @WidgetAttribute(name = "skin") })
public class LED extends Widget {

   boolean on; // false init

   /**
   * Called by the plugin when clicking on <code>Outputs</code> button from Front
   * Panel Preview.
   */
   @Override
   public void showYourself(boolean appearSwitchedOn) {
      update(appearSwitchedOn);
   }

   /**
   * Called by framework to render the LED.
   */
   @Override
   public Image getCurrentSkin() {
      // when LED is off, hide its skin returning null
      return on ? getSkin() : null;
   }

   /**
   * MicroEJ application native
   */
   public static void on() {
      update(true);
   }

   /**
   * MicroEJ application native
   */
   public static void off() {
      update(false);
   }

   private static void update(boolean on) {

      // retrieve the LED (there is only one LED on device)
      LED led = Device.getDevice().getWidget(LED.class);

      // update its state
      led.on = on;

      // ask to repaint it
      led.repaint();
   }
}
Empty Widget
By definition a widget may not contain an attribute. This kind of widget is useful to perform something at Front Panel startup, for instance to start a thread to pick up data somewhere.
The widget description is @WidgetDescription(attributes = { }). In start() method, a custom behavior can be performed. In fp file, the widget declaration is <com.mycompany.Init/> (where Init is an example of widget name).
Input Device Filters
The widgets which simulate the input devices use images (or “skins”) to show their current states (pressed and released). The user can change the state of the widget by clicking anywhere on the skin: it is the active area. This active area is, by default, rectangular.
These skins can be associated with an additional image called a
filter. This image defines the widget’s active area. It
is useful when the widget is not rectangular.

Active Area
The filter image must have the same size as the skin image. The active area is delimited by the fully opaque pixels. Every pixel in the filter image which is not fully opaque is considered not part of the active area.
Extension / Customization
Since UI Pack 14.3.0 it is also possible to extend the Front Panel window.
There are several zones available for extension: the tool bar, the status bar and the sides of the device. It may be convenient for example to concentrate all the mocks into one window instead of several ones.
The device widget can be retrieved using FrontPanel.getFrontPanel().getDeviceWidget().
From this widget, it is possible to retrieve the extensible zones.
Tool Bar
The tool bar can be retrieved with (javax.swing.JToolBar) ((javax.swing.JComponent) FrontPanel.getFrontPanel().getDeviceWidget()).getParent().getParent().getComponent(1).
Then it is possible to add one or several actions using JToolBar.add().
A good practice is to add a separator before adding the actions using JToolBar.addSeparator().
For example:
JToolBar toolBar = (JToolBar) ((JComponent) FrontPanel.getFrontPanel().getDeviceWidget()).getParent().getParent().getComponent(1);
ImageIcon myActionIcon = new ImageIcon(getClass().getClassLoader().getResource("myIcon.png"));
AbstractAction myAction = new AbstractAction(null, myActionIcon) {
   private static final long serialVersionUID = 1L;

   @Override
   public void actionPerformed(ActionEvent e) {
      // Execute my action.
   }
};
toolBar.addSeparator();
toolBar.add(myAction);
An example of action in the toolbar with the MicroEJ mascot as icon.
Status Bar
The status bar can be retrieved with (javax.swing.JPanel) ((javax.swing.JComponent) FrontPanel.getFrontPanel().getDeviceWidget()).getParent().getParent().getComponent(2).
The status bar contains 3 zones: one on the left, one on the center, one on the right.
Each zone is a component included in the status bar and can be retrieved with its position, respectively 0, 1 and 2.
In each zone, it is possible to add one or several components.
A good practice is to add a separator before adding the components.
For example:
JPanel statusBar = (JPanel) ((JComponent) FrontPanel.getFrontPanel().getDeviceWidget()).getParent().getParent().getComponent(2);
JPanel statusBarLeft = (JPanel) statusBar.getComponent(0);
JLabel myLabel = new JLabel("My information");
JSeparator mySeparator = new JSeparator(SwingConstants.VERTICAL);
Dimension myLabelPreferredSize = mySeparator.getPreferredSize();
myLabelPreferredSize.height = myLabel.getPreferredSize().height;
mySeparator.setPreferredSize(myLabelPreferredSize);
statusBarLeft.add(mySeparator);
statusBarLeft.add(myLabel);
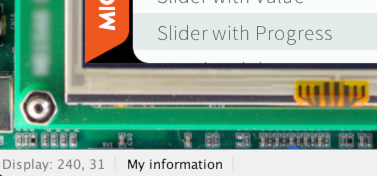
An example of simple information in the status bar.
Around the Device
The panel containing the device can be retrieved with (java.swing.JPanel) ((javax.swing.JComponent) FrontPanel.getFrontPanel().getDeviceWidget()).getParent()
The panel uses a border layout, the device being in the center. It is possible to add widgets around the device, on north, west, east or south.
For example:
JPanel panel = (JPanel) ((JComponent) FrontPanel.getFrontPanel().getDeviceWidget()).getParent();
panel.add(new JLabel("My left label"), BorderLayout.WEST);
panel.add(new JLabel("My top label"), BorderLayout.NORTH);
panel.add(new JButton("My bottom button"), BorderLayout.SOUTH);
JPanel myPanel = new JPanel();
myPanel.setLayout(new BoxLayout(myPanel, BoxLayout.Y_AXIS));
panel.add(myPanel, BorderLayout.EAST);
myPanel.add(new JLabel("My controls"));
myPanel.add(new JButton("My first control"));

// Update the window to be resized to fit the new widgets.
JFrame frame = (JFrame) panel.getParent().getParent().getParent().getParent();
frame.pack();
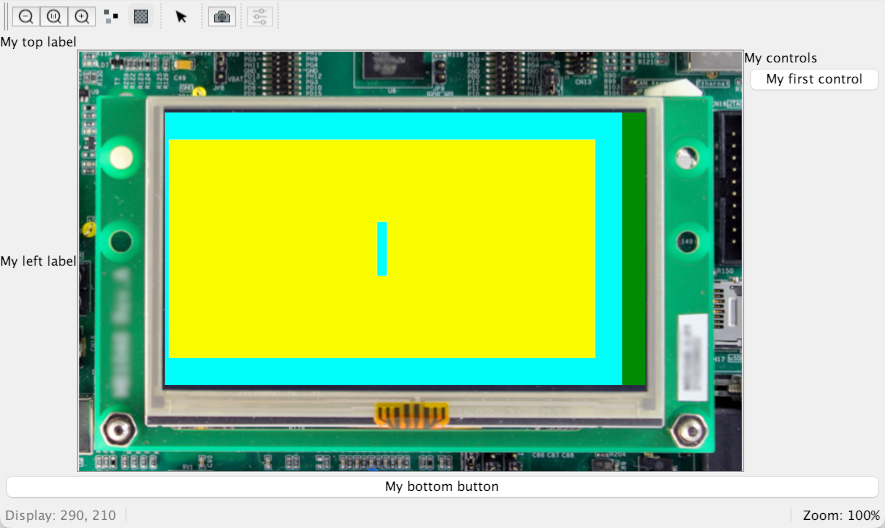
An example of widgets around the device.
Installation
In the VEE Port configuration file, check Front Panel to
install the Front Panel module. When checked, the properties file
frontpanel/frontpanel.properties is required during VEE Port creation to
configure the module. This configuration step is used to identify and
configure the Front Panel.
The properties file must / can contain the following properties:
project.name[mandatory]: Defines the name of the Front Panel project (same workspace as the VEE Port configuration project). If the project name does not exist, a new project will be created.fpFile.name[optional, default value is “” (empty)]: Defines the Front Panel file (*.fp) the application has to use by default when severalfpfiles are available in project.
Advanced: Test the Front Panel Project
Note
Starting from SDK 5.7.0 and Architecture 8.0.0, the Front Panel projects are automatically resolved in the workspace,
so this section and the property ej.fp.project are obsolete since.
See Resolve Foundation Libraries in Workspace for more details.
If the Front Panel project has been created with a SDK version lower than 5.7.0, a project option must be updated:
right-click on the
Module Dependenciesentry.click on
Properties.go to the
Classpathtab.check the
Resolve dependencies in workspaceoption.
To quickly test a Front Panel project without rebuilding the VEE Port or manually exporting the project, add the Application Option ej.fp.project to the absolute path of a Front Panel project (e.g. c:\mycompany\myfrontpanel-fp).
The Simulator will use the Front Panel project specified instead of the one included in the VEE Port.
This feature is useful for locally testing some changes in the Front Panel project.
-Dej.fp.project=${project_loc:myfrontpanel-fp}
Warning
This feature only works if the VEE Port has been built with the Front Panel module enabled and the VEE Port does not contain the changes until a new VEE Port is built.
Use
Launch an application on the Simulator to run the Front Panel.