Run the FS Test Suite on ESP32-WROVER VEE Port
This guide describes all the steps to configure and run a VEE Port Test Suite on a device using the Port Qualification Tools.
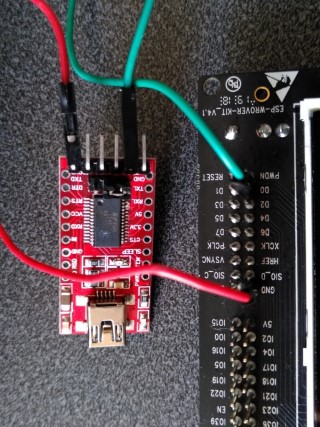
The target device is the Espressif ESP32-WROVER-KIT V4.1 board and the Filesystem Test Suite for FS module will be used as an example.
This guide should take 1 hour to complete (excluding the VEE Port setup from the Getting Started page).
Prerequisites
This guide assumes the following:
- Good knowledge of the MicroEJ Glossary.
- Tutorial Understand How to Build a Firmware and its Dependencies has been followed.
- MICROEJ SDK distribution 20.07 or more (see SDK Version).
- The WROVER VEE Port has been properly setup (i.e., it can be used to generate a Mono-Sandbox Executable).
The instructions of this page can be adapted to run the test suite on any other VEE Port providing:
- An implementation of LLFS: File System version 1.0.2 in com.microej.pack#fs-4.0.3.
- A partial or full BSP Connection.
Note
This documentation can also be adapted to run other test suites in addition to the Filesystem Test Suite presented here.
Introduction
This guide presents a local setup of the VEE Port Test Suite for the FS Foundation Library on a concrete device (not on Simulator).
In essence, a Foundation Library provides an API to be used by an Application or an Add-On Library.
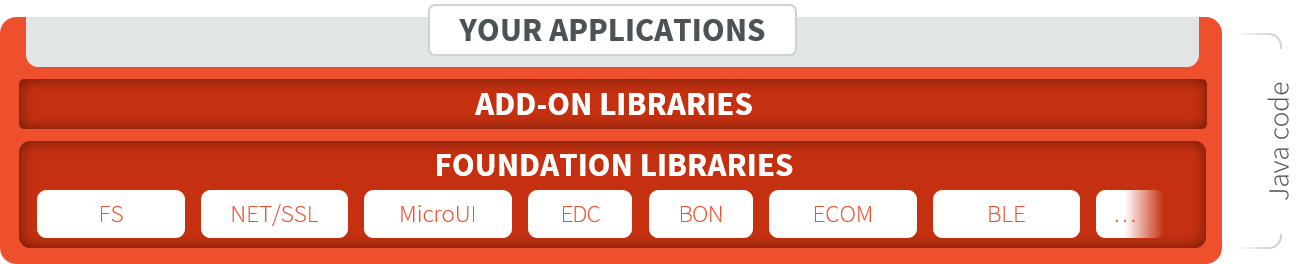
MicroEJ Foundation Libraries, Add-On Libraries and Application
For example, the Java file system API java.io.File is provided by the MicroEJ Foundation Library named FS. The Abstraction Layer of each Foundation API must be implemented in C in the Board Support Package. The Test Suite is used to validate the C code implementation of the Abstraction Layer.
Import the Test Suite
Follow these steps to import the Filesystem Test Suite into the workspace from the Port Qualification Tools:
- Clone or download the Port Qualitification Tools project 2.3.0.
- Select File > Import….
- Select Existing Projects into Workspace.
- Set Select the root directory to the directory
tests/fsin the Port Qualification Tools fetched in the previous step. - Ensure Copy projects into workspace is checked.
- Click on Finish.
The project java-testsuite-fs should now be available in the
workspace.
Configure the Test Suite
Select the Test Suite Version
For a given Foundation Library version, a specific Test Suite version should be used to validate the Abstraction Layer implementation. Please refer to Test Suite Versioning to determine the correct Test Suite version to use.
On the WROVER VEE Port, the FS Test Suite version to use is specified
in {VEE Port}-configuration/testsuites/fs/README.md. The Test
Suite version must be set in the module.ivy of the
java-testsuite-fs project (e.g. java-testsuite-fs/module.ivy).
For example:
<dependency org="com.microej.pack.fs" name="fs-testsuite" rev="3.0.3"/>
Configure the VEE Port BSP Connection
Several properties must be defined depending on the type of BSP Connection used by the VEE Port.
For a Application, these properties are set using the launcher
of the application. For a Test Suite, the properties are defined in a
file named config.properties in the root folder of the Test Suite.
For example, see this example of config.properties
file.
See BSP Connection for an explanation of the properties. See
the comments in the file for a details description of each properties.
The microej.testsuite.properties.deploy.* and
target.platform.dir properties are required.
Configure Execution Trace Redirection
When the Test Suite is executed, the Test Suite Engine must read the trace to determine the result of the execution. To do that, we will use the Serial to Socket Transmitter tool to redirect the execution traces dumped to a COM port.
The WROVER VEE Port used in this documentation is particular because the UART port is already used to flash the device. Thus, a separate UART port must be used for the trace output.
This VEE Port defines the option
microej.testsuite.properties.debug.traces.uart to redirect traces
from standard input to UART.
See the Testsuite Configuration section of the WROVER VEE Port documentation for more details.
Start Serial To Socket
The Serial to Socket Transmitter tool can be configured to listen on a
particular COM port and redirect the output on a local socket. The
properties microej.testsuite.properties.testsuite.trace.ip and
microej.testsuite.properties.testsuite.trace.port must be
configured.
Follow these steps to create a launcher for Serial To Socket Transmitter:
- Select Run > Run Configurations….
- Right-click on MicroEJ Tool > New.
- In the Execution tab:
- Set Name to
Serial To Socket Transmitter. - Select a VEE Port available in the workspace in Target > Platform.
- Select
Serial To Socket Transmitterin Execution > Settings. - Set the Output folder to the workspace.
- Set Name to
- In the Configuration tab:
- Set the correct COM port and baudrate for the device in Serial Options.
- Set a valid port number in Server Options >
Port. This port is the same as the one set in
config.propertiesasmicroej.testsuite.properties.testsuite.trace.port.
Configure the Test Suite Specific Options
Depending on the Test Suite and the specificities of the device,
various properties may be required and adjusted. See the file
validation/microej-testsuite-common.properties (for example
https://github.com/MicroEJ/VEEPortQualificationTools/blob/2.3.0/tests/fs/java/java-testsuite-fs/validation/microej-testsuite-common.properties)
and the README of the Test Suite for a description of each property.
On the WROVER VEE Port, the configuration files config.properties
and microej-testsuite-common.properties are provided in
{VEE Port}-configuration/testsuites/fs/.
In config.properties, the property target.platform.dir must be
set to the absolute path to the VEE Port. For example
C:/P0065_ESP32-WROVER-Platform/ESP32-WROVER-Xtensa-FreeRTOS-platform/source.
Run the Test Suite
To run the Test Suite, right-click on the Test Suite module and select
Build Module.
Configure the Tests to Run
It is possible to exclude some tests from being executed by the Test Suite Engine.
To speed-up the execution, let’s configure it to run only a small set
of tests. In the following example, only the classes that match
TestFilePermission are executed. This configuration goes into the
file config.properties in the folder of the test suite.
# Comma separated list of patterns of files that must be included
# test.run.includes.pattern=**/Test*.class
test.run.includes.pattern=**/TestFilePermission*.class
# Comma separated list of patterns of files that must be excluded (defaults to inner classes)
test.run.excludes.pattern=**/*$*.class
Several reasons might explain why to exclude some tests:
- Iterative development. Test only the Abstraction Layer that is currently being developed. The full Test Suite must still be executed to validate the complete implementation.
- Known bugs in the Foundation Library. The latest version of the Test Suite for a given Foundation Library might contain regression tests or tests for new features. If the VEE Port doesn’t use the latest Foundation Library, then it can be necessary to exclude the new tests.
- Known bugs in the Foundation Library implementation. The project might have specific requirements that prevent a fully compliant implementation of the Foundation Library.
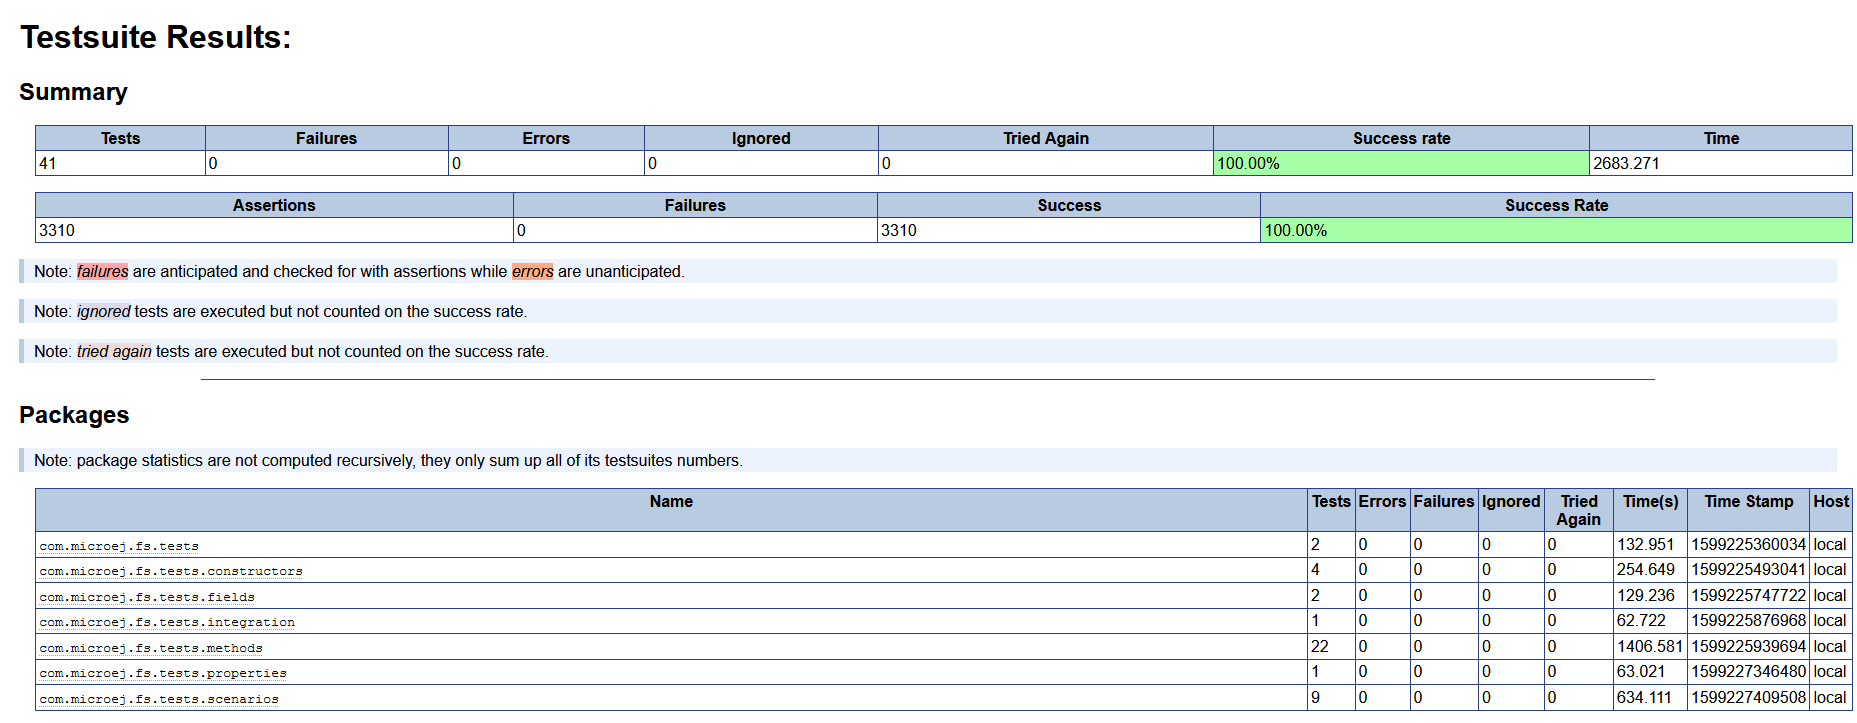
Examine the Test Suite Report
Once the Test Suite is completed, open the HTML Test Suite Report stored in
java-testsuite-fs/target~/test/html/test/junit-noframes.html.
At the beginning of the file, a summary is displayed. Below, all execution traces for each test executed are available.
If necessary, the binaries produced and ran on the device by the Test
Suite Engine are available in
target~/test/xml/<TIMESTAMP>/bin/<FULLY-QUALIFIED-CLASSNAME>/application.out.
The following image shows the test suite report fully passed:
 Docs
Docs Resources
 Forum
Forum